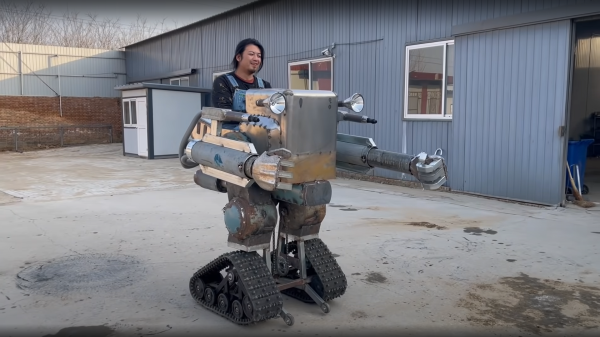
Matrix Digital Rain On The IBM PC With A High Persistence Monitor

Unless you’ve been hiding under a rock for the last 20-odd years, you will have come across The Matrix series of movies, and the cool green ‘digital rain’ effect used frequently. This inspired [Oli Wright] to wonder what it would look like if instead of running the animation on a modern display, using a digitally produced phosphor persistence effect, it was implemented on some retro PC hardware, using an actual high-persistence phosphor Green Monochrome monitor. (Video embedded, below) As luck would have it, [Oli] owns a 40-year-old IBM PC 5150 as well as the matching IBM 5151 monitor, so it was a simple matter to implement the effect in 8088 assembler to create falling sequences of characters. The final binary is less than 256 bytes!

The IBM 5151’s long display persistence was intended to reduce the visibility of display flicker due to the low scan rate, but has the unfortunate side effect of smearing horribly when the image changes. This is exactly what [Oli] needed to implement this effect and we think it looks jolly fine.

[Oli] made use of the excellent PCjs browser-based emulator written by [Jeff Parsons] to demonstrate what the software is doing, without the effect being evident. If you like, you can try it out for yourselves, as the assembly listing is available on the project GitHub.

Of course, we’ve covered the digital rain effect many. many times before, for example, with this Arduino Library, and here’s a custom PC case side panel from way back in December 2021, if you can remember those days.

Continue reading “Matrix Digital Rain On The IBM PC With A High Persistence Monitor”

Swiss Army Knife Of Power Tool Carts

When you’re into woodworking in a serious way, you’re going to eventually want some power tools. With such efficiency of operation, things can go pear-shaped quickly, with wood dust getting absolutely everywhere. It’s not always practical (or desirable) to work outdoors, and many of us only have small workshops to do our making in. But woodworking tools eat space quickly. Centralized extraction is one solution, but all that fixed rigid ducting forces one to fix the tool locations, which isn’t always a good thing. Moveable tool carts are nothing new, we’ve seen many solutions over the years, but this build by [Peter Waldraff] is rather slick (video embedded below,) includes some really nice features in a very compact — and critically — moveable format.

By repurposing older cabinets, [Peter] demonstrates some real upcycling, with little going to waste and the end result looks great too! There is a centralized M-Class (we guess) dust extractor with a removable vacuum pipe which is easily removed to hook up to the smaller hand-held tools. These are hidden in a section near the flip-up planer, ready for action. An auto-start switch for the small dust extractor is wired-in to the smaller tools to add a little ease of use while reducing the likelihood of forgetting to switch it on. We’ve all done that.

For the semi-fixed larger tools, such as the miter and table saws, a separate, higher flow rate moveable dust extractor can be wheeled over and hooked up to the integrated plenum chamber, which grabs the higher volume of dust and chips produced.

A nice touch was to mount the miter saw section on sliding rails.  This allows the whole assembly to slide sideways a little, giving more available width at the table saw for ripping wider sheets. With another little tweak of some latches, the whole miter section can flip over, providing even more access to the table saw, or just a small workbench! Cracking stuff!

Need some help getting good with wood, [Eric Strebel] has some great tips for you! And if you’re needs are simpler and smaller, much much smaller, here’s a finger-sized plane for you.

Continue reading “Swiss Army Knife Of Power Tool Carts”

Teaching A DC Servo Motor To Act Like A Stepper

[Frank Herrmann] had an interesting idea to turn a geared DC motor into a servo motor assembly, but with a stepper motor-like interface. By stacking some small PCBs behind the motor body, it was possible to squeeze a DRV8837 DC motor driver and a pair of hall effect sensors on the first PCB layer, with the magnetic encoder nestled tightly behind it. Pin headers at the edge of the PCB connect to a second PCB bearing the microcontroller, which is based on the cheap STM32L432. The second PCB also holds an associated LDO and debug LED. Together, this handful of parts provide all that is needed to read the encoder, control the motor rotation and listen on the ‘stepper motor driver’ interface pins hooked up to the motion controller upstream. The Arduino source for this can be found on the project GitHub.

Whilst [Frank] mentions that this assembly has a weight and torque advantage over a NEMA 17 sized stepper motor, but we see no hard data on accuracy and repeatability which would be important for precise operations like 3D printing.

This project is part of a larger goal to make a complete 3D printer based around these ‘DC motor stepper motors’ which we will watch with interest.

While we’re on the subject of closed-loop control of DC motors, here’s another attempt to do the same, without the integration. If these are too small for you, then you always repurpose some windscreen washer motors.

Continue reading “Teaching A DC Servo Motor To Act Like A Stepper”

3D Printering: Adding A Web Interface Where There Was None Before

[Renzo Mischianti] got himself a Chinese 3D printer, specifically a FlyingBear Ghost 5. (Cracking name, huh?) He was more than a little irritated with the fact that whilst the controller, an MKS Robin Nano, did have a integrated Wi-FI module, it provided no browser-based interface for monitoring and control purposes. This seemed a bit short-sighted in this day and age, to say the least. Not being at all happy with that situation, [Renzo] proceeded to write dedicated Wi-Fi firmware using websockets, but not without fully documenting his journey in a detailed series of the blog posts.

The resulting BeePrint web interface supports all the usual functions you would expect when managing a printer, everything from monitoring warm-up at the prep stage, to keeping tabs on the potential spaghetti monster via the connected IP camera. All good stuff. [Renzo] used an ESP32-cam, which is a low-cost 2 MP unit from our friends at Olimex, but we suspect it wouldn’t vastly difficult to add your own IP camera into the mix.

[Renzo] has a YT channel detailing quite a few other projects, which is definitely worth some viewing time in our opinion.

We’ve been covering 3D printer hacking since the dinosaurs were roaming. This is the oldest, and still one of the strangest, posts that we could find in a quick search. Anyone care to find something older?

Continue reading “3D Printering: Adding A Web Interface Where There Was None Before”

Customisable Micro-Coded Controller Helps With In-Circuit Debugging

Over on Hackaday.io, [Zoltan Pekic] has been busy building a stack of tools for assisting with verifying and debugging retro computing applications. He presents his take on using Intel hex files for customised in-circuit testing, which is based upon simple microcoded sequencers, which are generated automatically from a high level description.

The idea is that it is very useful to be able to use an FPGA development board to emulate the memory bus component of the CPU, allowing direct memory access for design validation purposes. This approach will also allow the production of a test rig to perform board level verification. The microcode compiler (MCC) generates all the VHDL, and support files needed to target a Xilinx FPGA based dev board, but is generic enough to enable targeting other platforms with a little adaptation.

Another interesting use case enables in-circuit tracing of buggy memory accesses, with the microcode sequencer decoding the accesses and dumping the relevant information out to either a serial port, or even direct to an embedded VGA controller, hardware allowing.

This automated approach to generating customisable microcoded hardware is a very nice trick to have in your bag, and even if it only helps in certain circumstances, [Zoltan] notes that it at least serves as an interesting example of the architecture of computers from history, if not much else.

Source for the example 8085 project can be found on the project GitHub, and the toolchain source can found here also.

For an interesting practical use of microding to implement emulations of historical hardware, checkout this neat switchable reproduction calculator project.

Quantum Atomic Interferometer For Precision Motion Sensing

The current state of the art of embedded motion sensing is based around micro-electromechanical systems (MEMS) devices. These miracles of microfabrication use tiny silicon structures, configured to detect acceleration and rotational velocity in three dimensions. Accumulate these accelerations and rotations, and you’ve got a device that can find its orientation and track movement without any external waypoints. This is the basis of the technique of dead reckoning.

Why do we care about dead reckoning anyway? Surely GPS and related positioning systems are good enough? Above ground GPS is usually good enough, but underwater and underground this simply won’t work. Even heading indoors has a dramatic effect on the GPS signal strength, so yes, we need another way for some applications.

Right now, the current state of the art in portable sensors are MEMS devices, and you can get them for the cost of a hamburger. But if you want the ultimate in accuracy, you’ll want a quantum atomic interferometer. What that is, and how it will be possible to make one small enough to be useful, is half of the story. But first, let’s talk MEMS.

Continue reading “Quantum Atomic Interferometer For Precision Motion Sensing”

Tiny Switch Ornament Plays GIFs With An ESP32

It constantly amazes us what we hackers can build these days, (electronics shortages aside) we have access to an incredible array of parts, with specifications that only a few years ago would be bank-breaking and longer ago just fantasy. It’s nice to see people building one-offs just for fun, in spite of the current difficulties getting parts to actually be delivered. For example, check out this miniaturized Nintendo Switch created by [scottbez1] that plays animated GIFs from an SD card on tiny 1.14″ LCD display.

Obviously such a diminutive hack requires a custom PCB, which was a job for KiCAD. Armed with a 3D model of the LCD, the casing and PCB outline were drawn using Fusion 360. The PCB hosts a LilyGo ESP32 module for all the heavy lifting, with the WiFi adding some fun future capabilities not yet explored. The design is about as tight as it can get without pushing the limits of the PCB process too far, including a neat trick of sneaking passives inside the body of the SD card! That’s another space-saving idea we’ll be banking.

All-in-all a neat little hack, showing some good modelling and construction techniques and a good looking end result. Code for your reference may be found on the project GitHub, but as of writing the hardware design is not available.

Whilst this project shrinks the Switch, here’s one that goes the other way and super-sizes it, and if you have a switch lite but crave a little modern charging magic, then look no further than this Qi wireless charging hack.

Continue reading “Tiny Switch Ornament Plays GIFs With An ESP32”