College Researcher Makes Supercomputer From 420 PS3s

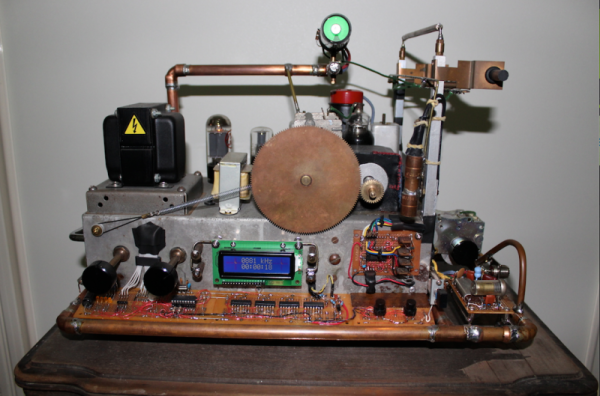
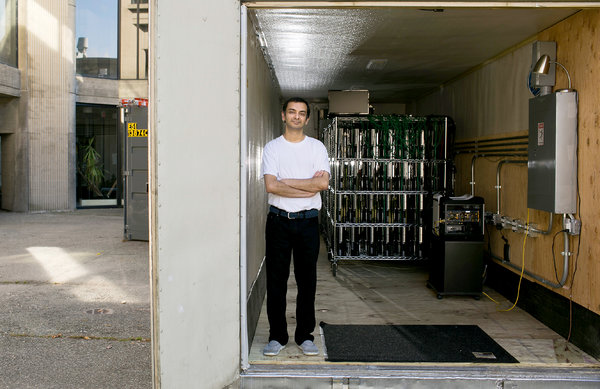
Noting that funding for science has run dry for many researchers, [Gaurav] has built a supercomputer from 200 Playstation 3 consoles housed and chilled inside an old refrigerated shipping trailer. His mission at UMass Dartmouth from the National Science Foundation is simulating black hole collisions with an eye on learning something about gravitational waves.

Dr. [Gaurav Khanna] is no stranger to using PS3 supercomputers to do meaningful science. Seven years ago he proposed a 16-PS3 supercomputer running Linux and managed to convince Sony to donate four consoles. The university kicked in funding for another 8 and [Gaurav] ponied up for the last four out of his own pocket. He dubbed it the “PS3 Gravity Grid” and received international attention for the cluster. For equivalent performance, it cost him only 10% the price of a real supercomputer. This led to published papers on both hacked supercomputers and gravity waves. But that rig is looking a little old today. Enter the Air Force.

Dr. [Khanna] was not the only one using PS3s to crunch data – back in 2010 the US Air Force built the “Condor Cluster” of 1,760 PS3s to perform radar imaging of entire cities and do neuromorphic AI research. With their hardware now expired, the Air Force donated 200 of the PS3s to [Gaurav] for his new build. Now that he has wired them up, the Air Force is donating another 220 for a not-snicker-proofed total of 420.

For those sceptical that the now 8-year-old hardware is still cost-effective, even with free consoles it is marginal. RAM is an issue and modern graphics cards are each equivalent to 20 PS3s. Ever the popular target these days, Sony has the PS4 OS locked down from the get go – thanks Sony. The next cluster planned will be with PCs and graphics cards. For now, [Gaurav] has plenty of calculations that need crunching and a queue of colleagues have formed behind him.

Robotically-Tuned Tube Radio

Dubbed the “Robot Radio” by [Brek], this clinking-&-clunking project merges three generations of hackers’ favorite technologies: robots, vacuum tubes, and microcontrollers. After the human inputs the desired radio frequency the machine chisels its way through the spectrum, trying its best to stay on target.

This build began its life as a junky old tube radio that [Brek] pulled out of a shed. The case was restored and then the hacking began. Inserted between the human and the radio, a PIC 16F628A keeps watch in both directions. On one side, the radio’s tank circuit is monitored to see what frequency the radio is currently playing. On the other, the human’s input sets a desired frequency. If the two do not match, the PIC tells a stepper motor to begin cranking a pair of gears until they do.

Another interesting feature is that as the tubes and other electronics warm up and change their values, the matching circuit will keep them in line. [Brek] shows this in the video by deliberately sabotaging the gears and seeing the robot adjust them back where they belong.

As an afterthought, the Robot Radio was supplemented with a module that adds 100khz to the signal so that the information from a nearby airport can be received.

[Brek] styled the whole machine up with some copper framing and other bits, similar to his spectacular atomic clock build we featured last month.

See the video of the radio tuning after the break.

Continue reading “Robotically-Tuned Tube Radio”

Laser-Etch Stainless With Only Plaster & Alcohol

Many hobbyists and hackerspaces have the $500 Chinese 40W lasercutters which most of us know are about as successful at etching metals as a featherduster is at drilling. [Frankie] and [Bryan] have figured out a way to use the laser to chemically activate an etching process. See experiment part 2 as well.

First, to be clear, they are using a quality 40W Epilog Zing, not the cheap one, but40W is40W. They mixed the plaster (calcium sulfate) with Isopropyl until it resembled white ketchup. After either thinly painting or airbrushing the material onto the stainless surface (both worked), the mixture is dried with a heatgun then put into the laser. 100% power and 5% speed was what worked for them.

The result was an engrave with a noticeable bite. Something they claim had no effect at all without the mixture.

Stainless steel is an alloy of iron and some chromium – not the same as chrome-plated steel. [Frankie]’s explanation of the chemistry is that the surface layer of the stainless is a transparent chromium oxide. With the heat of the laser, the calcium and chromium swap dance partners. Calcium takes the oxygen and chromium takes the sulfate. The calcium oxide washes off but the chromium sulfate causes the etch.

Next time you’re at your local space, give this a try.

Student Trolls Anti-Arduino Prof With Parasite MCU

Like some of our grouchier readers, [PodeCoet]’s Digital Sub-Systems professor loathes everyone strapping an Arduino onto a project when something less powerful and ten times as complicated will do. One student asked if they could just replace the whole breadboarded “up counter” circuit mess with an Arduino, but, since the class is centered around basic logic gates the prof shot him down. Undeterred, our troll smuggled an MCU into a chip and used it to spell out crude messages.

No Arduino? No problem. It took him 4 tries but [PodeCoet] hollowed out the SN74LS47N display driver from the required circuit and made it the puppet of a PIC16F1503 controller. The PIC emulated the driver chip in every way – as ordered it showed the count up and down – except when left unattended for 15 seconds. Then instead of digits the PIC writes out “HELLO”, followed by three things normally covered by swimsuits and lastly a bodily function.

For such a simple hack it is wonderfully and humorously documented. There are annotated progress/failure pictures and video of the hack working.

It is not as elaborate as the microscopic deception in the infamously impossible 3 LED circuit, but it gets to the point sooner.

Continue reading “Student Trolls Anti-Arduino Prof With Parasite MCU”

WiFi Lamp Challenge – 5 Hour Speedrun

“We want to get this done quick, not right.”

[CNLohr]’s favorite desk lamp broke, so he gave himself a challenge: convert the lamp to LED and control it via WiFi within 5 hours, from scratch. He video recorded and narrated the whole process and did a nice job of explaining the tricky parts and failures along the way, fast forwarding us through the slow parts.

Some bits and pieces were simple and obvious: gut the old bulb, wire some LEDs, add a few power resistors, toss in a power supply from “like a monitor or something, don’t care” for the LEDs, add in what looks like an LM2596 adjustable power supply for the logic, some kind of ATMega, that new ESP8266 (Wi07C), splice on a power cord, etc. Standard stuff.

To our readers who’s hacks tend to start with soldering irons and screwdrivers, the video shows harder parts of designing an electronics project: creating the PCB in software (he used KiCad), lithographically transferring the circuit to a PCB, bismuth solderpasting & populating the board, and writing and documenting his code on Github. Perhaps most reassuringly, he also showed the consequences of every greedy shortcut and the process of troubleshooting around them.

If you have ever tried to follow a recipe from a cooking show and noticed how easy it all seems when everything is measured and prepped beforehand – and then what a disaster it is when you try it – the same is revealed here. Overall, it is a very thorough demonstration of what it actually takes to design a project – not just perfect circuits and perfect steps to follow.

In the end he got it done in the nick of time an hour late because he cannot add. Close enough.

Thanks [gokkor] for the tip.

Accelerometers Are Actually Quite Simple

An accelerometer is the ubiquitous little sensor that tells your tablet when to flip orientation or informs the brain of your quadcopter how closely its actual actions are matching your desired ones. In a quick three minutes, [Afroman] explains what is inside an accelerometer and how they work.

It turns out the tiny devices that report acceleration in one, two or three dimensions are not powered by magic complicated mechanisms but very simple Micro Electro-Mechanical Systems or “MEMS.” MEMS are similar to copper/silver/gold-wired integrated circuits except in a MEMS circuit conductive silicon is used and they actually physically move, but only just a bit.

The secret is in creating microscopic capacitors along a weighted lever that flexes in response to changes in velocity. When the plates flex the distance between them changes which alters the capacitance. This translates physical motion into voltage which can then be interpreted by the rest of your circuit. The chemistry behind MEMS is interesting too.

This Christmas when your laptop’s power cord clotheslines your cousin’s kid, your hard drive has a chance of parking the head (on the drive, not on the child) between fall and impact and preventing damage (to the drive, not to the child) because of an accelerometer. If bad roads cause you to drift into the ditch, it is an accelerometer that senses the crash and tells your airbag to deploy before your body hits the steering wheel.

The MEMS market is exploding right now and for us hackers in particular, Wearables are looking to be a big part of that growth.

World’s First Smart Snowboard Changes Music According To Your Actions

Ever wanted a soundtrack to your life? For a couple of minutes at a time, Signal Snowboards creates that experience with a smart snowboard that varies your music depending on the tricks you perform on your way down the mountain.

The sign on the door says “School For Gifted Hackers”. Inside [Matt Davis] helped interface audio with an accelerometer – something he regularly does with all manner of hacked devices. At first the prototype was an iPhone mimicking the motions of a snowboarder the way fighter pilots describe dogfights with their hands. The audio engine that pulls those mostions to sound is open source and anyone is welcome to do their own tuning.

Once the audio was figured out the boys took it back to their shop and embedded the sensors into a new snowboard. The board is equipped with GPS, an accelerometer, a few rows of LEDs and a bluetooth board to connect to the phone app. It’s all powered by an on-board LiPo battery and a barrel jack out the side to charge it. Channels were cut by hand with a router then electronics sealed in place with epoxy. Not wanting to “just strap some Christmas lights onto a snowboard” the lighting is also connected to the sensors and is programmable.

See the video below of them making the board and taking it out for a test run on Bear Mountain.

Continue reading “World’s First Smart Snowboard Changes Music According To Your Actions”