Ask Hackaday: Helping Hands

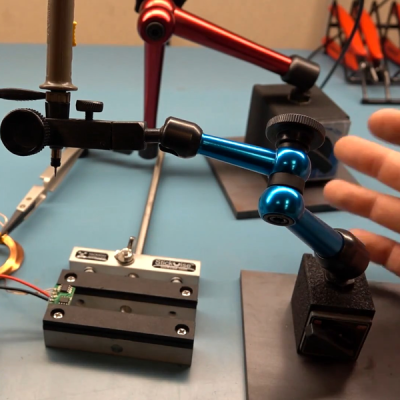
[ProtoG] sent us in this video (also below) where he demonstrates the use of machinist’s dial-gauge indicator arms as helping hands. I’ll admit that I got so jealous that I ordered a pair. I wouldn’t say that I need more tools to hold things in place, but I certainly want them. The rapid coarse placement combined with fine adjustment looks so sweet. Using them as scope-probe holders is brilliant.

Our own helping hands, purchased for $5 from a surplus shop, have seen nearly twenty years of use now. About ten years ago, I heat-shrinked and plasti-dipped the jaws, and since then they do less damage to cable insulation. The clips kept coming loose, but that was fixed with a little epoxy. I never used the magnifying glass, and by removing it I bought some more sliding room for the jaws, which was an easy win. The base has a “non-slip” coating of Shoe-Goo that keeps it in place on the desk. Cork might be classier.

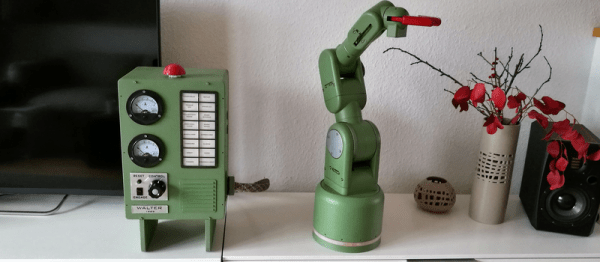
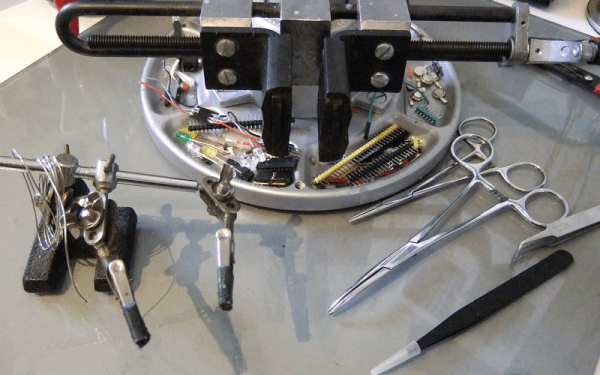
For bigger holding, there’s always the desk vise, though I’ll admit that I mostly use it for holding PCBs while soldering, and that a better solution for that particular task wouldn’t hurt. [Mike Szczys] tells me that the Stickvise seen here is a handy thing to have on the bench. It started on Hackaday.io and we still carry it in the store.

For grabbing the fiddly little things, nothing beats a pair of hemostats and a range of tweezers. Hemostats in the desk vise make a great ad hoc holder. Good sharp tweezers pay for themselves with the first removed splinter, or placing SMT parts.

So, Hackaday, what do you use for holding things? What do you hold your PCBs with while soldering? What do you use to hold down SMD parts? What’s your third hand, or twenty-third? Continue reading “Ask Hackaday: Helping Hands”

Tea For Two: A Tiny Tea Timer

The ATtiny85 microcontroller doesn’t have all that much of anything: 8 KB of flash, an 8-bit architecture, and only eight pins (three of which are taken up with power and reset duties). And that’s exactly what makes it a great fit for tiny little projects.

[Mimile]’s Tea Timer has a switch, a button, eight LEDs, and a buzzer. Flip the switch to “set” and button presses run through the desired steeping times. Flip it to “run” and you’re timing. The LEDs blink and the buzzer plays “Tea for Two” in squawky square waves. Wonderful!

But wait, how to control all of this I/O with just five pins? With one pin each for the two switches and one for the buzzer, that leaves only two pins for the eight LED display. [Mimile]’s fun solution is to use a binary counter (a 74HC393) and the remaining two lines to count and reset. That means toggling a pin very fast 255 times to light up all the LEDs. That’s a bizarre way to go, but we like it!

Hackaday has proven unable to resist the siren song of the ATtiny85. Whether teaching it to swear, to speak I2C, or to transmit analog TV signals, there’s just something about this cute little chip that invites you to test your mettle.

[Homo Faciens] Builds A Winchbot

The trademark hacker style of Hessian YouTuber [Homo Faciens] is doing a lot with a little. Given a package of parts from a sponsor, he could have made something “normal” like a fancy robot arm. Instead, he decided to make a winchbot. (Video embedded below.)

What’s a winchbot? It’s a big frame that supports three relatively heavy motors that pull steerable gripping arms around. It’s a little bit like the hanging Hektor / wallbot / plotterbot and a little bit like a delta-style 3D printer. Although [Homo Faciens]’s build doesn’t showcase it, a winchbot is also a great way to lift heavy things because the parts that need to be beefy — the frame and the lifting motors — don’t have to move. We love the gimballed square rod that works in concert with the winches!

With five extra servos on hand, and the computing power of a Raspberry Pi, [Homo Faciens] couldn’t just stop with lifting a claw. Instead, the gripping-arms part of the bot is mounted with four degrees of freedom and is powered with software that makes it stay parallel with the table and rotate around the gripper to make programming easier. Watch it in action in the video to see what we mean.

The biggest unsolved problem that we can see is the jerkiness that it displays in moving things around. That doesn’t stop it from building up a tower and a domino knock-down. We suspect that there’s some combination of firmware and hardware tweaking that can solve this problem, or it could just be run slowly so that the wobbles damp themselves out. We’re also quite confident that [Homo Faciens] will come up with an elegant and cheap solution. Have you seen his CNC machine?

Continue reading “[Homo Faciens] Builds A Winchbot”

Arduino Into NAND Reader

[James Tate] is starting up a project to make a “Super Reverse-Engineering Tool”. First on his list? A simple NAND flash reader, for exactly the same reason that Willie Sutton robbed banks: because that’s where the binaries are.

As it stands, [James]’s first version of this tool is probably not what you want to use if you’re dumping a lot of NAND flash modules. His Arduino code reads the NAND using the notoriously slow digital_read() and digital_write() commands and then dumps it over the serial port at 115,200 baud. We’re not sure which is the binding constraint, but neither of these methods are built for speed.

Instead, the code is built for hackability. It’s pretty modular, and if you’ve got a NAND flash that needs other low-level bit twiddling to give up its data, you should be able to get something up and working quickly, start it running, and then go have a coffee for a few days. When you come back, the data will be dumped and you will have only invested a few minutes of human time in the project.

With TSOP breakout boards selling for cheap, all that prevents you from reading out the sweet memory contents of a random device is a few bucks and some patience. If you haven’t ever done so, pull something out of your junk bin and give it a shot! If you’re feeling DIY, or need to read a flash in place, check out this crazy solder-on hack. Or if you can spring for an FTDI FT2233H breakout board, you can read a NAND flash fast using essentially the same techniques as those presented here.

Backscatter Your Own FM Pirate Radio Station

If you live in a city, you’re constantly swimming in a thick soup of radio-frequency energy. FM radio stations put out hundreds of kilowatts each into the air. Students at the University of Washington, [Anran Wang] and [Vikram Iyer], asked themselves if they could harness this background radiation to transmit their own FM radio station, if only locally. The answer was an amazing yes.

The trailer video, embedded below, demos a couple of potential applications, but the paper (PDF) has more detail for the interested. Basically, they turn on and off an absorbing antenna at a frequency that’s picked so that it modulates a strong FM signal up to another adjacent channel. Frequency-modulating this backscatter carrier frequency adds audio (or data) to the product station.

One of the cooler tricks that they pull off with this system is to inject a second (stereo) channel into a mono FM station. Since FM radio is broadcast as a mono signal, with a left-minus-right signal sent alongside, they can make a two-channel stereo station by recreating the stereo pilot carrier and then adding in their own difference channel. Pretty slick. Of course, they could send data using this technique as well.

Why do this? A small radio station using backscatter doesn’t have to spend its power budget on the carrier. Instead, the device can operate on microwatts. Granted, it’s only for a few feet in any given direction, but the station broadcasts to existing FM radios, rather than requiring the purchase of an RFID reader or similar device. It’s a great hack that piggybacks on existing infrastructure in two ways. If this seems vaguely familiar, here’s a similar idea out of the very same lab that’s pulling off essentially the same trick indoors with WiFi signals.

So who’s up for local reflected pirate radio stations?

Continue reading “Backscatter Your Own FM Pirate Radio Station”

Walter Is The Slickest Retro-Futuristic Robot Arm

[Jochen Alt] is on a roll. We just covered his ball-balancing robot, Paul, only to find his phenomenal six-DOF robot arm in full retro style. Its name is “Walter” and it’s done up in DDR style (the former East Germany), in painted, 3D-printed plastic. The full design and build documents are an absolutely amazing resource if you’re into robot arm or legs.

In particular, the sections on trajectory planning and kinematics are fantastic. If you’re interested in robot motion planning by Bezier curves, you know where to go. (We’ve always wanted a Bezier-curve 3D printer slicer, but that’s another story.) The construction is also top-notch here, and the attention to detail that went into this arm is phenomenal. It’s all done with stepper motors and geared belts, which allow each of Walter’s joints to be driven by a motor that’s one joint further upstream than would be the case if it were designed with servos. [Jochen] even went so far as to expose the belt in some places to show off the gearing. Walter is worth checking out.

Even if you’ll never build such a fancy robot arm, you should read through the docs just to appreciate all of the thought and work that went into this very refined and simple-from-the-outside design. If you’d like to start out on the simple side of the spectrum, check out these robot arms made of office supplies or a desk lamp. Once you’re ready for your second arm project this short list, some of which [Jochen] mention in his writeup, should get you up and grasping. And do check out his balancing bot, Paul.

Magnetic Stir Plate Is A Hack

If you’ve ever spent any time around a lab, you’ve doubtless seen one of those awesome combination magnetic stirrer and heater plates that scientists use to get liquids mixed and up to temperature. If you’ve ever etched your own PCBs using ammonium persulfate, you’ve experienced the need for both heating and agitation firsthand. Using a stirrer plate for PCB etching is putting two and two together and coming up with four. Which is to say, it’s a good idea that’s not amazingly novel. [acidbourbon] built his own, though, and there’s almost no part of this DIY heater/stirrer that isn’t a hack of some kind or another.

Start off with the temperature controller. Instead of buying a thermocouple or using an LM75 or similar temperature-measurement IC, [acidbourbon] uses a bog-standard 1n4148 diode. The current passed through a diode, at a given voltage, is temperature dependent, which means that adding a resistor and a microcontroller’s ADC yields a quick hacked temperature sensor. [acidbourbon] glued his straight onto the casserole that he uses as an etching tray.

Does the type of person who saves $0.25 by using a diode instead of a temperature sensor go out and buy a stirrer motor? No way. Motor and gears come from a CD-ROM drive. The “fish” — the magnetic bar that spins in the etchant — is made of neodymium magnets lengthened by shrink-wrapping heat-shrinking them together with some capacitors. Who knew that shrinkwrap heat-shrink, fused with pliers, was waterproof? Is that a wall-wart in that box, with the prongs wired to mains electricity?

Anyway, this just goes to show that etching equipment need not be expensive or fancy. And the project also provides a showcase for a bevy of tiny little hacks. And speaking of [acidbourbon]’s projects, this semi-automatic drill press mod has been on our to-do list for two years now. Shame on us! Continue reading “Magnetic Stir Plate Is A Hack”