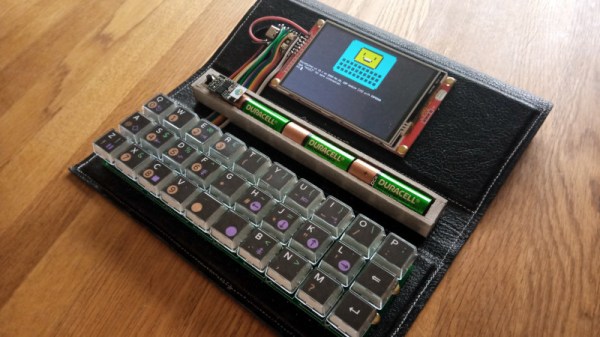
The humble desktop serial terminal may have long disappeared from the world of corporate IT, but there are still plenty of moments when professionals and enthusiasts alike need to hook up to a serial port. Many of us use a serial port on our laptops or other mobile devices, but [Neil Crawforth] has gone one better than that with the VT2040. It’s an old-style serial terminal in a super-handy portable format, and as one might guess from the name, it has an RP2040 microcontroller at its heart.
Attached to the chip is a rather nice keyboard, and an ILI9488 480×320 LCD display. The software is modular, providing a handy set of re-usable libraries for the different functions including a PIO-based serial port. His main application seems to be talking to an ESP8266, but we’re guessing with a MAX232 or other level shifter chip it could drive a more traditional port. Everything can be found in the project’s GitHub repository, allowing anyone to join the fun.
We all know the basics of how metal casting works, a metal is heated up to melting point and the resulting liquid metal is poured into a mold. When the metal sets, it assumes the shape of the mold. It’s a straightforward way to reliably replicate a metal item many times over, and the basics are the same whether the metal is a low-temperature alloy in a silicone mould or a crucible of molten steel poured into a sand mould.
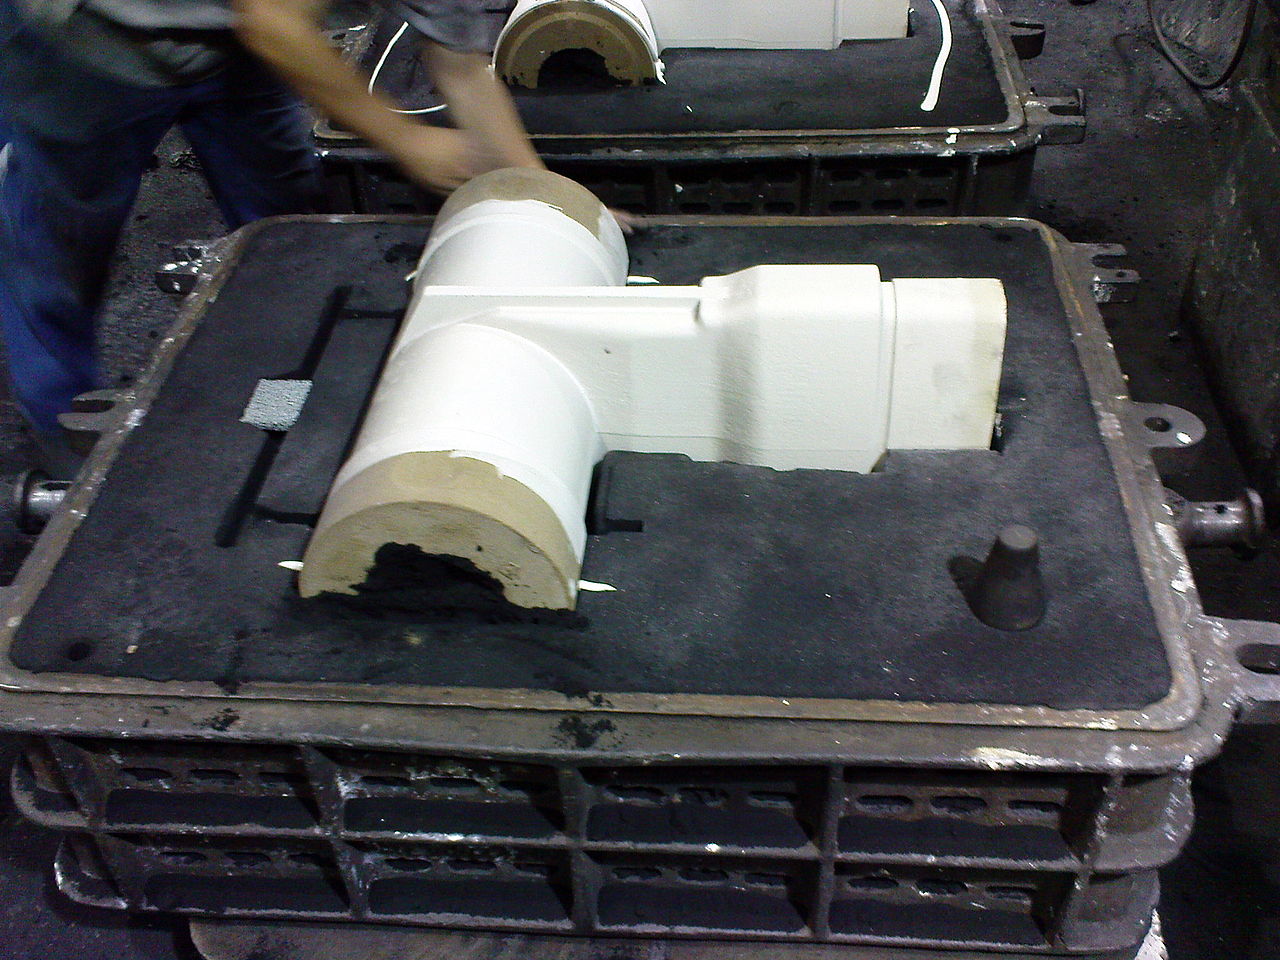
A sand mould being formed around a pattern. Lukas Stavek, CC BY-SA 3.0 .
What we all understood as casting in our conversation was sand casting. Sand is packed around a pattern of the piece to be cast, and then the pattern is removed leaving a cavity in its shape which becomes the mould. There are refinements to this process and the mould is frequently formed in two halves, but it’s something that’s even practical to do in a hackerspace level setting.
A refinement of sand casting is so-called lost-wax casting, in which a hollow wax model of the piece to be cast is packed around with sand, and when the metal is poured onto the top of it the wax melts and the wax is melted out before pouring the metal in to take its place. A variation on this appears here from time to time, so-called lost-PLA casting, where the wax model is replaced with a PLA 3D print.
Where our confusion crept in was with die casting. We could recognise a die-cast piece, but just what is die-casting, and how is a die-casting made? The answer there lies in mass-production, because a snag with sand casting is that a sand mould can be labour intensive to produce. Much better to come up with a quick-turnaround process that re-uses the same mould over and over, and save all that time!
Enter the die-casting, to metalwork what injection moulding is to polymers. The die is a mould made out of metal, usually with liquid cooling, and the casting is done not by pouring but by forcing the molten metal into the mould under pressure. The whole process becomes much quicker, meaning that it can become a piece of process machinery spitting out castings rather than a labour-intensive individual task. The metals used for die-casting are the lower temperature ones such as aluminium, zinc, and their alloys, but you will find die-castings in all conceivable places.
It’s obvious that Hackaday editors are not experienced foundrymen even if some of us grew up around metalwork, but we know that among our readers lie genuine experts in all sorts of fields. If that’s you and you operate a die-casting machine, please take a moment to tell us about it, we really would like to know more!
The Colecovision console from the early 1980s is probably not the most memorable platform of its era, but it retains a retrocomputing following to this day. The original hardware can be a bit pricey in 2023, so [nanochess] has built one of his own on a breadboard. It’s fully functional from original Colecovision cartridges, and we see it in the video below the break running Frogger.
Behind the mess of wires is a surprisingly simple circuit with only a few logic chips beyond the Z80 processor, the various memory and EPROM chips, and the video and sound chips. We’re told the complexity is considerably reduced by the use of a Texas Instruments TMS9118 video controller instead of a 9918.
Had we been building it we would probably have taken the less brave step of using color coded wires for the various signals, because we remember the fun and games associated with wiring old-style 8-bit computers by hand only too well. But we have to admit that it reminds us of a lost youth working out Z80 address decoder schematics, so it’s very pleasing to see one built today.
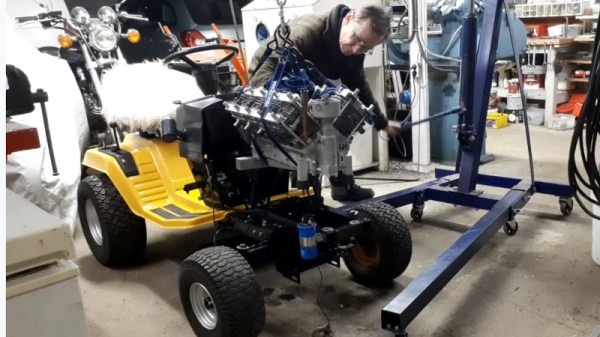
The Briggs & Stratton single cylinder sidevalve engine is one that has been in production in one form or another for over a century, and which remains one of the simplest, most reliable, and easiest to maintain internal combustion engines there is. The little single-cylinder can be found on lawnmowers and other similar machinery everywhere, so it’s rather easy to find yourself in possession of more than one. [Lyckebo Mekaniska] evidently had no shortage of them, because he’s produced a V8 engine for a small lawn tractor using eight of them. A small air-cooled V8 sidevalve is something of a unique engine to be made in the 2020s, and the series of videos is definitely worth a watch from start to finish. We’ve been keeping an eye on this build for a while now, and we’ve embedded it below the break for your entertainment.
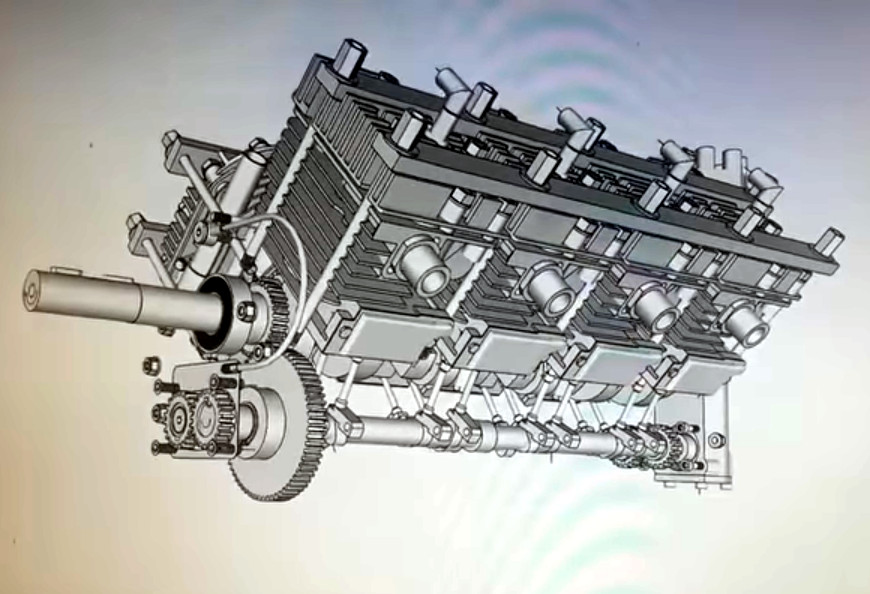
Clearly a lot of CAD work has gone into this build.
For an engine which uses mass-produced engines for its construction, this one still relies heavily on parts machined from first principles. The cylinder blocks, valves, pistons, and crank rods are Briggs & Stratton, the rest is made in the workshop. It’s a design with the valves on the outside — so instead of the single camshaft you might expect from experience with OHV engines nestling in the V above the camshaft it has two camshafts at the bottom of the crankcase.
The crankcase is cast in sections first, followed by the machining of the crankshaft and camshafts, then the preparation of the cylinders.. The engine is assembled with a home made alternator on its flywheel and a conventional distributor from a donor vehicle. The lubrication system is another work of the machinist’s art, and the simple straight-through exhaust system is more at home on a drag racer than a lawnmower. Finally we see it running, and it sounds the business. Most recently he’s had to deal with a seizure and a replacement cylinder, but now it’s back together and he’s working on an improved cooling system.
All in all this is one heck of a build, and we wish we had some of those skills. We’re not sure whether he’ll mow the lawn with this thing, but one thing’s for sure, lawnmower hacking has quite a past.
Reinforced concrete is the miracle material which made possible so many of the twentieth century’s most iconic structures, but here in this century its environmental footprint makes it something of a concern. As part of addressing this problem, a team at TU Dresden in Germany have completed what is believed to be the world’s first building made with carbon-reinforced concrete, in which the steel rebar is replaced with carbon fiber.
New materials are always of interest here at Hackaday, so it’s worth reading further about the nature of the reinforcement. The carbon fiber is woven into a mesh, or as a composite material that mimics existing rebar structures. These two types of reinforcement can be combined in a composite to produce a concrete structure much lighter than traditional steel-reinforced ones. If you page through the architecture critic description, it’s this lightness which has enabled the curving structure of the Dresden building to be so relatively thin.
The carbon saving comes presumably in the lower energy cost from not smelting iron to make steel, as well as the need for less concrete due to the lightness. All we need now is a low-carbon replacement for Portland cement.
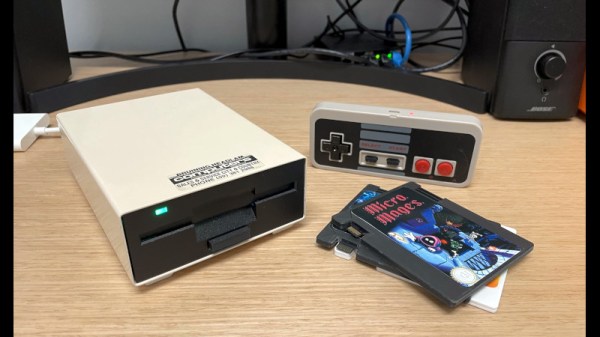
At first sight, Floppy-8 is simply a LattePanda based PC built into the shell of a external vintage floppy drive. Indeed, it’s a very nicely executed LattePanda PC in a floppy, and we’re impressed by it. What turns it from a nifty case mod into something a bit special though, is the way creator [Abraham Haskins] has used floppy-like cartridges in the original floppy slot, as a means of loading software.
The cartridges started out as PCBs in the shape of a floppy with an SD socket on their bottom, and progressed to USB drives on 3D printed cartridges and finally and simplest of all, the same 3D printed cartridges with micro SD cards embedded in their leading edges. All this was necessary to get them thin enough to fit into the existing disk slot — if dimensions weren’t a concern, you could enclose various USB devices into printed cartridges. A script on the computer looks for new card insertion, and runs the appropriate autostart.sh script on the SD card if it finds one. If you don’t need the “disks” to fit into an existing slot, you could print them larger and embed
Beyond the cartridges, the PC itself is assembled on a 3D printed frame inside the case. It’s controlled via Bluetooth, with a pair of knock-off NES controllers for games and an Amazon Fire remote for media. We particularly like the idea of weighting the controllers with ball bearings to give them a little heft.
The LattePanda gives the Raspberry Pi a run for its money in these applications. We particularly liked this portable Macintosh.
The seminal 1993 first-person shooter from id Software, DOOM, has become well-known as a test of small computer platforms. We’ve seen it on embedded systems far and wide, but we doubt we’ve ever seen it consume as little power as it does on a specialized neural network processor. The chip in question is a Syntiant NDP200, and it’s designed to be the always-on component listening for the wake word or other trigger in an AI-enabled IoT device.
DOOM running on as little as a milliwatt of power makes for an impressive PR stunt at a trade show, but perhaps more interesting is that the chip isn’t simply running the game, it’s also playing it. As a neural network processor it contains the required smarts to learn how to play the game, and in the simple circular level it’s soon picking off the targets with ease.
We’ve not seen any projects using these chips as yet, which is hardly surprising given their niche marketplace. It is however worth noting that there is a development board for the lower-range sibling chip NDP101, which sells for around $35 USD. Super-low-power AI is within reach.