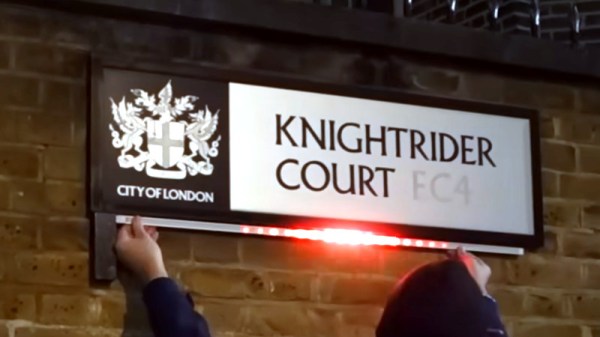
Do You Need The Raspberry Pi Camera Module V3?

This month came the announcement of some new camera modules from Raspberry Pi. All eyes were on version 3 of their standard camera module, but they also sneaked out a new version of their high quality camera with an M12 lens mount. The version 3 module is definitely worth a look, so I jumped on a train to Cambridge for the Raspberry Pi Store, and bought myself one for review.

There’s nothing new about a Pi camera module as they’ve been available for years in both official and third party forms, so to be noteworthy the new one has to offer something a bit special. It uses a 12 megapixel sensor, and is available both in autofocus and wide angle versions in both standard and NoIR variants. Wide angle and autofocus modules may be new in the official cameras, but these are both things which have been on the third-party market for years.

So if an autofocus camera module for your Pi isn’t that new, what can we bring to a review that isn’t simply exclaiming over the small things? Perhaps it’s better instead to view the new camera in the context of the state of the Pi camera ecosystem, and what better way to do that than to turn a Pi and some modules into a usable camera! Continue reading “Do You Need The Raspberry Pi Camera Module V3?”

Sequencing The Vintage Way

For most of us, an 8-bit microcomputer means one of the home computers which set so many of us on our way back in the 1980s. But this ignores an entire generation of 1970s 8-bit machines which filled the market for affordable office and industrial desktop computing before we were seduced by Pac-Man or Frogger. It’s one of these, an SWTPC 6809, that’s found its way into the hands of [Look Mum No Computer], and in direct contradiction to his branding, he’s used it to control a synthesizer.

As you’d expect from the name, the computer hides a 6809 processor, and comes from the end of the 1970s when that chip had been released in an effort to stave off the market threat from the likes of Zilog and MOS Technologies. It has an SS-50 bus motherboard, and the saga in the video below the break is as much about the production of a custom DAC and trigger port for it to drive the synth as it is about troubleshooting a four-decade-old computer. It’s a credit to SWTPC that the machine is largely working after all this time, however it succumbs to some damage during the development of the interface.

At the end though, there’s a fully functional sequencer on a 1970s computer, playing some pretty good electronic music from an analogue synth. This is EXACTLY the future we were promised, back in 1979!

Long-time readers will know this isn’t the first SWTPC that has graced these pages.

Continue reading “Sequencing The Vintage Way”

Reading Data From A CD, With A Microscope

There was a time when electronic engineering students studied the audio CD, for all its real-world examples of error correction and control systems. There’s something to be found in the system still for young and old though, and thus we were intrigued when we saw [Peter Monta] reading the data from a CD using a microscope.

CDs encode data as so-called pits and lands in a spiral track across a metalised surface, with a transition from pit to land signifying a logic 1 and a missing transition signifying a 0. Reading a section of the raw data is achieved in the first part of his write-up, but in the next installment he goes further into retrieving more data through stitching together microscope pictures and writing some code to retrieve data frames. He’s not quite at the audio playback stage, but he’s planning in the future to spiral-track a full image to rip an entire disc.

There are plenty of CD drives around to read audio the conventional way, but the techniques here still find a use where less ubiquitous media has to be read. In the last decade for example there was an effort to read the BBC Domesday Project from the 1980s, as it became clear that few of the original readers survived in working order.

An Unexpected Amiga Network Interface

The retrocomputer enthusiast has increasingly to grapple with not only runaway computer prices but the astronomical cost of vintage peripherals. A welcome solution in some cases comes from the Raspberry Pi, which has proved itself fast enough to emulate those add-ons for a lot less outlay. A good one comes from [Niklas Ekström], who’s made a Pi-based network adapter for the Commodore Amiga 1200. Better still it doesn’t hog the main expansion port or the PCMCIA slot, instead it sits on the 1200’s rarely-used real-time-clock port. Software wise it uses an updated version of his earlier project for the Amiga 500. It provides access to the Pi command prompt, as well as a SANA driver and a mounted filesystem.

While many of us view the Amiga from 2023 as a retro gaming platform, for those of us who used it at the time it was a desktop productivity machine on a more affordable budget than the Macintosh. At the time the thought of having a UNIX-like operating system running on a super-powerful co-processor in your Amiga would have been beyond our wildest dreams, but whether it provides enough now to make a 1992 machine compete on the desktop is debatable. Who wants to run Firefox from the Pi in an X server on the Amiga?

Addressable LEDs From A Z80

If you buy WS2812s under the Adafruit NeoPixel brand, you’ll receive the advice that “An 8 MHz processor” is required to drive them. “Challenge Accepted!“, says [ShielaDixon], and proceeded to first drive a set from the 7.3 MHz Z80 in an RC2014 retrocomputer, and then repeat the feat from a 3.5 MHz Sinclair ZX Spectrum.

The demos in the videos below the break are all programmed in BASIC, but she quickly reveals that they call a Z80 assembler library which does all the heavy lifting. There’s no microcontroller behind the scenes, save for some glue logic for address decoding, the Z80 is doing all the work. They’re all implemented on a pair of RC2014 extension cards, a bus that has become something of a standard for this type of retrocomputer project.

So the ubiquitous LEDs can be addressed from some surprisingly low-powered silicon, showing that while it might be long in the tooth the Z80 can still do things alongside the new kids. For those of us who had the Sinclair machines back in the day it’s particularly pleasing to see boundaries still being pushed at, as for example in when a Z80 was (almost) persuaded to have a protected mode.

Continue reading “Addressable LEDs From A Z80”

The First Afghan Sports Car Has An Engine You Shouldn’t Mock

In the news today, Afghanistan has made its first sports car, and it’s a sleek and low-slung model with a throaty exhaust note that would get a second look on the Autobahn just as much as it does on the streets of Kabul. Making a modern sports car is an impressive achievement no matter where you do it, but it wouldn’t be something we’d share with you were it not for how the story is being reported. The general tone of Western reporting is focused not upon the car itself, but instead poking fun of it for using a Toyota engine also found in a Corolla.

Anyone who grew up during the Cold War will remember the rhetoric of the era with respect to technology. To paraphrase a little, our planes or rockets were based on the finest and latest high technology, we were told, while theirs were held together with string and sealing wax from the 1940s. This neglected the fairly obvious fact that Soviet probes were visiting all the planets, something they must have had some pretty good tech at their disposal to achieve. This was then explained as the product of their having stolen all our super-advanced Western tech, something we now know that our lot weren’t averse to either when the opportunity arose.

It’s this which is brought to mind by the mirth of the Western commentators at the Afghan car’s supposedly humble engine. It doesn’t matter what you think of the Afghan regime (and there’s plenty there to criticize), the car should be assessed on its merits. After all, it’s hardly as though the engine in question didn’t find its way into more than one sports car that Western commentators might find appealing.

A Flex Sensor For A Glove Controller Using An LDR

When most of us think of glove controllers, the first which comes to mind is Nintendo’s PowerGlove, which promised much more than it delivered. But the idea persists, and from time to time we see them here at Hackaday. [Gord Payne] has one with an elegant sensor solution, it detects finger movement using a light dependent resistor.

The cleverest designs are those which are the simplest, and this one eschews complex mechanisms and exotic parts for a simple piece of flexible tube. At one end is an LED and at the other the LDR, and when attached to a glove it provides a finger sensor without the fuss. The amount of light reaching the LDR from the LED decreases as the pipe is bent, and with a simple divider circuit a voltage can be read by an Arduino. You can see it in action in the video below the break, where the glove flexing controls a servo.

Perhaps this might revitalize a bit of interest in glove controllers, something we probably don’t see too many of. Those Nintendo PowerGloves do still crop up from time to time though.

Continue reading “A Flex Sensor For A Glove Controller Using An LDR”