An SDR Transceiver The Old-School Way

Software-defined radios or SDRs have provided a step-change in the way we use radio. From your FM broadcast receiver which very likely now has single-application SDR technology embedded in a chip through to the all-singing-all-dancing general purpose SDR you’d find on an experimenter’s bench, control over signal processing has moved from the analogue domain into the digital. The possibilities are limitless, and some of the old ways of building a radio now seem antiquated.

[Pete Juliano N6QW] is an expert radio home-brewer of very long standing, and he’s proved there’s plenty of scope for old-fashioned radio homebrewing in an SDR with his RADIG project.  It’s an SDR transceiver for HF which does all the work of quadrature splitting and mixing with homebrewed modules rather than the more usual technique of hiding it in an SDR chip. It’s a very long read in a diary format from the bottom up, and what’s remarkable is that he’s gone from idea to working SDR over the space of about three weeks.

A block diagram of the N6QW SDR

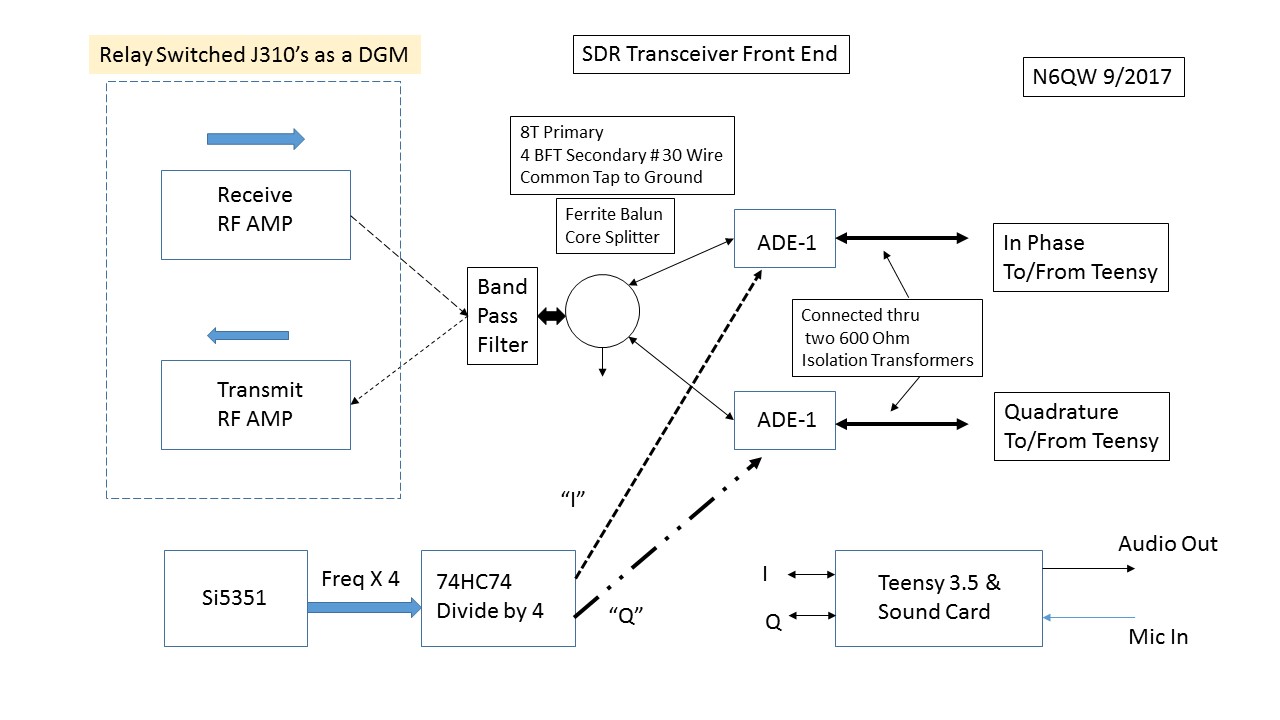
So what goes into a homebrew SDR? Both RF preamplifier, filters, and PA are conventional as you might expect, switched between transmit and receive with relays. A common transmit and receive signal path is split into two and fed to a pair of ADE-1 mixers where they are mixed with quadrature local oscillator signals to produce I and Q that is fed to (or from in the case of transmit) a StarTech sound card. The local oscillator is an Si5351 synthesiser chip in the form of an SDR-Kits USB-driven module, and the 90 degree phased quadrature signals are generated with a set of 74AC74 flip-flops as a divider.

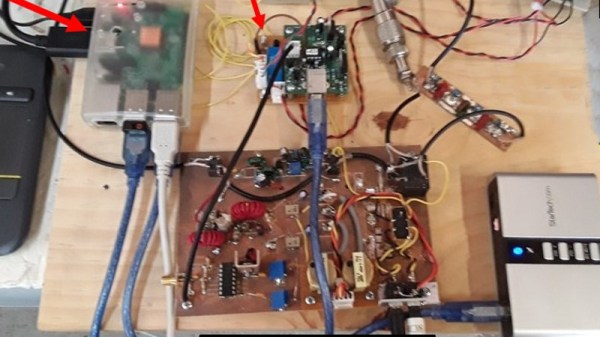
Running the show is a Raspberry Pi running Quisk, and though he mentions using a Teensy to control the Si5351 at the start of his diary it seems from the pictures of the final radio that the Pi has taken on that work. It’s clear that this is very much an experimental radio as it stands with wired-together modules on a wooden board, so we look forward to whatever refinements will come. This has the feel of a design that could eventually be built by many other radio amateurs, so it’s fascinating to be in at the start.

If I and Q leave you gasping when it comes to SDR technology, maybe we can help.

Thanks [Bill Meara N2CQR] for the tip!

Tic-Tac-Toe, In TTL

We’ll all be familiar with Tic-Tac-Toe, or Noughts and Crosses, a childhood pencil-and-paper diversion which has formed the basis of many a coding exercise. It’s an easy enough task to implement in software, but how many of us have seen it done in hardware alone? That’s just what [Warren Toomey] has done using TTL chips, and his method makes for a surprisingly simple circuit.

At its heart is an 8 kB ROM that contains precomputed move sequences that are selected via an address composed of the game states for both player and machine. A series of flip-flops control and buttons to make the board, and a 555 provides a clock.

The technique of using a ROM to replace complex logic is a very powerful one that is facilitated by the low price of relatively large devices that would once have been unaffordable. We’ve seen the technique used elsewhere, including as an ALU in a TTL CPU, and even for an entire CPU in its own right.

You can see the result in operation in the video below the break, and should you wish to have a go for yourself all the relevant information can be found in a GitHub repository.

Continue reading “Tic-Tac-Toe, In TTL”

Parallel Processing Was Never Quite Done Like This

Parallel processing is an idea that will be familiar to most readers. Few of you will not be reading this on a device with only one processor core, and quite a few of you will have experimented with clusters of Raspberry Pi or similar SBCs. Instead of one processor doing tasks sequentially, the idea goes, take a bunch of processors and hand out the tasks to be done simultaneously.

It’s a fair bet though that few of you will have designed and constructed your own parallel processing architecture. [BB] sends us a link which though it’s an old one is interesting enough to bring you today: [Michael] created a massively parallel array of Parallax Propeller microcontrollers back in 2008, and he did so on a breadboard.

The Parallax Propeller is an 8-core RISC microcontroller from the company that had found success in the 1990s with the BASIC Stamp, the PIC-based board that was all the rage before Arduino came into the world. In the last decade it was seen as an extremely exciting prospect, but high price and arcane development tools compared to a new generation of low-cost and easy to code competitors meant that it never quite caught on and remains today something of an intriguing oddity. So today’s value in this project lies not in something that you should run out and do yourselves, but instead in what the work tells us about the nuts and bolts of parallel processing architecture. It involves more than simply hooking up a load of chips and hoping for the best, and we gain some insight into the different strategies involved.

The Propeller certainly wasn’t the first attempt at a massively parallel microcontroller, and we doubt it will be the last. We’re certainly seeing microcontrollers with more than one core becoming more mainstream even in our community, but even with those how many of you have made use of the second core in your dual-core ESP32? Is a multicore microcontroller a solution searching for a problem, or will somebody one day crack it and the world will never be the same again? As always, the comments are below.

Be On Twitter Without Being On Twitter

Social media can connect us to a vibrant worldwide community, but it is also a huge time sink as it preys on both our need for attention and our insatiable curiosity. Kept on a leash by those constant notification sounds, we can easily look up from our phones to find half a day has gone and we’re behind with our work. [Laura Lytle] has a plan to tackle this problem, her OutBox project involves a single button press machine that posts a picture to Twitter of whatever is put in it. It’s not just another gateway to social media addiction though, she tells us it follows Design For Disuse principles in which it must be powered up and adjusted for each picture, and that it provides no feedback to satisfy the social media craving.

Under the hood of the laser-cut housing reminiscent of an older hobby 3D printer is a Raspberry Pi 3 Model A+ and a webcam, with a ring of LEDs for illumination. On top is the only interface, a small “arm” button to set things up and a big red arcade button to do the business. The software is in Python, and provides glue between resizing the photo, uploading it to a cloud service, and triggering ITTT to do the Tweeting. You can see the whole thing in the video below, and the result is a rather eye-catching device.

Of course, there are other ways to keep yourself off social media.

Continue reading “Be On Twitter Without Being On Twitter”

Power To The Pi 4: Some Chargers May Not Make The Grade

The Raspberry Pi 4 has been in the hands of consumers for a few days now, and while everyone seems happy with their new boards there are some reports of certain USB-C power supplies not powering them. It has been speculated that the cause may lie in the use of pulldown resistors on the configuration channel (CC) lines behind the USB-C socket on the Pi, with speculation that one may be used while two should be required. Supplies named include some Apple MacBook chargers, and there is a suggestion is that the Pi may not be the only device these chargers fail to perform for.

Is this something you should be worried about? Almost certainly not. The Pi folks have tested their product with a wide variety of chargers but it is inevitable that they would be unable to catch every possible one. If your charger is affected, try another one.

What it does illustrate is the difficulties faced by anybody in bringing a new electronic product to market, no matter how large or small they are as an organisation. It’s near-impossible to test for every possible use case, indeed it’s something that has happened to previous Pi models. You may remember that the Raspberry Pi 2 could be reset by a camera flash or if you have a very long memory, that the earliest boards had an unseemly fight between two 1.8 V lines that led to a hot USB chip, and neither of those minor quirks dented their board’s ability to get the job done.

Mistakes happen. Making the change to USB-C from the relative simplicity of micro-USB is a big step for all concerned, and it would be a surprise were it to pass entirely without incident. We’re sure that in time there will be a revised Pi 4, and we’d be interested to note what they do in this corner of it.

Brett Smith Makes Your Life Easier With Hidden Microcontroller Features

There was a time when microprocessors were slow and expensive devices that needed piles of support chips to run, so engineers came up with ingenious tricks using extra hardware preprocessing inputs to avoid having to create more code. It would be common to find a few logic gates, a comparator, or even the ubiquitous 555 timer doing a little bit of work to take some load away from the computer, and engineers learned to use these components as a matter of course.

The nice thing is that many of these great hardware hacks have been built into modern microcontrollers through the years. The problem is you know to know about them. Brett Smith’s newly published Hackaday Superconference talk, “Why Do It The Hard Way?”, aims to demystify the helpful hardware lurking in microcontrollers.

Join us below for a deeper dive and the embedded video of this talk. Supercon is the Ultimate Hardware con — don’t miss your chance to attend this year, November 15-17 in Pasadena, CA.

Continue reading “Brett Smith Makes Your Life Easier With Hidden Microcontroller Features”

The Digital Polaroid SX-70

What do you do if you own an iconic and unusual camera from decades past? Do you love it and cherish it, buy small quantities of its expensive remanufactured film and take arty photographs? Or do you rip it apart and remake it as a modern-day digital camera in a retro enclosure? If you’re [Joshua Gross], you do the latter.

The Polaroid SX-70 is an iconic emblem of 1970s consumer technology chic. A true design classic, it’s a single-lens reflex design using a Polaroid instant film cartridge, and its party trick is that it’s a folding camera which collapses down to roughly the size of a pack of 1970s cigars. It was an expensive luxury camera when it was launched in 1972, and today it commands high prices as a collector’s item.

[Joshua]’s build is therefore likely to cause weeping and wailing and gnashing of teeth among vintage camera enthusiasts, but what exactly has he done? In the first instance, he’s performed a teardown of the SX-70 which should be of interest to many readers in itself. He’s removed the mirror and lens, mounted a Raspberry Pi camera behind the lens mount, and a small LCD monitor where the mirror would be.

A new plastic lens in the original lens housing completes the optics, and the electronics come courtesy of a Pi Zero, battery, and USB hub in the space where the Polaroid film cartridge would otherwise be. Some new graphics and a fresh leather cover complete the  build, giving what we’d say is a very tidy electronic Polaroid. On the software side there is a filter to correct for fisheye distortion, and the final photos have a slightly Lomographic quality from the plastic lens.

We like what he’s created with his SX-70 even if we can’t help wincing that he did it to an SX-70 in the first place. Maybe it’s less controversial when someone gives the Pi treatment to a more mundane Polaroid camera.