If you have a microcontroller to program, it can be an easy enough process to hook up a serial lead and perform the task. If however you have hundreds of microcontrollers on PCBs to program, connecting that lead multiple times becomes an impossibility. In manufacturing environments they have pogo pin jigs, an array of spring-loaded pins carrying the programming signals that line up perfectly with the appropriate pads on a PCB places on top of it.
[Conor Patrick] is working on an upgrade to the U2F Zero 2-factor authentication token, and he faces exactly this problem of needing to program a lot of boards. His pogo pin jig is very nicely executed, and he’s taken us through his design and manufacture process for it.
Starting with his PCB design in Eagle, he exported it to Fusion 360 in which he was able to create a jig to fit it. Into the jig model he placed the holes for his chosen pogo pins in the appropriate places, before printing it with an SLA 3D printer. He is particularly complementary about the pins themselves, a solder bucket design that comes from mill-Max, and was sourced via DigiKey.
The proof of the pudding is in the eating, and happily when his completed jig received its first board, everything worked as planned and the programming proceeded flawlessly. We’ve shown you other pogo pin jigs, but this one is particularly nicely executed.
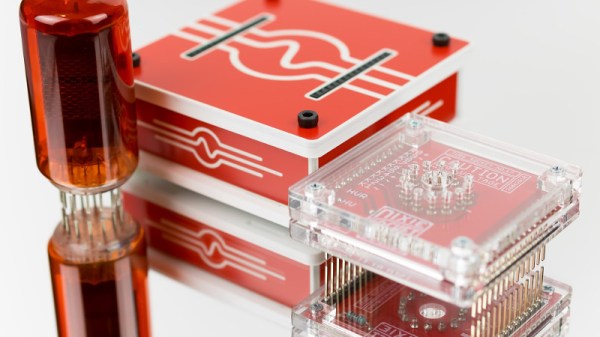
Nixie clocks, they’re a bit of a cliché, aren’t they? But still, they’re pretty to look at.
[Marcin Saj] has completely got our number, and with his Useless Nixie Device has stripped away any pretence of functionality from his Nixie and concentrated solely on the looking pretty part. It’s a box that steps through the display on any Nixie tube through the use of a set of pluggable socket modules, and it’s encased in an extremely attractive lase-cut acrylic enclosure. Internally it’s an extremely simple device, with a trusty 555 oscillator clocking a 4518 counter that in turn feeds 74141 driver. There is a MAX1771 boost converter in there too to create some high voltage for the tubes.
So it’s a pretty device and you can plug almost any Nixie into it given the right adapter. We guess it might be useful if you have a warehouse full of Nixies to test, but beyond that it’s a pretty desk toy. Still, it’s nice to see a Nixie project that’s not just another clock.
When you write a program for your computer, whether it is a desktop machine, a microcontroller, or a supercomputer, the chances are that you use software tools to help you get the job done. High level languages, compilers, linkers, assemblers, debuggers, and code libraries have become so integrated that in many cases you will barely be aware of their existence. To all intents and purposes this huge toolchain will be the computer. But the first computer programmers had none of these luxuries. They had to hand assemble their own binaries, check them by hand, and debug them by guessing what had happened when they failed.
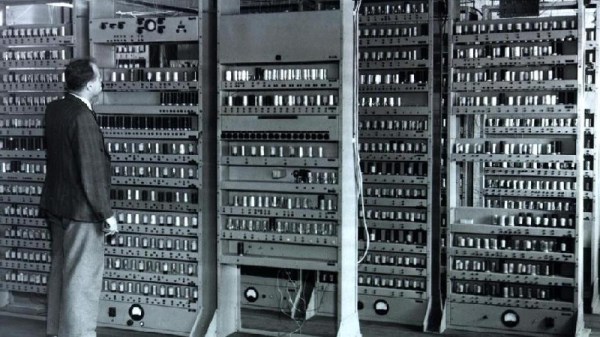
EDSAC I, 1948, W.Renwick with 5 hole tape reader and Creed teleprinter. Copyright Computer Laboratory, University of Cambridge. Reproduced by permission. [CC BY 2.0 UK]EDSAC (Electronic delay storage automatic calculator) was the first computer operated by the University of Cambridge in the UK and one of the first few computers in the entire world when it was built in the late 1940s. It is the subject of the 1951 film you’ll find embedded below. Originally produced for a conference, the video sports a 1976 introduction and narration from the machine’s creator Professor Maurice Wilkes. It doesn’t take us through the design of the machine itself, instead it concentrates on the workflow required to program it.
The Paper-Heavy Process of Programming EDSAC
To illustrate the programming process, a committee of people who would now call themselves computer scientists, but probably then called themselves mathematicians, breaking a formula into subroutines before the code is laboriously hand assembled. The linking process is performed manually too by the secretary who types the code into a teletype for transfer to a punched tape. When a library function is required she reaches into a filing cabinet for the roll of tape containing it before running it through a tape duplicator to add it to the program. Finally the completed tape is checked and added to a job queue that consists of a row of hooks on the wall. Never complain that your toolchain is unwieldy again!
The original EDSAC was decommissioned in the late 1950s after serving the university and spawning a commercial version, the LEO, which became the first ever computer manufactured for use in commerce. That was not the end of the EDSAC story though, because in this century a team at the National Museum of Computing at Bletchley Park set about recreating EDSAC as an exhibit. And as luck would have it a member of that team was at the recent Electromagnetic Field hacker camp to give a talk about their work which you will also find below.
Building a Faithful Reproduction of EDSAC
Tony Abbey gives us both a history of the machine and a description of its architecture, followed by a run through their efforts in rebuilding it. You may be surprised by some of the unexpected facts from the talk. For instance, while all the tubes used in the EDSAC are still available, their bases are not. Equivalents were sourced from China, but team members had to modify them with dental drills.
They also needed to manufact the 1940s-style tube chassis, and the solution to that problem happened to be just down the road. Bletchley is part of modern-day Milton Keynes, a post-war new town that is also home to another famous name: Marshall amplifiers. Tube amps are built in a surprisingly similar way, so they took on the manufactured challenge. Not all the parts of the new EDSAC are original though. The memory used mercury delay lines in 1949, but for 2018 recreation the computer has a delay line using nickel wire and modern components. Tony admits that even that has caused problems, and there is a simulator using a microcontroller.
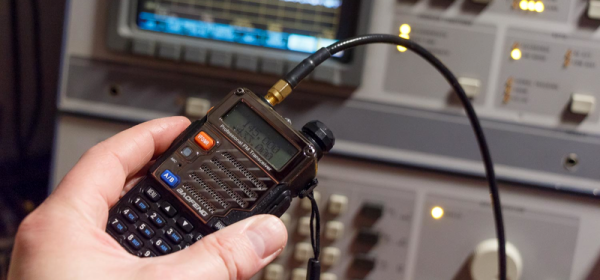
There was a time when a handheld radio transceiver was an object of wonder, and a significant item for any radio amateur to own. A few hundred dollars secured you an FM walkie-talkie through which you could chat on your local repeater, and mobile radio was a big draw for new hams. Thirty years later FM mobile operation may be a bit less popular, but thanks to Chinese manufacturing the barrier to entry is lower than it has ever been. With extremely basic handheld radios starting at around ten dollars and a capable dual-bander being yours for somewhere over twice that, most licencees will now own a Baofeng UV5 or similar radio.
The FCC though are not entirely happy with these radios, and QRZ Now are reporting that the FCC has issued an advisory prohibiting the import or sale of devices that do not comply with their rules. In particular they are talking about devices that can transmit on unauthorised frequencies, and ones that are capable of transmission bandwidths greater than 12.5 kHz.
We’ve reported before on the shortcomings of some of these radios, but strangely this news doesn’t concern itself with their spurious emissions. We’re guessing that radio amateurs are not the problem here, and the availability of cheap transceivers has meant that the general public are using them for personal communication without a full appreciation of what frequencies they may be using. It’s traditional and normal for radio amateurs to use devices capable of transmitting out-of-band, but with a licence to lose should they do that they are also a lot more careful about their RF emissions.
Read the FCC statement and you’ll learn they are not trying to restrict the sale of ham gear. However, they are insisting that imported radios that can transmit on other frequencies must be certified. Apparently, opponents of these radios claim about 1 million units a year show up in the US, so this is a big business. The Bureau warns that fines can be as high as $19,639 per day for continued marketing and up to $147,290 — we have no idea how they arrive at those odd numbers.
So if you’re an American who hasn’t already got a Baofeng or similar, you might be well advised to pick one up while you still can.
There is a widely derided quote attributed to [Bill Gates], that “640k should be enough for anyone”. Meaning of course that the 640 kb memory limit for the original IBM PC of the early 1980s should be plenty for the software of the day, and there was no need at the time for memory expansions or upgrades. Coupled with the man whose company then spent the next few decades dominating the software industry with ever more demanding products that required successive generations of ever more powerful PCs, it was the source of much 1990s-era dark IT humour.
In 2018 we have unimaginably powerful computers, but to a large extent most of us do surprisingly similar work with them that we did ten, twenty, or even thirty years ago. Web browsers may have morphed from hypertext layout formatting to complete virtual computing environments, but a word processor, a text editor, or an image editor would be very recognisable to our former selves. If we arrived in a time machine from 1987 though we’d be shocked at how bloated and slow those equivalent applications are on what would seem to us like supercomputers.
[Nikita Prokopov] has written an extremely pithy essay on this subject in which he asks why it is that if a DOS 286 could run a fast and nimble text editor, the 2018 text editor requires hundreds of megabytes to run and is noticeably slow. Smug vi-on-hand-rolled GNU/Linux users will be queuing up to rub their hands in glee in the comments, but though Windows may spring to mind for most examples there is no mainstream platform that is immune. Web applications come under particular scorn, with single pages having more bloat than the entirety of Windows 95, and flagship applications that routinely throw continuous Javascript errors being the norm. He ends with a manifesto, urging developers to do better, and engineers to call it out where necessary.
If you’ve ever railed at bloatware and simply at poor quality software in general, then [Nikita]’s rant is for you. We suspect he will be preaching to the converted.
David Mills is as a research scientist at the cutting edge of medical imaging. His work doesn’t involve the scanners you might find yourself being thrust into in a hospital should you be unfortunate enough to injure yourself. He’s working with a higher grade of equipment, he pushes the boundaries of the art with much smaller, very high resolution CT scanners for research at a university dental school.
He’s also a friend of Hackaday and we were excited for his talk on interesting uses for CT scanners at EMF Camp this summer. David takes us into that world with history of these tools, a few examples of teeth and bone scans, and then delves into some of the more unusual applications to which his very specialist equipment has been applied. Join me after the break as we cover the lesser known ways to put x-ray technology to work.
Linux started as a student project in the 1990s, the creation of Linus Torvalds. He has attained celebrity status while steering his creation through the decades, but along the way he has also attracted a different reputation within the Linux and software community. He is famous for his outbursts and rants, some of which become rather personal, and it is not difficult at all to find kernel developers or would-be kernel developers who have turned their backs on the project as a result.
It’s very refreshing indeed then to read an update from [Linus] as part of his regular communications, in which he admits that he has an issue, and says that he is taking the time to seek help for it. There is an accompanying update to the kernel maintenance code of conduct, which suggests that this is likely to mark a sea-change in that environment, as well as we hope salvage that aspect of [Linus]’ reputation.
“My flippant attacks in emails have been both unprofessional and uncalled for. Especially at times when I made it personal. In my quest for a better patch, this made sense to me. I know now this was not OK and I am truly sorry.”
The Hackaday community has a much greater than average proportion of Linux users among its readership. Even those readers who use a desktop OS with BSD, Windows, or other kernels will almost certainly have a Linux kernel somewhere, whether it’s in their phone, their set-top-box, their children’s toys, or even their domestic appliances. And of course a large swath of the Internet runs on Linux. It is in the best interest of us all that we continually attract and retain brilliant people to contribute to the effort put into developing and maintaining the Linux kernel.
Without wishing to lionise [Linus] above the many others whose work has also contributed to Linux and its success, his contribution to our community has been beyond measure and it has been uncomfortable to see his other side. It’s a step in the right direction to apologize for personal attacks and behavior that drives a wedge into the kernel developer community, and seek to change that behavior. We’d urge others to follow his example, we’re sure every grouping has at times had its personality problems, and it’s never too late to enact some repairs.
While Linus steps away to work on his self improvement, veteran kernel developer Greg Kroah-Hartman will take the reigns among the kernel maintainers.

![EDSAC I, 1948, W.Renwick with 5 hole tape reader and Creed teleprinter. Copyright Computer Laboratory, University of Cambridge. Reproduced by permission. [CC BY 2.0 UK]](https://hackaday.com/wp-content/uploads/2018/09/edsac99-34.jpg)