Remanufacturing A Rotary Airplane Engine

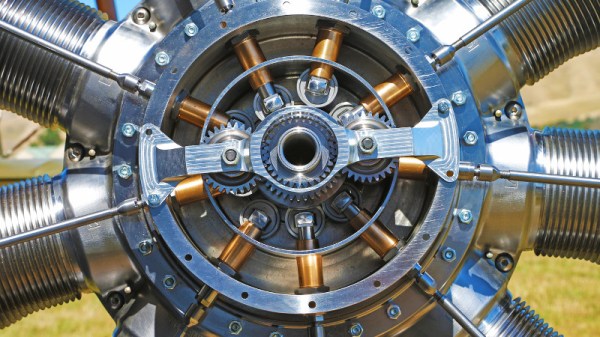
If someone tells you they have seen a rotary engine, the chances are that you will immediately think of a Wankel engine, as you might find in some of the more exotic Mazda sports cars. But there is another rotary engine that has a prior claim to the name, and it can be found as the power unit for many early-twentieth-century aircraft. In these rotary engines the cylinders are arranged radially around a stationary crankshaft, and it is the engine itself that rotates. They have the advantage of extreme simplicity, smooth power, and a low parts count, at the expense of total loss lubrication, a relatively large rotating mass, and some difficulty in controlling their power. These rotary engines were largely obsolete by the 1920s, but  recent upsurge of interest in WW1-era aircraft has led to the creation of a small demand for them. New Zealand based Classic Aero Machining Service have stepped in to fill that gap and are remanufacturing the Gnome radial engine, the most numerous design of that era.

For anyone with an interest in internal combustion engines, the Gnome is a fascinating study. It’s a nine-cylinder design that runs a four-stroke Otto cycle, but instead of the two or more valves you might be familiar with from your motor vehicle it has only a single valve. The so-called Monosoupape design uses its valve for both fuel and exhaust, opening it on the inlet stroke as well as the exhaust stroke. The simplicity of a single valve and no carburetor is thus offset by a difficulty in varying its power , so rotary engines would frequently reduce the number of firing cylinders in lieu of throttling back.

The CAMS Gnome is a faithful copy of the original, but with modern metallurgy and the addition of an electronic ignition system. The original castor oil is still used — it seems classic aviation buffs like the smell — but becuase it is notorious for leaving sticky deposits in the engine they are evaluating modern alternatives. They have some technical details on their website, and there’s a good chance you my hear one of their engines one day at an air show near you.

Continue reading “Remanufacturing A Rotary Airplane Engine”

It’s (Almost) Two Keytars In One!

All the best retro-1980s chiptune acts should possess a keytar. It’s the Law, or something. [Theremin Hero] has reminded us of this with a new video we’ve shown below featuring an instrument he had a part in creating alongside [Sam Wray] and [Siddharth Vadgama] a few years ago. The Blade is a 3D-printed keytar featuring two Guitar Hero necks and an integrated pair of Game Boys to provide the sound from the authentic silicon.

To describe it in those terms though is to miss a wealth of other components and featured. The keyboard itself is from a Rock Band keytar which feeds MIDI to a Raspberry Pi running PD Extended that handles all the button press mappings. An Arduino Mega performs the same task for the two Guitar Hero necks. Midi from the various sources is processed by an Arduino Boy which then feeds the Game Boys that make the sounds. Oh – and there’s a Leap Motion 3D motion controller in the mix as well, though that doesn’t seem to be used directly in the chiptune synth functionality.

We’ve had a few keytars here over the years, but this one makes us think of the Commodore 64 instrument created by [Jeri Ellsworth].

Continue reading “It’s (Almost) Two Keytars In One!”

Implementing Qi Inductive Charging Yourself

Inductive charging is a technology that has promised a lot, but hasn’t quite delivered on the promise of never needing to plug in your phone again. The technology behind it is surprisingly simple though, and [Vinod.S] takes us through it all with an ATtiny13-based example.

An inductive charger has to be clever in its operation, for if it were to operate continuously it would soon have more in common with an inductive hob and thus become a fire risk, so it has to be sure that a compatible device is resting upon it before it tries to transmit power. It achieves this by periodically sending out a pulse of power intended to wake any devices in contact with it, and the device responds with a serial data stream encoded onto the device’s field by modifying the resonance of the receiver tuned circuit. This is done by a pair of MOSFETs under the control of the ATtiny in [Vinod]’s device, resulting in a functioning inductive power receiver built on a piece of prototyping board and sporting a buck converter capable of supplying 5 volts suitable to charge a phone. You can find the code on GitHub and see it in action below the break.

This tech has made an appearance here before a few times, such as when a Qi charger was integrated into a Chromebook.

Continue reading “Implementing Qi Inductive Charging Yourself”

An Even Smaller World’s Smallest LED Blinky

Everything can be done with a 555. It’s a universal law, as all readers know. And a flashing light, you might think, will have been done before many times. But nobody has ever created a 555 flashing light as small as thie one created by [TWires], who has taken a TI LMC555 chip-scale packaged 555 and dead-bugged a working flasher on its surface using 01005 discrete components. There is a video showing it in operation that we’ve placed below the break, and it’s tiny. We probably all consider ourselves to be quite good at soldering, but this piece of work is in another class entirely.

The project was inspired by [Mike Harrison]’s previous holder of the smallest blinky prize, which used a PIC microcontroller atop a tiny surface mount supercapacitor. It uses the same capacitor for power, but we’d say it’s taken the blinky to new levels of tininess. Does this mean a new arms race is upon us in the world of tiny blinkies? We hope so, and though it’s difficult to imagine they can get much smaller we can’t wait to see what people come up with. If there’s one thing about our community it’s that saying something can’t be done is unwise: one of you will find a way if it is at all possible. Even Microchip’s MIC1555 might be a bit big though, so something inventive is called for.

For a fascinating run-down of the state of the 555 art, read this article from our own [Ted Yapo].

Continue reading “An Even Smaller World’s Smallest LED Blinky”

Blacksmithing For The Uninitiated: Let’s Talk About Anvils

When you grow up with something as the constant backdrop to your life, it’s easy to forget as an adult that not everyone else shares your instinctive knowledge of the subject. My dad is a blacksmith, he’s now retired, but as I was growing up his very active forge was in a workshop next to our house. This is the second part of a series based upon that experience, exploring blacksmithing for people who have maybe always fancied a go at the anvil but have little idea where to start.

The Most Obvious Blacksmithing Tool: The Anvil

Having considered the hearth in our previous outing, it’s time to turn our attention to what is the signature piece of blacksmithing equipment: the anvil. This has the function of providing a high-mass hardened working surface against which metal can be forged, and it has a distinctive shape with various parts for particular metalworking tasks. There are many minor and major variations of anvil design depending upon where in the world your anvil hails from, but since my experience comes from the English counties, the anvil I will be describing is the pattern you’ll find in the British Isles.

Continue reading “Blacksmithing For The Uninitiated: Let’s Talk About Anvils”

Restoring An HP LCZ Meter From The 1980s

We are fantastically lucky not only in the parts that are easily available to us at reasonable cost, but also for the affordable test equipment that we can have on our benches. It was not always this way though, and [NFM] treats us to an extensive teardown and upgrade of a piece of test equipment from the days when a hacker’s bench would have been well-appointed with just a multimeter and a 10MHz ‘scope.

The Hewlett Packard 4276A LCZ meter is, or perhaps was, the king of component testers. A 19″ rack unit that would comfortably fill a shelf, it has a host of functions and a brace of red LED displays. This particular meter had clearly seen better days, and required a look inside just to clean up connectors and replace aged batteries.

In the case is a backplane board with a series of edge connectors for a PSU, CPU, and analogue boards. Aged capacitors and those batteries were replaced, and those edge connectors cleaned up again. The CPU board appears to have a Z80 at its heart, and we’re sure we spotted a 1987 date code. There are plenty of nice high-quality touches, such as the individual 7-segment digits being socketed.

An after-market option for this equipment included a DC offset board, and incredibly HP publish its full schematic and a picture of its PCB in their manual. It was thus a simple process and quick PCB ordering to knock up a modern replica, with just a few component substitutions and single resistors replacing an HP specific encapsulated resistor pack.

As a treat we get a ringside seat for the set-up and alignment of the machine. The DC offset board gives the wrong voltage, which he traces to a voltage reference with a different tolerance to the original HP part. [NFM] makes some adjustments to resistor values, and is able to pull the voltage to the correct value. Finally we see the instrument put through its paces, and along the way have a demonstration of how capacitance of a ceramic capacitor can vary with voltage close to its working voltage. Even if you never have the need for an LCZ meter or never see an HP 4276A, this should be worth a watch. And if you now have an urge to find a bench full of similar treasures, take a look at our guide to old test equipment.

Continue reading “Restoring An HP LCZ Meter From The 1980s”

A Vintage Sony Portable TV, Brought Up To Date

In the time before smartphones for on-the-go visual entertainment, there were portable TVs. You might think of a portable TV as a luggable device, but the really cool ones were pocket-sized. Perhaps if you are familiar with pocket TVs you’ll be thinking of a Citizen or a Casio with a matchbox-sized LCD, but before those devices reached the market there was an earlier generation that featured tiny CRTs. These were simply the coolest electronics that an ’80s kid could lust after, and [Nick Reynolds] is lucky enough to have one. It’s a Sony Watchman from some time in the first half of that decade, and because it’s useless in the age of digital broadcasts he’s upgraded it by installing a Raspberry Pi in its case.

The unlikely inspiration for the project came from the 1970s British sci-fi TV series Space 1999, in which portable CRT-based communicators were a prop. They were typical of the sci-fi vision of the future in shows of the period, one that got so much right but didn’t quite see the smartphone coming.

The Watchman features Sony’s angled CRT, and fitting a Pi Zero W into the limited space behind it called for some careful insulation of its parts with Kapton tape. He’s even included a Pi camera module with a contorted run of flexible cable, placing it beneath the screen where a tuning indicator once sat. He has no sound as yet, but is able to demonstrate a working videophone using Ekiga as a client. He has a few more Watchmen, and has plans for a suite of retro videophones, and a Pi 3 based model.

Surprisingly this isn’t the only Sony Watchman that’s had this kind of treatment, previously we’ve brought you one that hosted a Pong game.