DIY Arduino Soldering Iron Hits Version 2.0

A few months ago we brought word that [Electronoobs] was working on his own open source alternative to pocket-sized temperature controlled soldering irons like the TS100. Powered by the ATMega328p microcontroller and utilizing a 3D printed enclosure, his version could be built for as little as $15 USD depending on where you sourced your parts from. But by his own admission, the design was held back by the quality of the $5 replacement soldering iron tips he designed it around. As the saying goes, you get what you pay for.
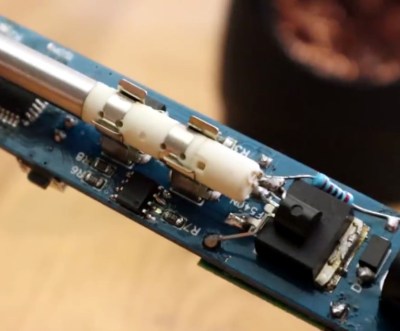
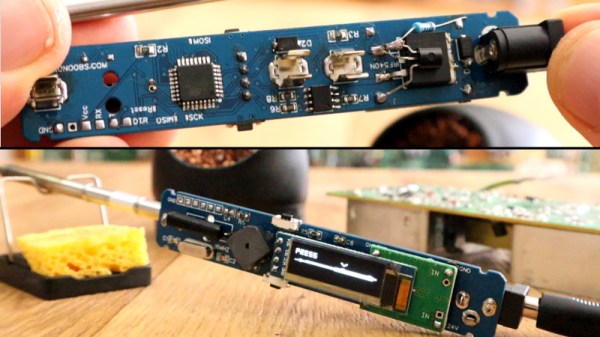
But [Electronoobs] is back with the second version of his DIY portable soldering iron, and this time it’s using the vastly superior HAKKO T12 style tip. As this tip has the thermocouple and heating element in series it involved a fairly extensive redesign of the entire project, but in the end it’s worth it. After all, a soldering iron is really only as good as its tip to begin with.

This version of the iron deletes the MAX6675 used in V1, and replaces it with a LM358 operational amplifier to read the thermocouple in the T12 tip. [Electronoobs] then used an external thermocouple to compare the LM358’s output to the actual temperature at the tip. With this data he created a function which will return tip temperature from the analog voltage.

While the physical and electrical elements of the tip changed substantially, a lot of the design is still the same from the first version. In addition to the ATMega328p microcontroller, version 2.0 of the iron still uses the same 128×32 I2C OLED display, MOSFET, and 5V buck converter from the original iron. That said, [Electronoobs] is already considering a third revision that will make the iron even smaller by replacing the MOSFET and buck converter. It might be best to consider this an intermediate step before the DIY iron takes on its final form, which we’re very interested in seeing.

The first version of the DIY Arduino soldering iron garnered quite a bit of attention, so it seems there’s a decent number of you out there who aren’t content with just plunking down the cash for the TS100.

Continue reading “DIY Arduino Soldering Iron Hits Version 2.0”

One Man’s Disenchantment With The World Of Software

There is a widely derided quote attributed to [Bill Gates], that “640k should be enough for anyone”. Meaning of course that the 640 kb memory limit for the original IBM PC of the early 1980s should be plenty for the software of the day, and there was no need at the time for memory expansions or upgrades. Coupled with the man whose company then spent the next few decades dominating the software industry with ever more demanding products that required successive generations of ever more powerful PCs, it was the source of much 1990s-era dark IT humour.

XKCD no. 303 (CC BY-NC 2.5)

In 2018 we have unimaginably powerful computers, but to a large extent most of us do surprisingly similar work with them that we did ten, twenty, or even thirty years ago. Web browsers may have morphed from hypertext layout formatting to complete virtual computing environments, but a word processor, a text editor, or an image editor would be very recognisable to our former selves. If we arrived in a time machine from 1987 though we’d be shocked at how bloated and slow those equivalent applications are on what would seem to us like supercomputers.

[Nikita Prokopov] has written an extremely pithy essay on this subject in which he asks why it is that if a DOS 286 could run a fast and nimble text editor, the 2018 text editor requires hundreds of megabytes to run and is noticeably slow. Smug vi-on-hand-rolled GNU/Linux users will be queuing up to rub their hands in glee in the comments, but though Windows may spring to mind for most examples there is no mainstream platform that is immune. Web applications come under particular scorn, with single pages having more bloat than the entirety of Windows 95, and flagship applications that routinely throw continuous Javascript errors being the norm. He ends with a manifesto, urging developers to do better, and engineers to call it out where necessary.

If you’ve ever railed at bloatware and simply at poor quality software in general, then [Nikita]’s rant is for you. We suspect he will be preaching to the converted.

Windows error screen: Oops4321 [CC BY-SA 4.0]

Maker Faire NY: Programmable Air

At this year’s World Maker Faire in New York City we’re astonished and proud to run into some of the best projects that are currently in the running for the Hackaday Prize. One of these is Programmable Air, from [Amitabh], and it’s the solution to pneumatics and pressure sensing in Maker and IoT devices.

The idea behind Programmable Air is to create the cheapest, most hacker-friendly system for dealing with inflatable and vacuum-based robotics. Yes, pneumatic robotics might sound weird, but there’s plenty of projects that could make use of a system like this. The Glaucus is one of the greatest soft robotic projects we’ve ever seen, and it turns a bit of silicone into a quadruped robot with no moving parts. The only control you have over this robot is inflating one side or the other while watching this silicone slug slowly crawl forward. This same sort of system can be expanded to a silicone robot tentacle, too.

On display at the Programmable Air booth were three examples of how this device could be used. The first was a simple pressure sensor — a weird silicone pig with some tubing coming out of the nostrils was connected to the Programmable Air module. Squeeze the pig, and some RGB LEDs light up. The second demo was a balloon inflating and deflating automatically. The third demo was a ‘jamming gripper’, basically a balloon filled with rice or coffee grounds, connected to a pump. If you take this balloon, jam it onto an odd-shaped object and suck the air out, it becomes a gripper for a robotic arm. All of these are possible with Programmable Air.

Right now, [Amitabh] has just finalized the design and is getting ready to move into mass production. You can get some updates for this really novel air-powered robotics platform over on the main website, or check out the project over on Hackaday.io.

Serpentine: multi-purpose hand gesture sensor

There Are Multiple Ways To Gesture With This Serpentine Sensor

Serpentine is a gesture sensor that’s the equivalent of a membrane potentiometer, flex and stretch sensor, and more.  It’s self-powering and can be used in wearable hacks such as the necklace shown in the banner image though we’re thinking more along the lines of the lanyard for Hackaday conference badges, adding one more level of hackability. It’s a great way to send signals without anyone else knowing you’re doing it and it’s easy to make.

Collecting analog data from Serpentine

Serpentine is the core of a research project by a group of researchers including [fereshteh] of Georgia Tech, Atlanta. The sensor is a tube made of a silicone rubber and PDMS (a silicone elastomer) core with a copper coil wrapped around it, followed by more of the silicone mix, a coil of silver-coated nylon thread, and a final layer of the silicone mix. Full instructions for making it are on their Hackaday.io page.

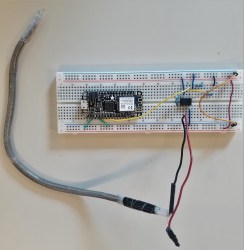
There are three general interactions you can have with the tube-shaped sensor: radial, longitudinal, and tangential. Doing various combinations of these three results in a surprising variety of gestures such as tap, press, slide, twist, stretch, bend, and rotate. Those gestures result in signals across the copper and silver-coated nylon electrodes. The signals pass through an amplifier circuit which uses WiFi to send them on to a laptop where signal processing distinguishes between the gestures. It recognizes the different ones with around 90% accuracy. The video below demonstrates the training step followed by testing.

Serpentine works as a result of the triboelectric nanogenerator (TENG) phenomenon, a mix of the triboelectric effect and electrostatic induction but fabrics can be made which use other effects too. One example is this fabric keyboard and theremin which works in part using the piezoelectric effect.

Continue reading “There Are Multiple Ways To Gesture With This Serpentine Sensor”

Prusa Introduces A Resin Printer At Maker Faire NY

For one reason or another, the World Maker Faire in New York has become the preeminent place to launch 3D printers. MakerBot did it with the Thing-O-Matic way back when, and over the years we’ve seen some interesting new advances come out of Queens during one special weekend in September.

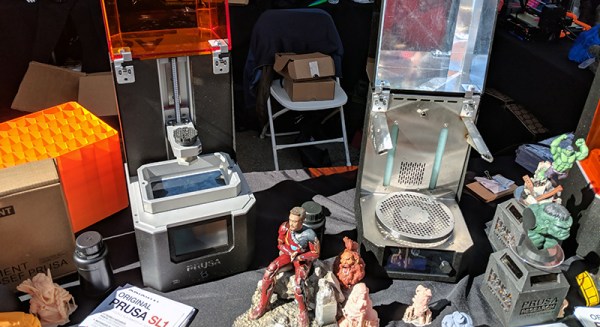
Today Prusa Research announced their latest creation. It’s the resin printer you’ve all been waiting for. The Prusa SL1 is aiming to become the Prusa Mk 3 of the resin printer world: it’s a solid printer, it’s relatively cheap (kit price starts at $1299/€1299), and it produces prints that are at least as good as resin printers that cost three times as much.

The tech inside the SL1 is about what you’d expect if you’ve been following resin printers for a while. The resin is activated by a bank of LEDs shining through a photomask, in this case a 5.5 inch, 1440p display. Everything is printed on a removable bed that can be transferred over to a separate ‘curing chamber’ after the print is done. It’s more or less what you would expect, but there are some fascinating refinements to the design that make this a resin printer worthy of carrying the Prusa name.

Common problems with a masked SLA printer that uses LEDs and an LCD are the interface between the LCD and the resin, and the temperature of the display itself. Resin is not kind to LCD displays, and to remedy this problem, Prusa has included an FEP film on the bottom of the removable tank. This is a user-replaceable part (technically a consumable, at least to the same extent as a PEI build plate on a filament printer), and Prusa will be selling those as spare parts on their store. The LCD is also cooled; one of the major drawbacks of shining several watts of UV through an LCD is the lifetime of the display. Cooling the display helps, and should greatly increase the lifetime of the printer. All of this is wrapped up in an exceptionally heavy metal case with the lovely hinged UV-opaque orange plastic lid.

Of course, saying you’ve built a resin printer is one thing, but how do the prints look? Exceptional. The Prusa booth at Maker Faire was loaded up with sample prints from the machine, and they’re of the same high quality you would expect from the Form 3D printers that have been the go-to in the resin printer world. The Prusa SLA also works with big-O Open resins, meaning you’re not tied to a single resin vendor.

This is just the announcement of the Prusa resin printer, but they are taking preorders. The price for the kit — no word on how complex of a kit it is — is $1300, while the assembled printer is $1600, with the first units shipping in January.

I Hear You Offer WiFi

We are swimming in radio transmissions from all around, and if you live above the ground floor, they are coming at you from below as well. Humans do not have a sensory organ for recognizing radio signals, but we have lots of hardware which can make sense of it. The chances are good that you are looking at one such device right now. [Frank Swain] has leaped from merely accepting the omnipresent signals from WiFi routers and portable devices to listening in on them. The audio signals are mere soundwaves, so he is not listening to every tweet and email password, merely a representation of the data’s presence. There is a sample below the break, and it sounds like a Geiger counter playing PIN•BOT.

We experience only the most minuscule sliver of information coming at us at any given moment. Machines to hack that gap are not had to find on these pages so [Frank] is in good company. Magnetosensory is a popular choice for people with a poor sense of direction. Echolocation is perfect for fans of Daredevil. Delivering new sensations could be easier than ever with high-resolution tactile displays. Detect some rather intimate data with ‘SHE BON.’

Continue reading “I Hear You Offer WiFi”

Wonderful IPad Mini 2 Home Made Spiral Notebook Case

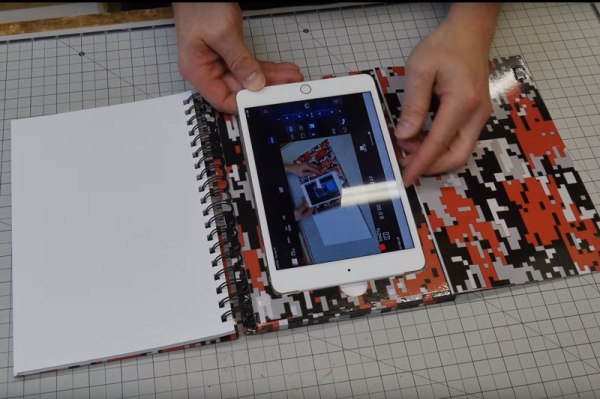
Part of the joy of hacking is the joy of discovery, of seeing how things go right as well as wrong. That’s one cool thing about this iPad Mini 2 case build by [Eric Strebel]: in the video, he details the things that went wrong as well as those that went right. For instance, he used glue on one version that melted the foam core he built the iPad holder from. The end product is wonderful, though. It combines an iPad Mini 2 case and a spiral-bound notebook so you can use both digital and paper mediums, with the iPad cleverly hidden behind a panel that both protects it and turns the screen off when not in use.

Continue reading “Wonderful IPad Mini 2 Home Made Spiral Notebook Case”