
Fail Of The Week: How Not To Build Your Own Motorcycle

There’s a saying among writers that goes something like “Everyone has a novel in them, but in most cases that’s where it should stay”. Its source is the subject of some dispute, but it remains sage advice that wannabe authors should remember on dark and stormy nights.

It is possible that a similar saying could be constructed among hackers and makers: that every one of us has at least one motor vehicle within, held back only by the lack of available time, budget, and workshop space. And like the writers, within is probably where most of them should stay.

[TheFrostyman] might have had cause to heed such advice. For blessed with a workshop, a hundred dollars, and the free time of a 15-year-old, he’s built his first motorcycle. It’s a machine of which he seems inordinately proud, a hardtail with a stance somewhere closer to a café racer and powered by what looks like a clone of the ubiquitous Honda 50 engine.

Unfortunately for him, though the machine looks about as cool a ride as any 15-year-old could hope to own it could also serve as a textbook example of how not to build a safe motorcycle. In fact, we’d go further than that, it’s a deathtrap that we hope he takes a second look at and never ever rides. It’s worth running through some of its deficiencies not for a laugh at his expense but to gain some understanding of motorcycle design.

Continue reading “Fail Of The Week: How Not To Build Your Own Motorcycle”
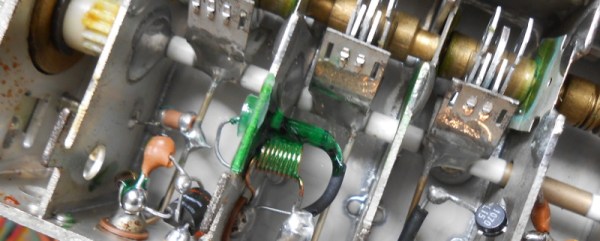
Not Quite 101 Uses For An Analog UHF TV Tuner

Young electronics hackers today are very fortunate to grow up in an era with both a plethora of capable devices to stimulate their imagination, and cheap and ready access to them. Less than the price of a hamburger meal can secure you a Linux computing platform such as the Raspberry Pi Zero, and a huge choice of sensors and peripherals are only an overnight postage envelope away.

Casing back a few decades to the 1980s, things were a little different for electronically inclined youth. We had the first generation of 8-bit microcomputers but they were expensive, and unless you had well-heeled parents prepared to buy you a top-end model they could be challenging to interface to. Other electronic parts were far more expensive, and mail order could take weeks to deliver the goods.

For some of us, this was not a problem. We simply cast around for other sources of parts, and one of the most convenient was the scrap CRT TV you’d find in nearly every dumpster in those days before electronic recycling. If you could make it from 1970s-era consumer-grade discrete components, we probably did so having carefully pored over a heap of large PCBs to seek out the right component values. Good training, you certainly end up knowing resistor colour codes by sight that way.

Continue reading “Not Quite 101 Uses For An Analog UHF TV Tuner”

Improving Rice Cooker Efficiency

Looking at the plate on the bottom of his electric rice cooker, [AC_Hacker] was surprised to find that it was rated to consume 400 watts. Furthermore when he measured its consumption he found that it consumed 385 watts without even having a cooking cycle initiated. The circuit to keep cooked rice warm was always on – even when the cooking circuit wasn’t engaged.

Something clearly had to be done, so he set about modifying the cooker for better economy. Removing the base revealed that disabling the warming circuit was as simple as disconnecting it. [AC_Hacker] also noticed that the device had no thermal insulation. There was plenty of space between the inner and outer walls, so he packed it with glass wool. The final modification was to reduce the power taken by the heater by installing a half-wave rectifier diode. The cooker still reached the desired temperature, it just used half the power.

You might think that would be the end of it, given that the modifications significantly reduced the cooker’s power consumption without detriment to its rice cooking ability. Rice now took a little longer to cook, so there was still room for improvement. The moment of inspiration came when [AC_Hacker] realized that the cooking time was proportional to the amount of water used in a cooking cycle. He could safely reduce the water without affecting the cooked rice. A 30% water reduction led to a proportional cooking time reduction, and rice cooked using a lot less power.

Surprisingly this seems to have been Hackaday’s first rice cooker hack. Perhaps that’s because you’ve been so busy supplying us with sous vide hacks to write about.

Converting A Lawnmower Engine To Run On Compressed Air

Our most likely exposure to a steam engine these days will probably come courtesy of a railway locomotive. A machine capable of immense power and probably with significant complexity and engineering  in its construction, something the majority of us will only ever be able to see at second-hand. But there was a period when steam engines were much more accessible, before internal combustion engines and electric motors took on the task of automating hard work you would have found small stationary steam engines in all corners of industry.

These engines are on a scale much more easily embraced by hackers and makers, and though vintage stationary engines are thin on the ground these days there are a significant number of people pursuing their construction by converting modern petrol and diesel engines to a more old-fashioned medium.

[Lindsay Wilson] has a lawnmower engine which a few years ago he converted with the addition of a sleeve valve to run on compressed air. It’s not a steam engine because creating a safe and legal steam boiler is an expensive process, but despite this it amounts to the same thing. The engine in question is a small sidevalve single cylinder Suffolk Punch lawnmower engine from which he has removed and blocked the valve gear, and added a sleeve valve powered by a linkage from the crankshaft and using the spark plug hole as an inlet and outlet. He provides a lot of detail on the sleeve valve’s construction, and it really is a surprisingly simple arrangement. We might look for a harder metal than copper pipe for the guide in which it runs though.

The video below the break shows the engine being run up after a period of storage. It’s an effective device, easily capable of taking more air than his compressor can supply.

Continue reading “Converting A Lawnmower Engine To Run On Compressed Air”

Beautiful Raspberry Pi Laptop Inspired By Psion

In the four years since the first Raspberry Pi appeared, there have been many takes on a portable computer based on it. The choice of components is fairly straightforward, there is now a wide selection of suitable keyboards, displays, and battery packs to choose from. You might therefore think that there could be nothing new in the world of the portable Pi, indeed another one might be as mundane as just another PC build.

News reaches us from Japan this morning of [nokton35mm]’s “RasPSION” Pi laptop build (machine translation) inspired by the Psion portable computers of the late 1990s.

That hinge, in close-up

The RasPSION features the Raspberry Pi 7″ display as well as a Bluetooth keyboard, 5V battery pack and the Pi camera. What makes it special is its laser cut case, and in particular its pivoting hinge mechanism. This is the part that takes its inspiration from the Psion machines, and its operation can be seen in the video below the break.

He claims the finished laptop gives him about two hours of battery life, which is no mean feat given that it lacks the sophisticated power management you’ll find in a commercial laptop. We hope that in time we’ll see him posting the details of the build somewhere other than Twitter, as this is a laptop we’d love to know more about.

Continue reading “Beautiful Raspberry Pi Laptop Inspired By Psion”

Ask Hackaday: How Hard Is It To Make A Bad Solder Joint?

When you learn to solder, you are warned about the pitfalls of creating a solder joint. Too much solder, too little solder, cold joints, dry joints, failing to “wet” the joint properly, a plethora of terms are explained  if you read one of the many online guides to soldering.

Unsurprisingly it can all seem rather daunting to a novice, especially if they are not used to the dexterity required to manipulate a tool on a very small-scale at a distance. And since the soldering iron likely to be in the hands of a beginner will not be one of the more accomplished models with fine temperature control and a good tip, it’s likely that they will experience most of those pitfalls early on in their soldering career.

As your soldering skills increase, you get the knack of making a good joint. Applying just the right amount of heat and supplying just enough solder becomes second nature, and though you still mess up from time to time you learn to spot your errors and how to rework and fix them. Your progression through the art becomes a series of plateaux, as you achieve each new task whose tiny size or complexity you previously thought rendered it impossible. Did you too recoil in horror before your first 0.1″ DIP IC, only to find it had been surprisingly easy once you’d completed it?

A few weeks ago we posted a Hackaday Fail of the Week, revolving around a soldering iron failure and confirmation bias leading to a lengthy reworking session when the real culprit was a missing set of jumpers. Mildly embarrassing and something over which a veil is best drawn, but its comments raised some interesting questions about bad solder joints. In the FoTW case I was worried I’d overheated the joints causing them to go bad, evaporating the flux and oxidising the solder. This was disputed by some commenters, but left me with some curiosity over bad solder joints. We all know roughly how solder joints go wrong, but how much of what we know is heresay? Perhaps it is time for a thorough investigation of what makes a good solder joint, and the best way to understand that would surely be to look at what makes a bad one.

Continue reading “Ask Hackaday: How Hard Is It To Make A Bad Solder Joint?”

The Champagne Of Light Bulbs

We’re all used to making our own lighting projects. Triac dimmers, LEDs, Neopixels, EL wire, there is a huge array of lighting components and technologies at our fingertips. But how many of us have made our own lighting rather than buying off-the-shelf? [Confined Maker] set out to do just that by creating an incandescent light bulb from scratch, and since he’s obviously a hacker with a bit of class he did it in an empty Dom Perignon champagne bottle.

It might seem a daunting project, but as he shows us in the video below the break, it turns out to be surprisingly straightforward with no exotic tooling required. He starts by winding a fine coil of thin tungsten wire round a dowel to act as his filament, before bringing a pair of enameled copper wires through holes drilled in the base of the bottle and out of the neck. The ends of these wires are then spliced to his filament and secured with conductive epoxy before the whole assembly is carefully slid back into the bottle. The holes are caulked with silicone, and the bottle is then carefully charged with argon. Argon is heavier-than-air, so he can do this on the bench with nothing more than a bicycle tube inflator and a drinking straw. The bottle is then sealed with a cork and more silicone, and his bulb is ready.

The first power-up with 120V mains power sees a puff of smoke inside the bottle as a coating on the tungsten is vapourised, but after that the bulb does its job well. He’s concerned about his epoxy melting, and the filament has moved to one side of the bottle so he’s not sure about the lifetime he can expect, but to make a working light bulb with such basic equipment is still an impressive accomplishment. His video below the break is eleven and a half minutes long, but well worth watching every minute.

Continue reading “The Champagne Of Light Bulbs”