Cute Brass Lunar Lander Is A Neat Little Environment Monitor

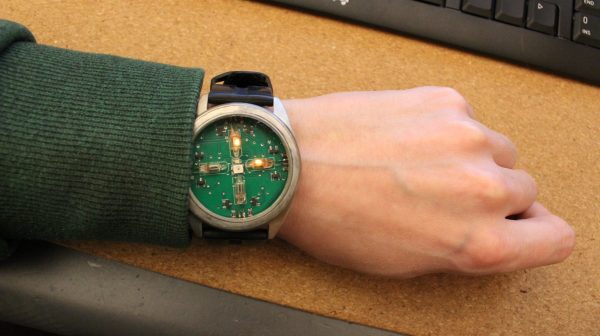
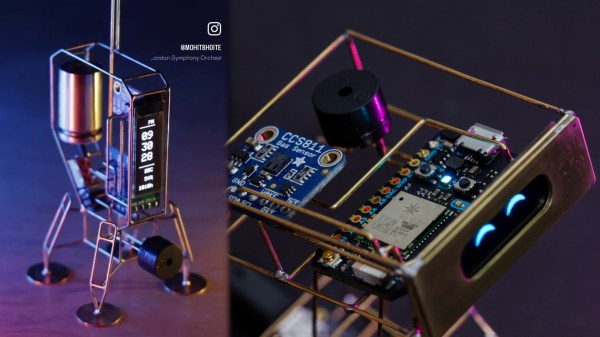
Sometimes form can make a project more attractive than its simple function. [Mohit Bhoite]’s free-form builds are great examples of this. His latest effort is a gorgeous little device that displays environmental readings, and it’s shaped like a lunar lander. (Nitter) Just exquisite!

The device is based around a Seeedstudio XIAO nRF52840 dev board. It’s hooked up to a BME280 sensor which delivers temperature, humidity and air pressure readings from the immediate environment. These readings are displayed on a tiny 128×32 OLED display, along with the current time. Power is via a compact 14250 lithium cell.

So far, so simple, but the real magic is in the housing. It’s a wireframe lunar lander lookalike which [Mohit] put together using brass wire and some careful soldering. It adds so much to the build, which wouldn’t be nearly as attractive if just assembled on a PCB. It’s not his first rodeo, either. He previously built a cute device (Nitter) with an animated face in 2019 using similar techniques; it used a CCS811 gas sensor to detect air quality.

Often, we find ourselves falling most in love with devices that please the eye. [Mohit] certainly demonstrates a great skill in building things that fit this brief. Sometimes, it only takes a bit of thought and careful application of the mind to bring a beautiful aesthetic to your projects, and the results can be most rewarding. Try his Hackaday Supercon talk if you want to learn more. Continue reading “Cute Brass Lunar Lander Is A Neat Little Environment Monitor”

How To Spend A Million Dollars On The Ultimate Stereo

We’ve all seen the excesses that the Golden Ears set revel in; the five-figure power conditioning boxes, the gold-plated HDMI cables. As covered by the Washington Post, however, [Ken Fritz] may have gone farther than most. Before he passed away, he estimated that he spent a million dollars on the greatest possible hi-fi setup he could imagine.

There’s plenty of hardcore gear in the rig. Massive cabinets loaded with carefully-tuned speaker drivers. A $50,000 record player built into a 1,500-pound weighted base for the utmost in stability and vibration resistance. Expensive cartridges, top-tier reel-to-reel decks, and amplifiers worth more than most used cars.

As the piece explores, [Fritz] knew that none of that was enough. Sound is all about the space as much as it is the equipment. Thus, the family home itself was transformed to become the ultimate listening environment in turn. The listening room got everything from concrete floors and its own HVAC and electrical systems. Much of the equipment was custom built to avoid wasting money on overpriced name-brand gear. The story of the kit was also the subject of a documentary shared online, by the name of One Man’s Dream.

The piece examines what goes into a top-tier setup like this, while also exploring the human cost that [Fritz’s] passion had on him and his family. The ending is sad and brutal in a way you wouldn’t think a story about hi-fi gear ever could be.  It’s an education in more ways then one, and teaches us that it’s worth keeping an eye on the rest of our lives while pursuing what we enjoy the most. Video after the break.

Continue reading “How To Spend A Million Dollars On The Ultimate Stereo”

A Dim Bulb Tester Is For Testing Other Equipment, Not Bulbs

If you’re testing old stereo equipment, a dim bulb tester can really come in handy. It’s not for testing bulbs, though, it’s a tester that uses a dim bulb to test other things. [Nicholas Morganti] explains it all in his guide to making your own example of such a tool. Just be wary — you need to know what you’re doing with mains voltages to do this safely!

The dim bulb is a deceptively simple tool that nonetheless often proves useful in diagnostics. It normally just consists of a bulb connected in series with the equipment under test. The bulb is intended to be a similar wattage to the power draw of the equipment itself. Take for example, an amplifier. If the bulb glows brightly when the amp is under no load, it suggests there may be a short circuit somewhere. That’s because the glowing bulb indicates that plenty of current is being drawn under a condition when very little should be flowing. The bulb protects the equipment by essentially acting as a bit of a current limiting device. It’s a soft-start tool for a piece of vulnerable equipment.

Building one is usually as simple as gathering an enclosure, a plug receptacle, a bulb socket, and some other ancillary parts to lace everything together. [Nicholas] explains it all with clear diagrams and tells you how to follow along. It’s easy enough, but you really need to know what you’re doing to use one safely, as mains voltages are involved.

It’s a great tool to have if you’re getting into amplifier repair or similar work on old gear. If you’ve been whipping up your own must-have tools, don’t hesitate to let us know!

Neon Watch Glows Rather Nicely, Tells Time

It wasn’t long after the development of the LED that LED watches became available. They were prized for their clear light output and low power draw. Neon bulbs, on the other hand, are thirsty for current and often warm or even hot in operation. And yet, [Lucas] found a way to build them into a sweet watch that actually does the job. Nice, right?

The design uses a simple trick to avoid killing the batteries with excessive power draw. The neon lamps are only activated when the user waves a hand above the watch, at which point the lamps light to display the time. Reading the time is  a little fiddly, but understandable with the aid of this PDF diagram. Basically, the two electrodes of each neon lamp are driven independently. This gives each of the four lamps three possible states: with the first electrode lit, the second electrode lit, or both lit. Four lamps multiplied by three states equals 12—so the watch can display the hour quite easily. As for minutes, a similar scheme is used with some modifications for clarity. Setting the time is via a light sensor on the watch which picks up flashes from a computer screen.

It reminds us of a time when we once thought nixie tubes were too power hungry for a wristwatch build… until the hackers of the world proved us wrong. Video after the break.

Continue reading “Neon Watch Glows Rather Nicely, Tells Time”

Blastoise Humidifier Shows Us You Don’t Need A 3D Printer If You’re This Good With A 3D Pen

[3D SANAGO] is a bit of a master when it comes to using a 3D-printing pen. Their latest work involved fixing a broken humidifier and giving it a Pokemon-themed makeover. It’s an education in just what can be achieved with a tool many of us write off as a simple novelty.

The basic idea of the build was to create a Blastoise figurine that serves as a humidifier. Work starts with marking out a basic outline on a round stone. The 3D pen is then used to create a tortoise shell with the appropriate concave shape, directly on the rock. [3D SANAGO] also demonstrates how a simple plastic framework can be heated with a blowtorch and shaped around the rock as needed to generate gentle curves. Meanwhile, a simple marker pen serves as a form for creating the gun barrels on Blastoise’s back. The legs are built with a similar technique, but with expert manipulation with a blowtorch to turn them into stubby muscular forms.

The full figurine is built up in stages, with individual wireframe components assembled into a complete body. The gaps in the frame are then filled in by hand, which takes a long time; [3D SANAGO] calls it “the most boring for sure.” Plenty of post-processing is then done with various sanding tools and a bladed tip on a soldering iron. The latter is used as the melting action allows the creation of a smooth final surface. In contrast, subtractive methods like sanding would leave holes and divots that need to be filled in before painting. There’s plenty of sealing to be done before paint, too, to ensure the interior of Blastoise can hold water without leaking. Then, the internal componets are installed and the body finished to its final cartoon form. In case you’re wondering, [3D SANAGO] says that sanding took 2-3 days to get such a great result.

If you really dig it, it’s on display at [3D SANAGO’s] cafe in Daejeon. Overall, it’s amazing to see such craftsmanship with a 3D pen. A resin printer could obviously print a wonderful Blastoise of similar quality, but there’s something about watching the level of human skill in this that’s just compelling. Video after the break.

Continue reading “Blastoise Humidifier Shows Us You Don’t Need A 3D Printer If You’re This Good With A 3D Pen”

Fan With Automatic Door Is Perfect For Camper Vans

Ventilation fans are useful for clearing stuffy or stale air out of a space. However, they also tend to act as a gaping hole into said space. In the case of caravans and RVs, an open ventilation fan can be terrible for keeping the interior  space warm, quiet, and free from dust. “Blast doors” or fan blocks are a common way to solve this problem. [Raphtronic] whipped up a duly-equipped ventilation fan to do just that.

The solution was to create a fan setup with a custom fan holder and a sliding door to block airflow when necessary. [Raphtronic] designed a fan frame for this purpose using parts 3D printed in ASA plastic. This material was chosen such that they could readily withstand the 50 C (120 F) temperatures typical in his Ford Transit camper during the summer. A simple 12 V ventilation fan was then fitted to the frame, along with a sliding door controlled by a 12 V linear actuator.

The mode of operation is simple. A DPDT switch controls the linear actuator. Flipped one way, the linear actuator is fed 12 V in such a polarity as to move it to open the fan door. In this mode, 12 volts is also supplied to the fan to start ventilation. When the switch is flipped the other way, the actuator moves to the closed position, and a diode in the circuit stops the fan spinning backwards. As a bonus, limit switches are built into the linear actuator, so there’s no need for any microcontrollers, “off” switch positions, or additional wiring.

It’s a tidy solution to the problem of ventilating a camper in a clean and effective manner. Files are on GitHub for those wishing to build their own. We’ve seen some great work in this area before, like this off-grid van project that made excellent use of 3D scanning during the build process. If you’ve designed and built your own nifty camping gear, don’t hesitate to drop us a line!

Check Out This PDP-11 Running Unix With A Teletype Terminal

If you’ve spent a few years around Hackaday, you’ve probably seen or heard of the DEC PDP-11 before. It was one of the great machines of the minicomputer era, back when machines like the Apple ][ and the Commodore 64 weren’t even a gleam in their creator’s eyes. You’ve also probably heard of Unix, given that so many of us use Linux on the regular. Well, now you can see them both in action, as [HappyComputerGuy] fires up real Unix on a real PDP-11/73… with a real Teletype Model 33 to boot!

It’s a fascinating dive into the tech of yesteryear, with a rich dose of history to boot. It’s mindboggling to think that video terminals were once prohibitively expensive and that teletype printers were the norm for interacting with computers. The idea of interacting with a live machine via a printed page is alien, but it’s how things were done! We’re also treated to a lesson on how to boot the PDP-11 with 2.11BSD which is a hilariously manual process. It also takes a very long time. [HappyComputerGuy] then shows off the Teletype Model 33 rocking the banner command to great effect.

It’s awesome to see this hardware as it would really have been used back in its heyday. Computing really was different before the microcomputer format became mainstream. It’s not the only PDP-11 we’ve seen lately, either! Video after the break.

Continue reading “Check Out This PDP-11 Running Unix With A Teletype Terminal”