Hacking A Proper Dash Into The Tesla Model 3

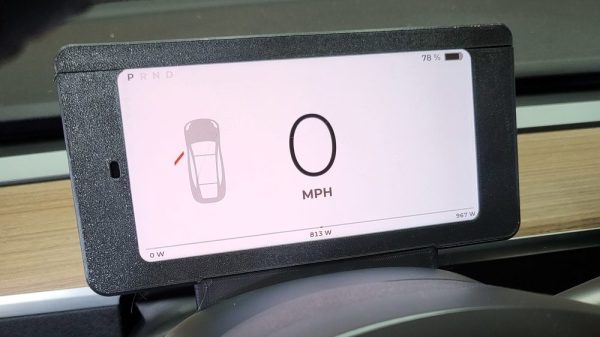
The Tesla Model 3 and Model Y are popular electric vehicles that dispense with some of the usual provisions you’d expect in a typical car. Namely, there’s no dash cluster in front of the driver; instead, all information is solely displayed on the center console screen. [Nick Nguyen] wasn’t a fan of this setup, and decided to hack together a dash cluster of his own. 

The CANdash works in a simple fashion, snooping the Tesla’s CAN bus for all the information relevant to the vehicle’s operation. It’s capable of displaying everything from speed to the remaining range in the battery, while also allowing the user to keep an eye on things like coolant temperatures and whether the Tesla Autopilot system is currently available.

The build relies on a CANserver, an ESP32-based device specifically built for hooking up to the CAN bus on Tesla vehicles and sharing the data externally. The data can then be piped wirelessly to an Android phone running CANdash to display all the desired information. With the help of an aftermarket dash clip or a 3D printed custom mount, the phone can then be placed behind the steering wheel to display data in the usual location.

It’s a simple, straightforward hack that gives Tesla owners a useful feature that they’re otherwise missing from the factory. The US automakers cars are proving to be fertile ground for hackers and DIYers, with one man recently saving thousands on a battery swap with a simple mod. Video after the break.

Continue reading “Hacking A Proper Dash Into The Tesla Model 3”

Recreating MS Paint For The ESP32

Microsoft Paint was one of the first creative outlets for many children when they first laid hands on a computer in the 1990s. Now, [Volos Projects] has brought the joy of this simple application to a more compact format on the ESP32!

The GUI is a fair bit simpler than even the Windows 3.1 version of MS Paint, looking a little more like something from the very early GUI era. Regardless, one can draw simple shapes in block colors just like the old days, with a pair of potentiometers to move the cursor and twin tactile buttons for selecting tools and committing changes to the canvas.

The build shows that even a 1.3″ 240×240 TFT display can display some charming, colorful graphics, and realistically it’s not far off the resolution most computers had in the late 80s anyway.  We’d love to see the software get some more tools too, like the spray can and brushes that were such a key part of the MS Paint experience. Code is available for those eager to play with ES Paint 32 for themselves.

It bears noting that despite some claims to the contrary, MS Paint isn’t dead. Incidentally, if you’re a masochist, you can even program in everybody’s favorite Windows-bundled art program. Video after the break.

Continue reading “Recreating MS Paint For The ESP32”

Pocket-Sized Doom Is Actually Playable

It used to be that you needed a well-equipped expensive new beige-box PC if you wanted to play Doom at all. Now, you can do so in a form factor with a footprint smaller than a credit card, as demonstrated by this nifty little build from Adafruit.

The build relies on the Retro-Go firmware for ESP32 devices, which can emulate a range of machines, from the Nintendo NES and Game Boy to the NEC PC Engine, Atari Lynx, and, yes, Doom itself. It can even run Doom mods, via the WAD architecture used by the game.

It was a simple matter of porting Retro-Go to run on the tiny QT Py ESP32 Pico board, and everything fell into place. With six tactile buttons, it’s capable of not just running Doom, but running it at full playable speeds including that classic soundtrack. The 1.3″ 240×240 screen looks surprisingly crisp and does a great job of displaying the game while keeping everything readable.

It’s one of the smaller Doom-capable portables we’ve seen; we reckon you could stuff this in the change pocket in your jeans if you tried hard enough. We’ll never quite get over seeing the world’s most loved FPS running on commercial kitchen hardware, though. Video after the break.

Continue reading “Pocket-Sized Doom Is Actually Playable”

Building Switching Points For A Backyard Railway

A home-built railway is one of the greatest things you could possibly use to shift loads around your farm. [Tim] and [Sandra] of YouTube channel [Way Out West] have just such a setup, but they needed some switching points to help direct carriages from one set of rails to another. Fabrication ensued!

The basic layout of the railway points.

The railway relies on very simple rails made with flat bar and angle iron, allowing the railway to be built without a lot of heavy blacksmithing work. For a light-duty home railway, these are more than strong enough to do the job.

As for the points, a simple V-shaped frog-and-blade design was used. The frog is the V-shaped section where the rails diverge into two directions, sitting in the center of the Y, while the blade is the part that moves to either side to guide the carriages in one way or t’other.

The blade consists of a 2.2 meter long piece of angle iron with a pin welded on, allowing it to pivot. Two pieces of flat bar were then welded together with a pin to make the frog. Two metal bushes were then forced into a wooden sleeper, allowing the blade to pivot as needed. The rails themselves are slightly kinked as needed and everything tacked down into sleepers with bolts and pipe pegs.

The design runs smoothly, much to [Tim]’s enjoyment. It’s a clear improvement over the earlier design we looked at least year.

There’s something inherently charming about a railway built with little more than wood, metal, and hammers. Seeing the little stone wagon run down the rails to bed in the sleepers is utterly joyful in a way that’s difficult to fully explain. Video after the break.
Continue reading “Building Switching Points For A Backyard Railway”

Reverse Engineering The NeXT Computer Keyboard Protocol

The NeXT computer was introduced in 1988, with the high-end machine finding favor with universities and financial institutions during its short time in the marketplace. [Spencer Nelson] came across a keyboard from one of these machines, and with little experience, set about figuring out how it worked.

The keyboard features a type of DIN connector and speaks a non-ADB protocol to the machine, but [Spencer] wanted to get it speaking USB for use with modern computers. First attempts at using pre-baked software found online to get the keyboard working proved to be unreliable. [Spencer] suspected that the code, designed to read 50 microsecond pulses from the keyboard, was miscalibrated.

Some analysis with an oscilloscope and logic analyzer allowed [Spencer] to figure out the keyboard was communicating with pulses ever 52.74 microseconds, corresponding to a frequency of 18.960 kHz, sending two 9-bit messages at a time. Disassembling the keyboard confirmed these findings – inside was a 455 kHz clock, with the keyboard sending a signal every 24 ticks producing the 18.960 kHz output.

Reworking the initial code found online to work with the actual pulse widths coming from the keyboard got everything humming along nicely. Now, [Spencer] has a nice vintage keyboard with excellent feel that reliably works with modern hardware. We’d call that a win.

If you need more of a fix, be sure to dive into Keebin’ with Kristina, a regular column all about our favorite tactile input devices!

Exercise Bike Hacked As Input For Xbox 360

If you like playing Grand Theft Auto, you’re pretty familiar with squeezing the triggers for accelerating and braking while driving around. [David Programa] decided this was too easy, and instead developed a system to allow him to pedal his way around the virtual world.

The device relies on a flywheel-based exercise bike, with six magnets placed on the flywheel that triggers a reed switch six times per rotation. The extra magnets give the system better resolution at slow speeds. A Hall Effect sensor would be a more reliable way to build this to survive in the long term, but the reed switch does work. It’s paired with a debounce circuit to keep the output clean. A Raspberry Pi is pressed into service, running a Python program to read a GPIO pin activated by the reed switch, counting pulses to determine the speed of pedalling.

The trigger control used in the Xbox 360 controller is a potentiometer that creates varying voltages depending on its position, allowing it to act as an analog accelerator input. 0 volts corresponds to no input, while the trigger reads 3.3 volts when fully depressed. The Raspberry Pi emulates this with its PWM output, paired with a low-pass filter to create the relevant voltage to inject into the trigger input on a generic Xbox 360 controller.

While it’s a lot less practical than simply using a regular controller, the pedal controls do allow you to get a great workout while playing Grand Theft Auto. Some of the more intense chase missions should be a great way to get your heart rate up, and that’s got to be a good thing.

Ironically, though, the system only works for cars and motorbikes in game. The bicycles in Grand Theft Auto are controlled by mashing the A button instead. Alternatively, you might consider a similar system for playing Mario Kart on the Nintendo Switch. Video after the break.

Continue reading “Exercise Bike Hacked As Input For Xbox 360”

Building A Lightsaber And Scoring A World Record, Too

As we all know, the lightsaber is an elegant weapon, for a more civilized age. [Alex Burkan] is doing what he can to bring that technology to fruition, and even secured a Guinness World Record in the process.

Melty melty.

The build relies on an electrolyzer, splitting water into hydrogen and oxygen gas which is stored in a small tank. This gas can then be released and combusted in a burning stream, creating a weapon with a vague resemblance to a movie-spec lightsaber. With the hydrogen torch burning at temperatures of thousands of degrees, it’s hot enough to melt steel just like in the films.

While the concept of operation is simple, actually building such a device in a handheld size is incredibly difficult. [Alex] highlights key features such as the flashback arrestor that stops the gas tank exploding, and the output nozzle that was carefully designed to produce a surprisingly long and stable flame.

The resulting device only burns for 30 seconds, so you’ve only got a short period of time to do what you need to do. However, unlike previous designs we’ve seen, it doesn’t use any external gas bottles and is entirely self-contained, marking an important step forward in this technology. Video after the break.

Continue reading “Building A Lightsaber And Scoring A World Record, Too”