Automatically Sorting Beads By Color

beadsorter

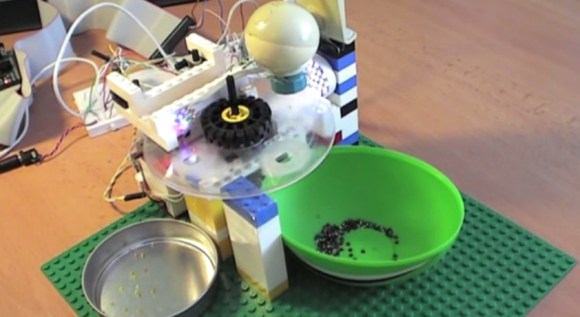
[Tomas] wanted to try building something mechanical with electronic control, and ended up with this sorter that organizes beads into one of two containers based on color. He built most of the structure from popular interlocking plastic bricks, then added a stepper motor salvaged from an old scanner and two plastic discs.

The two discs sit on top of each other. The bottom one is stationary and has two holes drilled in it, with a container sitting below each hole. The top disc has a smaller, bead-sized hole and rotates from its starting position—where it collects one bead—to a camera for analysis. After the camera determines the color of the bead, the disc rotates again to position itself over one of the two sorting holes in the disc below, and the bead falls into the awaiting container. The device is controlled by the MSP430 microcontroller on a FITKit (translated), which is the development platform of choice for [Tomas’s] school.

[Tomas] originally attempted to determine the color of beads by using 3 different color LEDs and a light-dependent resistor, but switched to using a webcam and a Java program to capture images and calculating average hues. You can find more details and the source code on his site, but first see the short video below.

Continue reading “Automatically Sorting Beads By Color”

3D Printed Netduino Remote Controlled Car

netduinocar

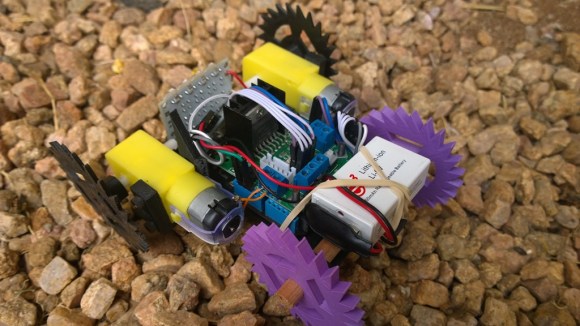
[Matt] lives in South Africa, where homes have smallish crawlspaces (some only 30cm high!) that he can’t quite squeeze himself into. Even if he could, he probably wouldn’t: they’re apparently vacation homes for the local rats. He did, however, want to explore these spaces to get a better idea what’s going on inside, so he built a Windows Phone-controlled car with a Netduino and 3D-printed parts.

Such a specialized application requires unique parts, so [Matt] designed and 3D-printed the wheels and frame from scratch. You’ve probably noticed that the wheels aren’t your typical cylinders. The terrain [Matt] faces is sand, so the spiked shape provides better grip. The body’s design required extra attention because it holds the motors, the Netduino, the motor driver, and the battery.

A Bluetooth module connects to the Netduino and allows [Matt] to drive the car with his Windows Phone, and an inexpensive 5V LED board provides some light for those dark corners. How does it see once inside the crawlspace? It looks like [Matt’s] getting to that part. His plan is to simply mount a second phone running Skype and watch the stream. Stick around after the break to see [Matt] use the car to both confuse and excite his dog.

Continue reading “3D Printed Netduino Remote Controlled Car”

Low-Power SMD Fireflies

lowpowerledfireflies

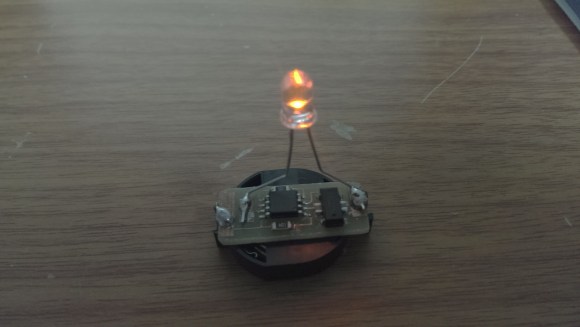
[Tyson’s] family went with creating rather than buying Christmas presents last month, which gave him the opportunity to build some electronic fireflies for gifts. He drew inspiration from a similar firefly project we featured last year, but expanded on the original model by designing dedicated PCBs and housings for each of his firefly pieces.

Although he’d settled on using ATTiny85’s for this project, [Tyson] was fresh out of through-hole versions. He decided to skip the prototyping phase and go right for fabrication, cranking up the laser-jet printer for some toner-transfer, which successfully produced 4 functioning boards (and 3 failures). The fireflies were [Tyson’s] first attempt at SMD soldering, and we’d have to say it’s a job well done; he reflowed each board with a cheap-o heatgun from Harbor Freight.

After some hiccups with fuse programming, [Tyson] got the code uploaded and the fireflies illuminated.  Swing by his site for the nuts and bolts on construction, then snag the project files here. (Direct .zip download)

3D Printed Guitar

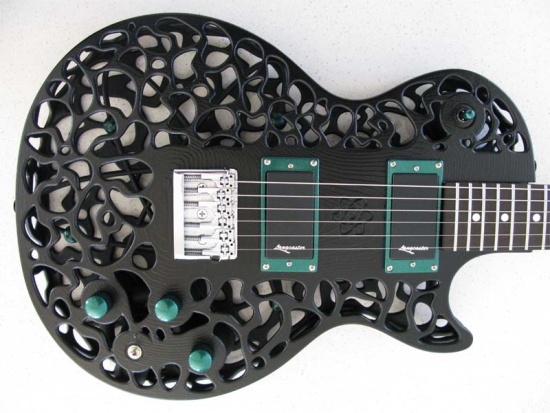
We’re not sure how we missed this one, but it definitely deserves a look. Professor of Mechtronics [Olaf Diegel’s] 3D printer must go to 12, because he’s printed these incredible electric guitar bodies. You probably won’t be making your own on your filament printer, however, because [Diegel] uses SLS (Selective Laser Sintering) to create the body out of nylon, then he dyes the resulting piece in a two-step process. You can read more about the construction specifics on his website.

And, they’re more than just eye-candy: the guitars sound brilliantly metallic. There are more than enough pictures and videos to keep you occupied on the site, where you can sift through all eight designs to your heart’s content. You’ll want to keep reading for a couple of videos embedded after the break, which feature some demonstrations of the guitar and comparisons to traditional electric guitars, as well as a brief history of its construction and build process.

Continue reading “3D Printed Guitar”

AVR Barn Door Tracker For Astrophotography

zzjBarnDoorTracker

[ZigZagJoe’s] first foray into astrophotography is this impressive AVR barn door tracker, which steps up his night sky photo game without emptying his bank account. If you’ve never heard of astrophotography, you should skim over its Wikipedia page and/or the subreddit. The idea is to capture images otherwise undetectable by the human eye through longer exposures. Unfortunately, the big ball of rock we all inhabit has a tendency to rotate, which means you need to move the camera to keep the night sky framed up.

Most trackers require precision parts and fabrication, which was out of [ZigZagJoe’s] grasp. Instead, he found a solution with the Cloudbait Observatory model, which as best as we can tell looks vaguely similar to the tracker we featured last year. Unlike last year’s build—which uses an ATmega32u4 breakout board— [ZigZagJoe’s] tracker uses an ATTiny85 for the brains, running a pre-configured table that determines step rate against time.

Continue reading “AVR Barn Door Tracker For Astrophotography”

GPS Engagement Ring Box

gpsEngagementRingBox

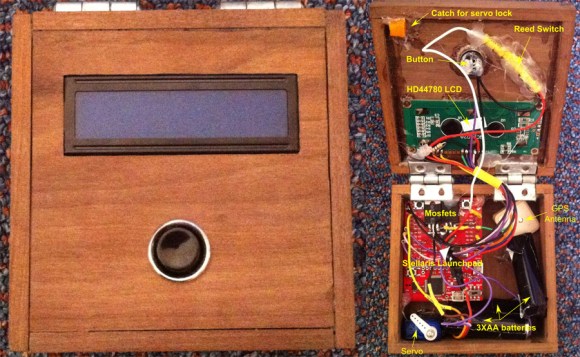
[James] got engaged recently, in part thanks to his clever GPS Engagement Ring Box, and he sent us a brief overview of how he brought this project to life. The exterior of the box is rather simple: one button and an LCD. Upon pressing the button, the LCD would indicate how far it needed to be taken to reach a pre-selected destination. After carrying it to the correct location, the box would open, revealing the ring (and a bit of electronics).

Inside is a GPS antenna and a Stellaris Launchpad, which are powered by three Energizer lithium batteries to ensure the box didn’t run out of juice during the walk. To keep the lid closed, [James] 3D printed a small latch and glued it to the top of the box, which is held in place by a micro servo. Once the box reaches its destination, the microcontroller tells the servo to swing out of the way, and the box can then open. As a failsafe, [James] added a reed switch to trigger an interrupt to open the box regardless of location. It seems this was a wise choice, because the GPS was a bit off and the box didn’t think it was in the correct place.

Swing by his blog for more information on the box’s construction and the wiring. We wish [James] the best and look forward seeing his future hacks; perhaps he’ll come up with some clever ones for the wedding like our friend Bill Porter.

Finding The Fix For A Dimmed 27″ IMac Screen

machack27

Like many with a 27″ iMac, [Gerry’s] been experiencing some screen brightness issues. According to him, Apple’s been largely ignoring the problem and the community’s outcry, which led to [Kaos2k] poking around inside to hack together a fix. It’s a solution clearly born from trial and error; [Kaos2k’s] initial post on the issue simply recommending “applying pressure” to the panel itself, which would sometimes cause the dim screen to spring back to life.

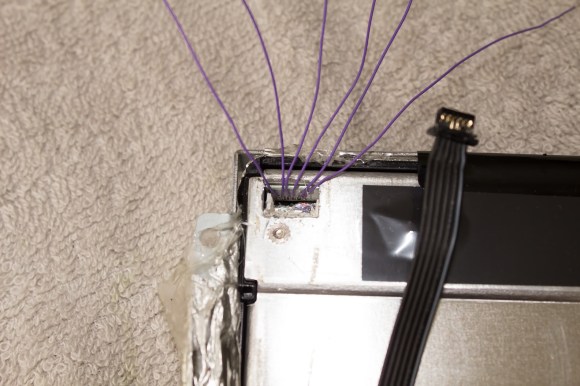
It turns out that heat (or stress, or something) from the screen causes the solder joints to weaken on the board where a 6-pin connector hooks up, dimming the screen to eye-strain levels. Some Mac users are suing over it, because the problem tends to show up just outside of the warranty window and affects a large number of people. [Kaos2k], however, provided the much needed solution for those looking to get the fix over with: just solder the cable directly to the board. Our tipster, [Gerry], has documented his experiences over at his blog, and was kind enough to make a step-by-step video of the repair, which you can see after the break.

Continue reading “Finding The Fix For A Dimmed 27″ IMac Screen”