Bus Stop Bloom Filter

Imagine you’re sitting on a nice bench, the sun shines warmly, and a bus pulls up. You’re headed to Stendal from Osnabrück, how can you tell if you should get on that bus? [Julian Vanecek] is trying to turn that from an O(n) problem to an O(1) one with a Bloom filter right at the bus stop.

In [Julian’s] sample code, each stop is a 3-bit number that can be encoded into a 192-bit array. Your ticket is just that 3-bit number encoded, so you can look at the graphic on the side of the incoming bus, match it against your ticket, and hop on. Gone are the days of waiting for the little LED screen to cycle through all the stops, waiting for yours to come up. Your ticket should have just a few boxes filled in so it is relatively quick to search against the bus’s graphic.

Of course, there is a potential for a false positive rate. [Julian] points out that this can be tuned to prevent errors and has achieved a < 0.5% false positive rate using the Deutsche Bahn bus system. The code is written in Python and available on GitHub. Perhaps buses could have a large flip-dop display on the side, to adjust to show which stops they’re headed to next. Additionally, it doesn’t encode which stops are next, just which stops the bus will eventually go to.

In the video after the break, [Julian] explains how the system works. Whether it would be ultimately adopted is somewhat beside the point. We love the seeing people re-imagining ideas and trying to apply new techniques to improve the things around them.

Continue reading “Bus Stop Bloom Filter”

Why LLaMa Is A Big Deal

You might have heard about LLaMa or maybe you haven’t. Either way, what’s the big deal? It’s just some AI thing. In a nutshell, LLaMa is important because it allows you to run large language models (LLM) like GPT-3 on commodity hardware. In many ways, this is a bit like Stable Diffusion, which similarly allowed normal folks to run image generation models on their own hardware with access to the underlying source code. We’ve discussed why Stable Diffusion matters and even talked about how it works.

LLaMa is a transformer language model from Facebook/Meta research, which is a collection of large models from 7 billion to 65 billion parameters trained on publicly available datasets. Their research paper showed that the 13B version outperformed GPT-3 in most benchmarks and LLama-65B is right up there with the best of them. LLaMa was unique as inference could be run on a single GPU due to some optimizations made to the transformer itself and the model being about 10x smaller. While Meta recommended that users have at least 10 GB of VRAM to run inference on the larger models, that’s a huge step from the 80 GB A100 cards that often run these models.

While this was an important step forward for the research community, it became a huge one for the hacker community when [Georgi Gerganov] rolled in. He released llama.cpp on GitHub, which runs the inference of a LLaMa model with 4-bit quantization. His code was focused on running LLaMa-7B on your Macbook, but we’ve seen versions running on smartphones and Raspberry Pis. There’s even a version written in Rust! A rough rule of thumb is anything with more than 4 GB of RAM can run LLaMa. Model weights are available through Meta with some rather strict terms, but they’ve been leaked online and can be found even in a pull request on the GitHub repo itself. Continue reading “Why LLaMa Is A Big Deal”

Haptick: The Strain Gauge Based 6DoF Controller

Six degrees of freedom (6DoF) controllers are used for manipulating an object in a CAD or 3d modeling program and are often called spacemice. You can twist it, push it, and even bop it. Most work with optical encoders, shining an LED through a slit to some form of photodetector on the other side. [Matthew Schubert] wanted to make his own spacemouse, but had some new ideas of how to go about it. His two-part project, dubbed haptic, focuses on measuring the forces, not the displacement.

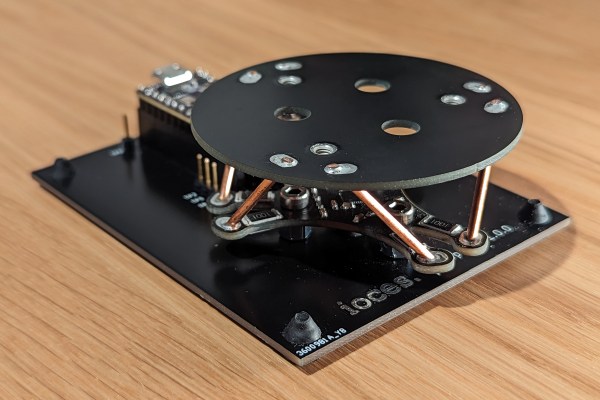
He decided to try thick-film resistors as strain gauges and revisit load cells and proper strain gauges later. The actual structure quickly converged on the Stewart Platform, formed from three custom PCBs. A base to sit on, a knob for the top, and a middle board designed to take the strain with SMD resistors. A Teensy 3.2 talks to the ADS131M06 ADC and streams 4k samples per second to the host computer via serial. For prototyping, the calculations were done on the PC. Continue reading “Haptick: The Strain Gauge Based 6DoF Controller”

Creating GIFs For The Channels Between Channels

In the United States, analog TV broadcasting officially ended in 2009. While the transition wasn’t without hiccups, we did lose something along the way. For [Emily Velasco], she misses the channels between channels — where an analog TV isn’t quite tuned right and the image is smeared and distorted. A recent bug in one of her projects led to her trying to recreate the experience of the in-between on a CRT.

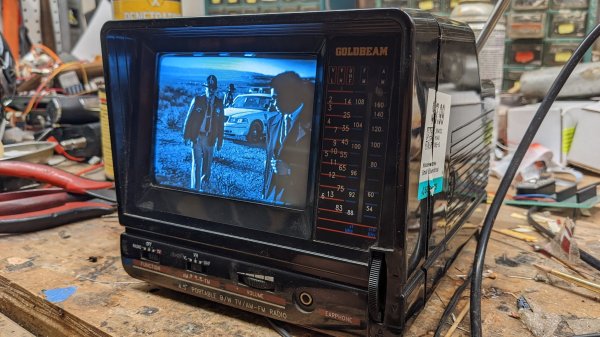
One of [Emily]’s other projects involved generating composite video signals from an ESP32 microcontroller. While experimenting with adding color to the output signal, the image came out incredibly scrambled. She had made an error in the stride, which smeared the image across the screen. This immediately brought back memories of old analog TV sets. A quick potentiometer allowed her to control the stride error and she wrote some code to break the GIF up into discrete bitmaps for display since the GFX library handles GIFs differently than static images. Next up was vertical hold, which was accomplished by shifting the Y coordinates. With some help from [Roger], there was now a handy GIF library that would draw GIFs line by line with the composite video effects.

She used a Goldbeam portable CRT, soldered the tuning potentiometer to the ESP32, and set up 10 different GIFs to act as “channels” with space in between. It’s a fun and quirky idea, which is exactly the sort of thing [Emily] has been encouraging people to do.

Continue reading “Creating GIFs For The Channels Between Channels”

Wooden ITX PC Case Smacks Of Sophistication

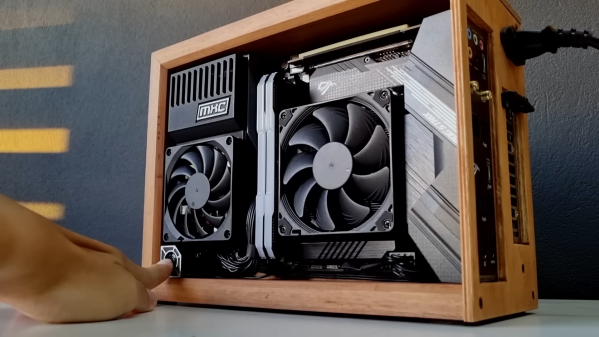
Computer cases have come a long way from the ugly beige boxes of the early 2000s. Still, if it was going to sit on his desk, [MXC Builds] wanted something with a little more class. His custom Ironbark ITX PC seems to fit the aesthetic nicely.

The case’s outer shell is ironbark wood cut at 45 degrees and joined for a beautiful waterfall edge (the wood grain seems to flow uninterrupted). The power supply was heavily modified to take a thinner but larger fan, and a new cover and intake grill were 3D printed. As there were no mounting holes on the bottom of the power supply, he printed a bracket with spring clips to hold the PSU securely. Next, he routed a PCI riser cable to the other side of the internal panel so the GPU could mount on the back. He cut custom cables to match up the lengths needed for every run. Finally, rather than placing the power button on the front or top, it was on the side in a custom bracket.

It’s an absolutely gorgeous build that packs some respectable hardware in a tiny space (7.9 L or ~482 in3). The use of 3D printed parts and careful planning results in an incredibly tidy computer that most would proudly display on their desk. It is an open-air case, and if you’re looking for something a little more enclosed, perhaps this mid-century PC might whet your appetite.

Continue reading “Wooden ITX PC Case Smacks Of Sophistication”

E-Paper Wall Paper

Just like the clock clock of old, there’s something magical about a giant wall of smaller pieces working together to make a larger version of that thing. The E-Paper Wall 2.0 by [Aaron Christophel] is no exception as it has now upgraded from 2.9″ to 7.4″ screens.

On the 1.0 version, the bezels made it harder to make out the image. The larger screens still have bezels but the larger screen area makes it much easier to make out the image. 3D-printed clips hold the displays onto a plywood backer. We can marvel that e-ink price tags brought the price of e-ink down so that building a wall is still expensive but not eye-wateringly so. The 5×9 array likely uses a module sold on DigiKey for $47 each.

So aside from being willing to drop some money on a custom piece of art, what’s special about this? The real magic comes with the firmware and tooling that [Aaron] developed to flash custom firmware onto each of the 45 displays. A 100MHz ZBS243/SEM9110 8051-based controller lives inside each display and [Aaron] even has a Ghidra plugin to reverse-engineer the existing firmware. It only has 64kb of flash onboard, so [Aaron] devised a clever compression technique that enabled him to store complex images on the displays. A 3D-printed jig with pogo pins means flashing them doesn’t require soldering pins or headers, just drop it on and flash it with an Arduino with a helpful library [Aaron] wrote. A central station communicates with the various displays over ZigBee to send image updates.

The 8051 has a funny way of showing up in projects like this portable soldering iron or the TV Guardian. In many ways, it is a boon for us hackers as it makes it easier to reverse engineer and write new custom firmware when so many devices use the same architecture.

Continue reading “E-Paper Wall Paper”

A Smart Home That CAN Do It All

In an ideal smart home, the explosion of cheap WiFi and Bluetooth chips has allowed hundreds of small wireless devices to control the switches, lights, and everything else required for a “smart home” at a relatively low price. But what if you don’t want hundreds of internet-connected devices in your home polluting the wireless spectrum and allowing potential security holes into your network? If you’re like [Lucas Teske], you might reach for something wired and use cheap and (currently) available Raspberry Pi Picos to create PicoHome.

The unique twist of PicoHome is that it uses a CAN bus for communication. One of [Lucas’] goals was to make the boards easily swappable when hardware failed. This meant board-to-board communication and protocols like I2C were susceptible to noise (every time a relay triggered, the bus would lock up briefly). The CAN bus is designed to work in an electrically noisy environment.

There are two parts to the system: pico-relay and pico-input. The first connects to a 16 relay board and can control 16 different 24v relays. The second has 16 optoisolators to read from 12v-24v switches and various buttons throughout the house. These can be placed in a giant metal box in a central wiring location and not worry about it.

The firmware and board files are all released under an Apache 2.0 license, but the CAN2040 library this project relies on is under GPL. We covered the CAN2040 library when it was first released, and it’s lovely to see it being used for something entirely unexpected.

Continue reading “A Smart Home That CAN Do It All”