Building The Sanni Cartridge Reader To Back Up And Restore Games And Saves

Game cartridges are generally seen as a read-only medium with the contents as immutable as text chiseled into a granite slab, and with accompanying save files on the cartridge surviving for generations. The unfortunate truth is that as with any media storage, cartridges can and do fail, and save files are often just ethereal bits in battery-backed SRAM. This makes being able to copy not only the game data but also the save files off these cartridges essential. Projects like the Open Source Cartridge Reader by [sanni] make this something that everyone can do.

Intended to be a kind of Swiss Army knife of game cartridges, many game systems are supported directly, and many others via (user-created) adapters. A how-to-build tutorial is provided on the project wiki, though anyone interested in building such a system would do well to look at the expected price tag on the BOM page, which comes in at $134. A recent video by [Kytor Industries] (also included below) demonstrates how to assemble one of these systems, including some modding of the preassembled components.

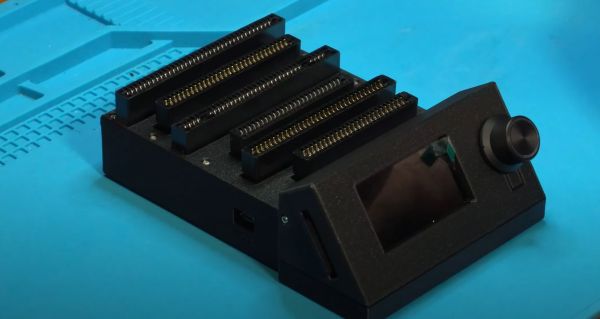
The main components are the Arduino Mega 2560 Pro MCU module, a Makerbase assembly with LCD, control knob, and SD card slot, an SI5351-based clock generator, a PIC12F629 MCU (for snesCIC and handling SNES DRM) and a lot of pin headers and card edge connectors for specific cartridge types. The assembly is rounded off with a surface-mounted GBA card reader and an enclosure.

One important gotcha is that some of these cartridges run on 5V, while others use 3.3V.  N64 cartridges require the dedicated voltage switch to be set to 3.3V, lest 5V gets sent into the unsuspecting cartridge. Once everything is configured properly, the firmware is flashed onto the Mega 2560 Pro module. The Sanni reader is then ready to run. You can use it to dump ROMs onto SD cards, along with dumping and restoring save files and loading ROMs onto new cartridges.

(Thanks to [Roman] for the tip)

Continue reading “Building The Sanni Cartridge Reader To Back Up And Restore Games And Saves”

Making Dry Ice At Home Is Just As Hard As It Sounds

Along the road to developing his own cryocooler to produce liquid nitrogen, there are a number of interesting rabbit holes [Hyperspace Pirate] has found himself taking a look at. For example, using dry ice for a pre-cooling stage and subsequently wondering what it’d take to make this dry ice oneself.

Getting the CO2 required for the dry ice is the easy part, requiring nothing more complicated than baking soda and a suitable acid (like hydrochloric acid). The other options to gather CO2 include using yeast, capturing the gas from the air people breathe out, calcium hydroxide, etc., none of which are as easy or convenient.

The acid is mixed with the baking soda, with the produced gas led through a bubbler and subsequent dehumidification stage before being collected. For the more involved part of getting dry ice, a bit more science is needed. First, a compressor is used to get pressurized CO2 into a previously evacuated tank at 160 psi (~12 bar). For the next phase the compressed gas has to be compressed further so that it condenses into a liquid. This involves a second compressor stage and a repurposed paintball tank. At the needed pressure of 1000 psi (69 bar), safety is essential.

With liquid carbon dioxide in the paintball tank, all it takes at this point is to turn the tank upside-down to get the liquid part near the exhaust valve and crank it open. Capturing the dry ice at this point is another fascinating challenge, which was partially solved by a 3D printed mold, with plenty of room for improvement still.

Given the cost and effort involved in producing it, just buying dry ice at the local store looks like it’s still the way to go for your Halloween fog machine this year. But it’s a fascinating experiment regardless, especially since it actually produced results — unlike some of the attempts we’ve covered previously.

Continue reading “Making Dry Ice At Home Is Just As Hard As It Sounds”

Supercon 2022: Alec Vercruysse Can See Through Murky Water

Detecting objects underwater isn’t an easy challenge, especially when things get murky and dark. Radio waves don’t propagate well, so most techniques rely on sound. Sonar is itself farily simple, simply send out a ping and listen for an echo, and that will tell you how far something is. Imaging underwater is significantly harder, because you would additionally need to know where each echo is coming from.

To answer the question of whether it is possible to put together an ultrasonic 3D imager that would cheaply enable anyone to image objects underwater, [Alec Vercruysse] and fellow team members at the Harvey Mudd College set out to create a system that does exactly that. You can read the presentation slides (PDF) or check out the entire project in the GitHub repository.

Continue reading “Supercon 2022: Alec Vercruysse Can See Through Murky Water”

Hacking A €15 8051-Based Portable Soldering Iron With Custom Firmware

With soldering irons being so incredibly useful, and coming on the heels of the success of a range of portable, all-in-one soldering irons from the likes of Waveshare and Pine64, it’s little wonder that you can get such devices for as little as 10 – 15 Euro from websites like AliExpress. Making for both a great impulse buy and reverse-engineering target, [Aaron Christophel] got his mittens on one and set to work on figuring out its secrets.

The results are covered in a brief video, as well as a Twitter thread, where this T12 soldering iron’s guts are splayed around and reprogrammed in all their glory. Despite the MCU on the PCB having had its markings removed, some prodding and poking around revealed it to be an STC8H3K62S2, an 8051-based MCU running at a blistering 11 MHz. As a supported PlaformIO target, reprogramming the MCU wasn’t too complicated after wiring up a USB-TTL serial adapter.

Completing this initial foray into these cheap T12 soldering irons is the GitHub repository, which contains the pin-outs, wiring diagrams and further information. Although [Aaron] indicates that he’ll likely not pursuing further development, the mixed responses by people to the overall quality of the firmware on the as-purchased T12 may inspire others to give it a shake.

Continue reading “Hacking A €15 8051-Based Portable Soldering Iron With Custom Firmware”

Graphene And Copper Nanowire Thermal Interface With Low Thermal Resistance

With the increasing waste heat production by today’s electronics in ever smaller spaces, drawing this heat away quickly enough to prevent thermal throttling or damage is a major concern. This is where research by Lin Jing and colleagues from Carnegie Mellon University’s Department of Mechanical Engineering demonstrates a thermal interface material (TIM) that should provide a significant boost here. In the article, published in ACS Nano (paywalled; open access preprint alternative) the construction of this copper and graphene ‘sandwich’ TIM is described, along with tests.

The general idea is to use pillars between the two surfaces that can quickly carry the heat from the hot surface to the cool one. Although pure copper versions exist and do work, they suffer from the complications of having to build up these copper pillars in place, and subsequent oxidation reducing the effectiveness. While graphene and similar materials have shown superior heat-transfer capabilities, interfacing these materials with copper and other metals has proven problematic.

What Lin Jing et al. demonstrate in this study is to use essentially the pure copper approach, but to combine it with earlier research by Raghav Garg et al. (2017), who demonstrated how to grow 3-dimensional graphene structures. By cladding the copper pillars with graphene, this material improves heat transfer by 60%, while preventing oxidation of the metal. While the challenge is obviously to transfer these findings to something that can be mass-produced for consumer devices, it demonstrates how much potential there is in the use of graphene, which is a relatively new material for such applications due to how hard it was to produce until recently.


Assessing The Micromirror Device From A DLP Printer For Maskless Lithography Duty

Inspired by the idea of creating a maskless lithography system using a digital micromirror device (DMD), [Nemo Andrea] tore into an Anycubic Photon Ultra, DLP & resin-based 3D printer to take a look at its projector system. Here Anycubic isn’t the maker of what is called the ‘optical engine’, which would be eViewTek’s D2 projector and its siblings. This projector assembly itself is based around the Ti DLP300s, which we covered a while back when it was brand new. Since that time Anycubic has released the Photon Ultra and Photon D2 3D printers based around these optical engines.

Using DMD for lithography isn’t a new thing, as [Nemo] points out, referencing the μMLA system by Heidelberg Systems. What would be new is using a freely available and rather affordable DMD (even if it requires sacrificing a 3D printer) to obtain its optical engine in order to create an open and more affordable lithography platform than commercial ‘contact us for a quote’ option.

No doubt it’s a challenging project, but perhaps the nice side effect of having affordable DLP 3D printers out and about is that their DMDs are now also significantly more accessible than they were previously.  We wish [Nemo] all the best in this endeavor, as a maskless lithography machine would be just that addition to any hobbyist’s toolset that we are no doubt waiting for.

(Thanks to Jerry for the tip)

Trying (and Failing) To Restore A 1970s CDC 10MB Hard Drive

One fun aspect of 1970s-era hard disk drives is that they are big, clunky and are fairly easy to repair without the need for a clean room. A less fun aspect is that they are 1970s-era HDDs and thus old and often broken. While repairing a CDC 10 MB HDD for the upcoming VCF East event, the folks over at [Usagi Electric], this led to quite a few struggles, even after a replacement 14″ platter was found to replace the crashed platter with.

These CDC HDDs are referred to as Hawk drives, and they make the associated 8-bit Centurion  TTL logic-based computers so much faster and easier to work with (for a 1970s system, of course). Despite the large size of the components involved and the simple, all through-hole nature of the PCBs, issues that cropped up ranged from corroded DIP switches, to head alignment sensors, a defective analog board and ultimately a reported bad read-write head.

Frustratingly, even after getting the platters to spin up and everything moving as intended, it would seem that the remaining problem is that of possibly bad read-write heads, as in plural. Whether it’s due to age, previous head crashes onto platters, or something else, assembling a working Hawk drive turned out to be somewhat more complicated than hoped.

We definitely hope that the bunnies can get a working Hawk together, as working 1970s HDDs like these are become pretty rare.

Continue reading “Trying (and Failing) To Restore A 1970s CDC 10MB Hard Drive”