The Electromechanical Computer Of The B-52’s Star Tracker

The Angle Computer of the B-52, opened. (Credit: Ken Shirriff)

In the ages before convenient global positioning satellites to query for one’s current location military aircraft required dedicated navigators in order to not get lost. This changed with increasing automation, including the arrival of increasingly more sophisticated electromechanical computers, such as the angle computer in the B-52 bomber’s star tracker that [Ken Shirriff] recently had a poke at.

We covered star trackers before, with this devices enabling the automation of celestial navigation. In effect, as long as you have a map of the visible stars and an accurate time source you will never get lost on Earth, or a few kilometers above its surface as the case may be.

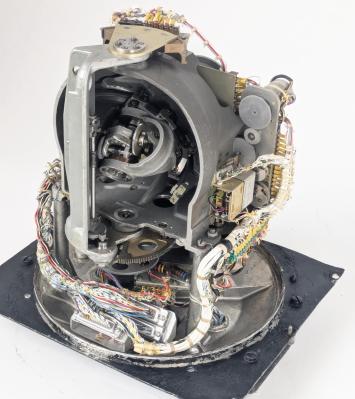
The B-52’s Angle Computer is part of the Astro Compass, which is the star tracker device that locks onto a star and outputs a heading that’s accurate to a tenth of a degree, while also allowing for position to be calculated from it. Inside the device a lot of calculations are being performed as explained in the article, though the full equations are quite complex.

Not burdening the navigator of a B-52 with having to ogle stars themselves with an instrument and scribbling down calculations on paper is a good idea, of course. Instead the Angle Computer solves the navigational triangle mechanically, essentially by modelling the celestial sphere with a metal half-sphere. The solving is thus done using this physical representation, involving numerous gears and other parts that are detailed in the article.

In addition to the mechanical components there are of course the motors driving it, feedback mechanisms and ways to interface with the instruments. For the 1950s this was definitely the way to design a computer like this, but of course as semiconductor transistors swept the computing landscape, this marvel of engineering would before long find itself too replaced with a fully digital version.

Why Some S3 Videocards Have A Brightness Issue

Once a pioneer in videocards, S3’s legacy is today mostly found in details like texture compression as well as the strong presence of S3-branded videocards in the retro-computing world. There’s however a bit of a funny issue with some of these S3 cards in what is often called a ‘brightness bug’, but which as [Bits und Bolts] covers in a recent video was actually a hardware feature that we can once again blame composite video for.

This issue appears with AGP cards like the Trio 3D, Trio64 and ViRGE, where the brightness on the output signal is set too high, easily seen with the washed out look on boot, where especially on CRTs you’d expect to see the nice deep black background. Using an S3 Trio 3D 2X card that was saved from the e-waste pile this so-called Pedestal Bit responsible is investigated and tweaked to show what difference it makes.

At the core is adjusting the black level to make scanline changes easier to detect for TVs, which is no longer relevant for CRTs, LCDs, etc., while adjusting the brightness for one videocard in a system can cause issues elsewhere, such as when using said card alongside a 3dfx Voodoo II card or with inconsistent brightness levels inside 3D games.

Fortunately S3 provided in-depth datasheets on their chips, including how to address the responsible bit. After demonstrating the principle, the BIOS is then patched to set this Pedestal Bit to the value of 0 on boot, solving the issue once and for all.

Continue reading “Why Some S3 Videocards Have A Brightness Issue”

Growing Aluminium-Copper Alloy Crystals Using Hydrogen

Having molten aluminium interact with atmospheric water forms a source of hydrogen which can be rather problematic if you’re trying to cast aluminium parts. As the molten metal cools down, the dissolved hydrogen is forced out, creating bubbles and other flaws that make aluminium foundries rather upset. While you can inject inert gases to solve the problem, you can also lean into this issue to make some rather fascinating aluminium crystals and geodes, as [Electron Impressions] recently did.

The key here is to use a eutectic Al-Cu alloy at around 45% Cu by weight, as this alloy readily forms large crystals as it cools down. With hydrogen injected into the molten metal, this hydrogen forms large bubbles inside the cooling metal with crystals clearly visible.

A way to create proper geodes involves very slow cooling and pouring off the still molten metal before the eutectic point is reached. As can be seen in this video, this creates a rather impressive looking geode after it’s been smashed open. This also gives a good clue as to how these geological features form in nature, although one does not typically observe Al-Cu alloy geodes in the wild.

Continue reading “Growing Aluminium-Copper Alloy Crystals Using Hydrogen”

Making The Most Pick-Proof Lock Yet

3D cutaway of the lock with the handle engaging the cog that rotates the mechanism. (Credit: Works By Design, YouTube)

Throughout the centuries the art of lock-making and lock-picking have been trapped in a constant struggle, with basic lock designs being replaced by ever more complex ones that seek to thwart any lockpicking attempts, as well as less gentle approaches. When it comes to the very common pin-and-tumbler lock design, the main issue here is that the keyway also provides direct access to the lock’s mechanism. This led [Works By Design] to brainstorm a lock design in which the keyway is hidden.

The ingenious part here is that because the actual key is rotated away after insertion, there is no clear path to the pins. This did require some creative thinking to have a somewhat traditional style key as well as a way to turn the internal mechanism so that the key would be pressed against the pins. Here inspiration was drawn from the switchable magnet mechanism as seen with e.g. magnetic bases. This ensures the key and key handle can be detached and attached quite firmly.

After many 3D printed prototypes, a metal version was CNCed and subjected to some early testing by a locksmith, who even with having seen the CAD model of the lock was stumped. With this initial result and some user feedback in the bag, it was time for large-scale testing with more lockpick enthusiasts, as there are many more ways to open a lock beyond pushing pins. That said, a mechanism was also added to the lock to prevent bumping attacks.

The next testers were found in the Lock Pickers United community, one of whom raised the issue of an impressioning attack. With a couple of test locks on their way to said lockpicking enthusiasts it’ll be exciting to see whether this new lock design will set the standard for future locks or not.

Continue reading “Making The Most Pick-Proof Lock Yet”

DIY Nuclear Battery With PV Cells And Tritium

Nuclear batteries are pretty simple devices that are conceptually rather similar to photovoltaic (PV) solar, just using the radiation from a radioisotope rather than solar radiation. It’s also possible to make your own nuclear battery, with [Double M Innovations] putting together a version that uses standard PV cells combined with small tritium vials as radiation source.

The PV cells are the amorphous type, rated for 2.4 V, which means that they’re not too fussy about the exact wavelength at the cost of some general efficiency. You generally find these on solar-powered calculators for this reason. Meanwhile the tritium vials have an inner coating of phosphor so they glow. With a couple of these vials sandwiched in between two amorphous cells you thus have technically something that you could call a ‘nuclear battery’.

With an approximately 12 year half-life, tritium isn’t amazingly radioactive and thus the glow from the phosphor is also not really visible in daylight. With this DIY battery wrapped up in aluminium foil to cover it up fully, it does appear to generate some current in the nanoamp range, with a single-cell and series voltage of about 0.5 V.

A 170 VAC-rated capacitor is connected to collect some current over time, with just under 3 V measured after a night of charging. In how far the power comes from the phosphor and how much from sources like thermal radiation is hard to say in this setup. However, if you can match up the PV cell’s bandgap a bit more with the radiation source, you should be able to pull at least a few mW from a DIY nuclear battery, as seen with commercial examples.

This isn’t the first time we’ve seen this particular trick. A few years ago, a similar setup was used to power a handheld game, as long as you don’t mind waiting a few months for it to charge.

Continue reading “DIY Nuclear Battery With PV Cells And Tritium”

Fixing A GameCube’s Dodgy Optical Drive With Fresh Capacitors

Generally when a game console with an optical drive stops reading discs the first thing that people do is crank on the potentiometer that controls the power to the laser diode to ramp up its output. While this can be a necessary solution to eke out a bit more life out of a clearly dying laser diode, this can actually massively shorten the lifespan of a good diode that’s just held back by bad capacitors. This is demonstrated by [Skawo] with a fix on a GameCube that stopped reading discs.

While it’s absolutely true that laser diodes have a limited lifespan, so do the capacitors and other components in the system. Thus, after tearing down this Japanese GameCube, [Skawo] accesses the optical PCB for some delicate plier-based capacitor surgery. One can absolutely question such violence, as well as the replacement mix of MLCC ceramics and a stray THT electrolytic capacitor, but the results after reassembly are obvious.

Without having to adjust the laser diode’s potentiometer, the game console now happily reads the game disc while the laser diode breathes a sigh of relief. Although all GameCube consoles will face the inevitable demise of their optical drives – barring a replacement optical pickup solution appearing – with this capacitor replacement solution it’s at least possible to stave off that undesirable time for a bit longer.

Continue reading “Fixing A GameCube’s Dodgy Optical Drive With Fresh Capacitors”

Making A Bronze Mirror From Scratch

Although modern-day silvered glass mirrors have pretty much destroyed the market for bronze mirrors, these highly polished pieces of metal once were the pinnacle of mirror technology. Due to the laborious process required these mirrors saw use essentially only by the affluent. That said, how hard would it be to make a bronze mirror today with all of the modern technologies that even a hobbyist can acquire for their shed? Cue [Lundgren Bronze Studios] giving it a shot, starting by casting something flat-ish to start polishing.

Just getting that initial shape to start polishing is a chore, with hammering out the shape possibly being also a viable method. When casting metal it’s tricky to avoid having air bubbles and other defects forming, though using a sand mold seems to help a lot.

After you have the rough shape, polishing using power tools seems like cheating, but as you can see in the video even going from 50 to 8000 grit with a rotating disc left countless scratches. Amusingly, hand sanding did a much better job of removing the worst scratches, following which a polishing compound helped to bring out that literal mirror finish.

A quick glance at the Wikipedia entry for bronze mirrors shows that a tin-bronze alloy like speculum metal was used for thousands of years as it was much easier to polish to a good mirror finish. The metallurgy of what may seem like just a vanity item clearly goes deeper than just polishing up a metal surface.

Continue reading “Making A Bronze Mirror From Scratch”