Fail Of The Week: Physical Pixel Display

fotw-physical-pixel-display

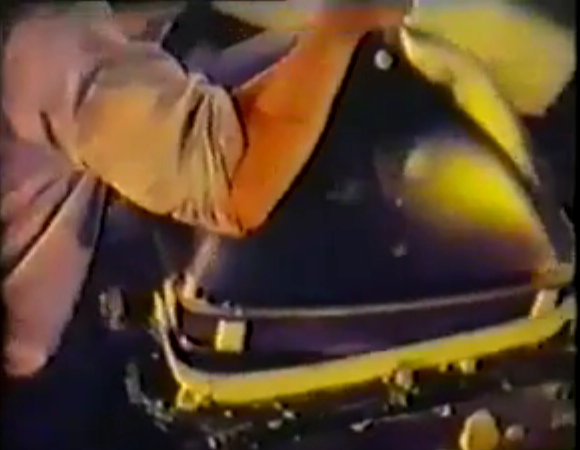
This physical pixel display reminds us of a couple of different hacks that we’ve seen over the years. It looks impressive, but [Matt] couldn’t quite get it to work. It wasn’t the Kinect sensor and image interpretation that was the problem. It was a failure to get the hardware components seen above to perform reliably.

If you can’t figure out what this is supposed to do, take at look at the inFORM morphing table or the pixel wall installed at the Hyundai expo last year. [Matt’s] attempt is much more modest with a grid of just 10×6. The pixels themselves are ballpoint pens (he gets bonus points for cheap and easy materials). The pens move in and out thanks to some Bowden cables connected to hobby servos. The mechanical engineers have probably already figured out the fail… the pixels seem to get hung up and despite several revisions in the materials used , it couldn’t be fixed.

The hobby servos were chosen because they are much less expensive than proper linear actuators. We thought maybe [Matt] should build his own solenoids but that’s not a great idea because you can’t have variable depth that way (can you?).  Perhaps the pens should be vertical and the servos could pull on a string attached to the pen via a pulley with gravity to return them to the starting position? There’s got to be an inexpensive and relatively simple way get this thing working. Let us know how you’d get the project back on track by leaving a comment below.


2013-09-05-Hackaday-Fail-tips-tileFail of the Week is a Hackaday column which runs every Wednesday. Help keep the fun rolling by writing about your past failures and sending us a link to the story — or sending in links to fail write ups you find in your Internet travels.

Retrotechtacular: Cathode Ray Tube (CRT) Manufacturing

This week we return to the grainy and un-color-corrected goodness that is synonymous with ancient video reels. [CNK] sent in a tip to a set of videos showing how Cathode Ray Tubes are manufactured on a massive scale. You’ll want to watch the pair of clips embedded below which total about 18 minutes. But there’s also some background to be found at this post from the Obsolete Technology Telley Web Museum.

The video presentation starts off with a brief overview of the way a color CRT works. It then moves to a factory tour, carefully showing each step in the process. The footage was shot in the 1960’s and because of that we catch a glimpse of some vintage equipment, like that used to measure the curvature of the CRT glass. You may be thinking that the world of CRT is in the past, but not so. We think there may even been a coming fad of producing them in your home lab.

Continue reading “Retrotechtacular: Cathode Ray Tube (CRT) Manufacturing”

Fubarino Contest: Morse Code Transmitter

fubarino-contest-morse-code-keyer

The Fubarino Contest entries are slowing streaming in. Here’s the first one that we’re featuring, sent in by [Nathanael Wilson]. He dusted off a project from some time ago, which is just fine with us. It’s a Morse Code transmitter which he designed for use during a fox hunt (locating a hidden transmitter using radio direction finding).

For the project he revised his old code, adding in a Morse look-up table so that the Arduino Mega 2560 can convert plain text into dots and dashes. It uses the tone library to output signals to the radio seem above. The easter egg is unlocked when shorting pin 10 at power-up. It then broadcasts a slightly altered message as interpreted above.

One of the reasons we chose to feature [Nathanael’s] entry first is that he presented it very well. Watch his video after the break to see for yourself. Then go back and check out the contest rules to get your own project submission in. After all, you can win a free Fubarino board from Microchip if you’re in the top twenty!

Continue reading “Fubarino Contest: Morse Code Transmitter”

Hackaday Links: December 8, 2013

hackaday-links-chain

Let’s start off with some high voltage. Here’s a sweet Jacob’s Ladder build from [Robert]. The site hosting his short writeup has been up and down for us so here’s a cache link.

Speaking of high voltage, if you want to switch mains with your project [Tom] has a breakout board for cheap mechanical relays. [via Dangerous Prototypes]

[Dario] made his own version of an electronic Advent calendar [translated]. There are no numbers, you must solve the mystery of the flashing LEDs to figure out which package goes with each day.

If you ever work with lighted arcade buttons here’s a guide for swapping out the light for an RGB LED. This hack uses through-hole LEDs. We’ve actually seen a surface mount hack that includes a PCB to mimic the old bulbs.

Next time you stay overnight at an event you can give yourself the best view in the campground. This tiny little camper was mounted on a scissor lift! That first step on the way to the Porta Potty is a doozy! [via Adafruit]

[Žiga] was nice enough to demonstrate this smart-watch hack by displaying our name and logo (we love pandering!). It features the MSP-WDS430 which is a surprisingly stylish offering from Texas Instruments. In addition to analog clock hands it has an OLED display driven by the MSP430 inside.

Here’s a quick PIC-based metal detector which [Nicholas] built.

And finally, [Chet] saw the oil tank level sensor we featured this week. He built a nearly identical system earlier this year. The oil level sensor works in conjunction with the custom thermostat he built around an Android tablet.

Fail Of The Week: Hackaday Writer’s First CNC Adventure

This Fail of the Week post focuses on a project from [Limkpin] aka [Mathieu Stephan], one of the Hackaday contributors. He wanted a CNC mill of his very own and decided to go with a kit that you assemble yourself. If it had been clear sailing we wouldn’t be talking about it here. Unfortunately he was met with a multitude of fails during his adventure. We’ll cover the highlights below.

Continue reading “Fail Of The Week: Hackaday Writer’s First CNC Adventure”

Hack Your Datasheets Using Datasheet.net

datasheet-dot-net-snippet-example

If you use datasheets (which is probably every reader of Hackaday) you need to check out this tool that seeks to add modern features to the decades-old component specification delivery system. That link takes you to the announcement of the launch of Datasheet.net.

What you see above is the biggest feature the service brings to the table, the ability to create “snippets” from datasheets by clicking and dragging the area you’d like to save (you can even get a public link to the snippet). Once you have selected a snippet there are a few tools that allow you to make annotations on it. We’ve used the rectangle tool to highlight the clock speed and divider settings in this snippet for an ATmega328 uC. The interface also offers the ability to draw arrows, freehand, or to add text to the snippet. At the bottom of this example we used the description area to notate the fuse settings (in hex) which we most often use with this chip. These snippets and annotations can then be shared with other users of the service, and there’s also a comments section below the snippet for your team to use. See examples of this in the video below.

This solves one of our biggest beefs with PDF datasheets — the ability to jump back and forth and to easily find commonly used sections. This datasheet is 567 pages long and not fun to paw through looking for the same info repeatedly. It also offers rudimentary “favorite” flagging to keep a list of your oft-used sheets — but we’d like to see more options for categorizing our collection. We also find it hard to get by without the Table of Contents functionality we’re used to in our normal document view (evince). We’ve already pestered the lead developer, [Ben Delarre], to add this feature. He’s the same guy who came up with the schematic sharing site CircuitBee. Now would be a great time to mention that this service is owned by Hackaday’s parent company SupplyFrame.

Datasheet.net has a mammoth source of datasheets available through the search, but the list of planned feature additions includes datasheet upload. Also on the list is a “Discussion” feature which sounds interesting to us. What if, through the discussion engine, searching for datasheets also turned up a list of open hardware projects that use this part? We are also drooling over the ability to embed these snippets directly in webpages. [Ben] tells us that’s already built but they didn’t have time to add it to the UI before launch. Gone will be the days of taking screenshots of PDFs for your blog writeup!

PDF delivery of datasheets revolutionized access to information about electronic components. We’re hoping that this marks the next evolution. In addition to better working features, wouldn’t it be nice if you could actually get notifications when new datasheet revisions or errata were published?

Continue reading “Hack Your Datasheets Using Datasheet.net”

Fabricate Your Own 7-Segment Displays

We see more and more projects that use custom molds and casting materials. The latest is this custom seven segment display which [Ray74] put together. The idea of making your own LED displays couldn’t be much easier than this — everything but the LEDs and wire is available at the craft store.

He started by making models of each segment out of pink erasers. The lower left image of the vignette above shows the eraser segments super glued to some poster board. The decimal is a pencil eraser, with a fence of wood to contain the molding material. Amazing Mold Putty was mixed and pressed into place resulting in the mold shown in the upper right.

From there, [Ray] cast the clear epoxy three times. Once dried the clear pieces were sanded, which will shape them up physically but also serves to diffuse the light. They were then placed inside of another mold form and an epoxy pour — this time doped with black enamel paint — finishes the 7-segment module. The final step is to glue the LEDs on the back side and wire them up.

This definitely trumps the build which Hackaday Alum [Kevin Dady] pulled off using hot glue sticks as light pipes.