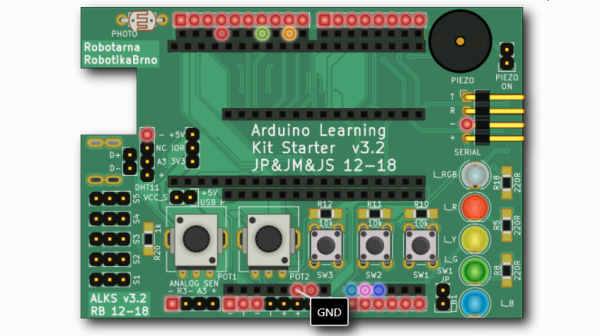
The result is an interactive diagram that can be viewed in any web browser. Hovering over a pin or pad highlights those signals with a callout for the name, and clicking makes it stay highlighted for easier reference. Further information can be as detailed or as brief as needed.
Interestingly, Pinion isn’t a web service that relies on any kind of backend. The diagrams are static HTML and JavaScript only, easily included in web pages or embedded in GitHub documentation.
If you think Pinion looks a bit familiar, you’re probably remembering that we covered [Jan]’s much earlier PcbDraw tool, which turned KiCad board files into SVG renderings but had no ability to add labels or interactivity. Pinion is an evolution of that earlier idea, and its diagrams are able to act as both documentation and interactive reference, with no reliance on any kind of external service.
Well, at least the acronym will stay the same. It looks like black is the new blue for Windows 11, as the BSOD screen gets its first makeover in years. It’s an admittedly minor change, since the on-screen text is virtually identical to the BSOD from recent versions of Windows 10, and the new death-knell even sports the same frowny-face emoji and QR code. Really, the white-on-black color scheme is the only major difference we can see — even the acronym will stay the same. It’s not really that newsworthy, we suppose, although it does make us miss the extremely busy BSODs from back in the Windows NT days.
As the semiconductor shortage continues, manufacturers are getting desperate to procure the parts they need to make their products. And if there’s one thing as certain as death and taxes, it’s that desperation provides opportunity to criminals. A thread over on EEVBlog details an encounter one company had with an alleged scammer, who sent an unsolicited offer to them for a large number of ordinarily hard-to-find microprocessors at a good price. Wisely, the company explored the offer in some depth and found that “Brian” (the representative who contacted them) is actually named Nick Martin and, according to an article on the Electronic Resellers Association International (ERAI) website, is apparently associated with a number of fraudulent operations. Their list of allegedly fraudulent deals made by Mr. Martin stretches back to 2018 and totals over $300,000 of ill-gotten gain.
Last year, friend-of-Hackaday and laser artist Seb Lee-Delisle spent a lot of time and effort getting together an amazing interactive laser light show for the night skies of cities in the UK. Laser Light City, with powerful lasers mounted on the tops of tall buildings, was a smashing success that brought a little cheer into what was an otherwise dreadful time. But we have to admit that the videos and other materials covering Laser Light City left us wanting more — something like that, with a far-flung installation on rooftops and the ability for audience members to control it all from their phone, really needs a deeper “how it works” treatment. Thankfully, Seb has released a video that dives into the nuts and bolts of the show, including a look at ludicrously powerful lasers with beams that can still be seen in broad daylight.
One of the nicest amenities of interpreted programming languages is that you can test out the code that you’re developing in a shell, one line at a time, and see the results instantly. No matter how quickly your write-compile-flash cycle has gotten on the microcontroller of your choice, it’s still less fun than writing blink_led() and having it do so right then and there. Why don’t we have that experience yet?
If you’ve used any modern scripting language on your big computer, it comes with a shell, a read-eval-print loop (REPL) in which you can interactively try out your code just about as fast as you can type it. It’s great for interactive or exploratory programming, and it’s great for newbies who can test and learn things step by step. A good REPL lets you test out your ideas line by line, essentially running a little test of your code every time you hit enter.
This is your development environment
The obvious tradeoff for ease of development is speed. Compiled languages are almost always faster, and this is especially relevant in the constrained world of microcontrollers. Or maybe it used to be. I learned to program in an interpreted language — BASIC — on computers that were not much more powerful than a $5 microcontroller these days, and there’s a BASIC for most every micro out there. I write in Forth, which is faster and less resource intensive than BASIC, and has a very comprehensive REPL, but is admittedly an acquired taste. MicroPython has been ported over to a number of micros, and is probably a lot more familiar.
But still, developing MicroPython for your microcontroller isn’t developing on your microcontroller, and if you follow any of the guides out there, you’ll end up editing a file on your computer, uploading it to the microcontroller, and running it from within the REPL. This creates a flow that’s just about as awkward as the write-compile-flash cycle of C.
What’s missing? A good editor (or IDE?) running on the microcontroller that would let you do both your exploratory coding and record its history into a more permanent form. Imagine, for instance, a web-based MicroPython IDE served off of an ESP32, which provided both a shell for experiments and a way to copy the line you just typed into the shell into the file you’re working on. We’re very close to this being a viable idea, and it would reduce the introductory hurdles for newbies to almost nothing, while letting experienced programmers play.
Or has someone done this already? Why isn’t an interpreted introduction to microcontrollers the standard?
This article is part of the Hackaday.com newsletter, delivered every seven days for each of the last 200+ weeks. It also includes our favorite articles from the last seven days that you can see on the web version of the newsletter.
Want this type of article to hit your inbox every Friday morning? You should sign up!
From the first time humans crawled into a cave with a bit of charcoal to sketch scenes from the world around them, artists have been searching for new media and new ways to express themselves. Natural products ruled for thousands of years, with pigments stolen or crafted from nature as well as wood, ivory, bone, and stone for carving. Time and experience guided our ancestors to new and better formulations and different materials, to the point that what qualifies as art and what we’d normally think of as technology have, in many cases, blended into one, with the artist often engineering projects of mammoth proportions and breathtaking beauty.
Aaron Oppenheimer co-founded color+light, a company that specializes in large-scale custom art installations for companies like Google, Nike, and Nissan. One of their projects, the “Oddwood Tree”, is displayed alongside other gigantic art pieces at Area15 on the Las Vegas strip. His most recent project, fluora, is a digital houseplant, with addressable LEDs in the leaves that can be controlled by a smartphone app or respond to stimuli in the environment.
Aaron will join us on the Hack Chat to discuss the LED as artistic medium. Join us as we learn what it takes to make enormous art that’s strong enough to interact with yet responsive enough to be engaging.
Click that speech bubble to the right, and you’ll be taken directly to the Hack Chat group on Hackaday.io. You don’t have to wait until Wednesday; join whenever you want and you can see what the community is talking about.
We live in a strange time indeed. People who once eschewed direct interactions with fellow humans now crave it, but to limited avail. Almost every cashier at the few stores deigned essential enough to maintain operations are sealed away behind plastic shields, with the implication that the less time one spends lingering, the better. It’s enough to turn an introvert into an extrovert, at least until the barriers are gone.
We get the idea that the need to reach out and touch someone is behind [Niklas Roy]’s “Please Leave a Message”, an interactive art installation he set up in the front window of his Berlin shop. Conveniently located on a downtown street, his shop is perfectly positioned to attract foot traffic, and his display is designed to catch the eye and perhaps crack a smile. The device consists of a large wooden easel holding the guts from an old X-Y pen plotter, an Arduino and an ESP-8266, and a couple of drivers for the plotter’s steppers. Passers-by are encouraged to scan a QR code that accesses a web page served up by the ESP-8266, where they can type in a brief message. The plotter dutifully spells it out on a scroll of paper for all to see, using a very nice font that [Niklas] designed to be both readable and easily plotted. The video below shows it in action with real people; it seems to be a crowd-pleaser.
Gears are fairly straightforward way to couple rotational motion, and the physics topics required to understand them are encountered in an entry level physics classroom, not a university degree. But to really dig down to the root of how gears transfer motion may be somewhat more complex than it seems. [Bartosz Ciechanowski] put together an astonishingly good interactive teaching tool on gears, covering the fundamentals of motion up through multi-stage gear trains.
Illustrating the distance traveled at different points on the disc
The post starts at the beginning – not “how to calculate a gear ratio” – but how does rotational motion work at all. The illustrations help give the reader an intuitive sense for how the rate of rotation is measured and what that measurement actually represents in the real world. From there [Bartosz] builds up to describing how two discs touching edge to edge transfer motion and the relationship of their size on that process. After explaining torque he has the fundamentals in place to describe why gears have teeth, and why they work at all.
Well written explanatory copy aside, the real joy in this post is the interactivity. Each concept is illustrated, and each illustration is interactive. Images are accompanied by a slider which lets you adjust what’s shown, either changing the speed of a rotating gear or advancing the motion of two teeth interlocking. We found that being able to move through time this way really helped form an intuitive understanding of the concepts being discussed. This feels like the dream of interactive multimedia textbooks come to life.
Robots have certainly made the world a better place. Virtually everything from automobile assembly to food production uses a robot at some point in the process, not to mention those robots that can clean your house or make your morning coffee. But not every robot needs such a productive purpose. This one allows you to punch the world, which while not producing as much physical value as a welding robot in an assembly line might, certainly seems to have some therapeutic effects at least.
The IoT Planet Puncher comes to us from [8BitsAndAByte] who build lots of different things of equally dubious function. This one allows us to release our frustration on the world by punching it (or rather, a small model of it). A small painted sphere sits in front of a 3D-printed boxing glove mounted on a linear actuator. The linear actuator is driven by a Raspberry Pi. The Pi’s job doesn’t end there, though, as the project also uses a Pi camera to take video of the globe and serve it on a webpage through which anyone can control the punching glove.
While not immediately useful, we certainly had fun punching it a few times, and once a mysterious hand entered the shot to make adjustments to the system as well. Projects like this are good fun, and sometimes you just need to build something, even if it’s goofy, because the urge strikes you. Continue reading “Punch The World With A Raspberry Pi”→