Google Science Fair Finalist Explains Squid-inspired Underwater Propulsion

google-sciencefair-finalist-squid-propulsion

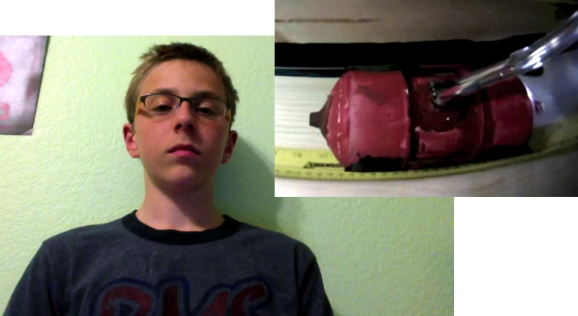
Meet [Alex Spiride]. He’s one of the fifteen finalists of the 2013 Google Science Fair. A native of Plano, Texas, [Alex] entered his squid-inspired underwater propulsion system in the 13-14 year old category.

The red cylinder shown in the image inlay is his test rig. It is covered well on his project site linked above. You just need to click around the different pages using the navigation tiles in the upper right to get the whole picture. The propulsion module uses water sprayed out the nozzle to push the enclosure forward. The hull is made of PVC, with a bladder inside which is connected to the nozzle. The bladder is full of water, but the cavity between it and the hull is full of air. Notice the plastic hose which is used to inject pressurized air, squeezing the bladder to propel the water out the nozzle. Pretty neat huh?

We think [Alex’s] work stands on its own. But we can’t help thinking what the next iteration could look like. We wonder what would happen if you wrapped that bladder in muscle wire? Would it be strong enough to squeeze the bladder?

You can see all fifteen finalists at the GSF announcement page. Just don’t be surprised if you see some of those other projects on our front page in the coming days.

Continue reading “Google Science Fair Finalist Explains Squid-inspired Underwater Propulsion”

Easily 3D Print Mesh Screens

easy-way-to-3d-print-mesh-screens

If you need a way to make openings in your project enclosures look nice just head on over to the 3D printer. In the image above [Alfred] is showing off the result of his Slic3r hack for printing mesh grills.

It’s important to note that you need to make sure you’re using Slic3r version 0.9.8. This won’t work with newer versions because starting with 0.9.9 the software will add a raft to the bottom of your design.

The grill can be in any shape you desire. It starts by modelling this outline, then extruding the edges downward the same distance as your desired mesh thickness. After importing the design file into Slic3r [Alfred] uses the support material settings to choose this honeycomb design. He then sets the fill density to zero. This means the design will not be printed at all, only the fill material, resulting in these honeycomb screens.

Slic3r’s a fantastic piece of software. Check out this interview with Slic3r’s lead developer.

Build A Light Following Bristlebot As A Way To Teach Science

light-following-bristlebot

[Ben Finio] designed this project as a way to get kids interested in learning about science and engineering. Is it bad that we just want to build one of our own? It’s a light following bristlebot which in itself is quite simple to build and understand. We think the platform has a lot of potential for leading to other things, like learning about microcontrollers and wireless modules to give it wireless control.

Right now it’s basically two bristlebots combined into one package. The screen capture seen above makes it hard to pick out the two toothbrush heads on either side of a battery pack. The chassis of the build is a blue mini-breadboard. The circuit that makes it follow light is the definition of simple. [Ben] uses two MOSFETs to control two vibration motors mounted on the rear corners of the chassis. The gate of each MOSFET is driven by a voltage divider which includes a photoresistor. When light on one is brighter than the other it causes the bot to turn towards to the brighter sensor. When viewing the project log above make sure to click on the tabs to see all of the available info.

This directional control seems quite good. We’ve also seen other versions which shift the weight of the bot to change direction.

Continue reading “Build A Light Following Bristlebot As A Way To Teach Science”

Car Stereo AUX Input Taps Into CD Ribbon Cable

[Gezepi] wanted to add an auxiliary input to the stereo in his 1994 Camry. At first look there wasn’t an easy way to patch into the system. But a bit of probing with an oscilloscope and figured out that he could inject audio through the CD ribbon cable shown above. The CD reader is a self-contained unit that receives commands through the cable, and passes analog stereo audio back to the receiver portion of the head unit. We’re not sure how he figured out which pins to tap into, but it may have been as easy as probing with some headphones while a CD is playing.

The extent of his hack is documented in the image below. He cut the two audio leads on the CD side of the ribbon cable, then soldered his auxiliary jack on the receiver side of the cable connector. This ensures that two audio signals aren’t being piped into the receiver at the same time. Unfortunately it also means that he won’t be able to use the CD player. We have seen other methods that use a special audio jack as a pass-through which cuts the connection when a jack is inserted. That’s the method used in this Subaru hack.

Continue reading “Car Stereo AUX Input Taps Into CD Ribbon Cable”

An XBMC Controller Built For Grandma

10-finished-controller

Is your grandmother cool enough to use XBMC? Maybe it’s a testament to the functionality of the wildly popular home entertainment suite rather than the hipness of your elders. But indeed, [Brian’s] grandmother is an XBMC user who needed a controller with larger buttons to accommodate her. This is what he built. He sent us a set of photos and a description of the build, both of which you can see below. He was inspired to get in touch after reading about the custom controller which [Caleb] has been working on for [Thomas].

[Brian] didn’t get bogged down with electronics. He went with the simple, cheap, and popular solution of gutting a wireless keyboard. After tracing out the keys he needed he got rid of everything except the PCB. A wiring harness was crafted by soldering jumper wires to the PCB traces and terminating them with crimping slide connectors. The arcade buttons he used have terminals for the connectors which will make it simple to mate the electronics with the mechanics.

The enclosure is a little wooden hobby box. It originally had a lid with a mirror. [Brian] broke open the lid’s frame to replace it with a thin piece of plywood which hosts the buttons. Inside you’ll find a battery power source. These keyboards last a long time on one set of batteries so he just needs to remember to preemptively replace them from time to time. The finishing touch was to add decals so that granny can figure out what each button does.

Continue reading “An XBMC Controller Built For Grandma”

Dimming LED Bulbs Designed To Replace Halogen Lamps

dimming-led-halogen-replacements
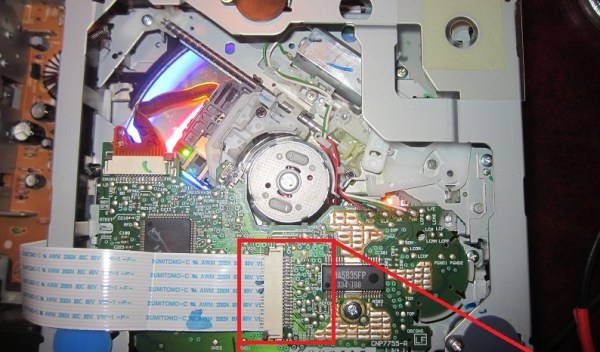
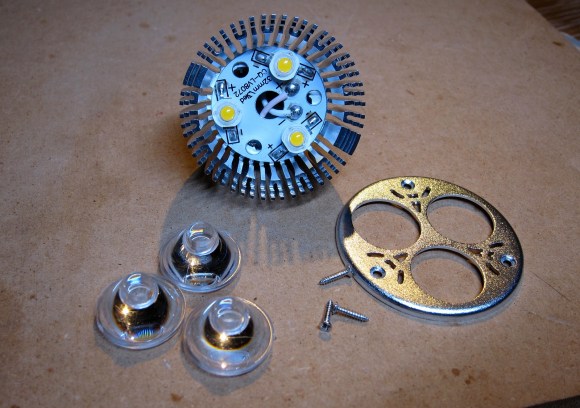
Halogen bulbs put out a lot of focused light but they do it at the expense of burning up a lot of Watts and generating a lot of heat. The cost for an LED replacement like the one seen disassembled above has come down quite a bit. This drove [Jonathan Foote] to purchase several units and he just couldn’t resist tearing them apart to try out a couple of hacks.

The one we find most interesting is a PWM based dimming hack he pulled off with an Arduino board and a FET. The bulbs are designed to be dimmable through the 12V supply that feeds the light fixture. But the relationship of dimmer position to light level is not linear and [Jonathan] figured he could do better. His solution is to add a FET in parallel with the LEDs. When activated it basically shunts the current around the diodes, resulting in a dimming. The video below shows this in action. We wonder if the flashing is a camera artifact or if you pick that up with your eye as well?

You may also be interested to read his post on Gelling the LED bulbs. Gels are colored filters for lights (or camera lenses). He cuts his preferred color down to size and inserts it between the LEDs and the lenses.

Continue reading “Dimming LED Bulbs Designed To Replace Halogen Lamps”

RF Wireless Kernel Module For Raspberry Pi, BeagleBone And Others

rfm12b-kernel-module

If you’ve done any wireless work with hobby electronics you probably recognize this part. The green PCB is an RFM12B wireless board. They come in a few different operating bandwidths, the 433 MHz is probably the most common. They’re super easy to interface with a small microcontroller but what about an embedded Linux board? That is the focus of this project, which builds a kernel driver for the RF module.

You can get your own RFM12B for a few bucks. They’re quite versatile when paired, but a lot of inexpensive wireless consumer goods operate on this band so the board can be used to send commands to wireless outlets, light fixtures, etc. [Georg] has been working with the BeagleBone, BeagleBone Black, and Raspberry Pi. His software package lets you build a kernel module to add an entry for the device into the /dev directory of a Linux system. So far the three boards listed are all that’s supported, but if you have five I/O pins available it should be a snap to tailor this to other hardware.

Wondering what else you can do with the setup? This will get the receiving end of a text-messaging doorbell up and running in no time.

Continue reading “RF Wireless Kernel Module For Raspberry Pi, BeagleBone And Others”