Dummy Batteries Let You Use An AC Adapter

We find it frustrating when battery operated consumer electronics don’t include a way to connect an external power supply. We try not to purchase disposable alkaline cells if we can avoid it, and this dummy battery AC adapter hack will aid in our mission.

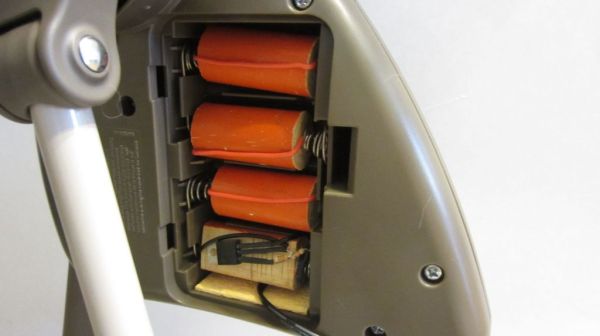
The battery compartment shown above is for a motorized baby swing. It accepts C sized batteries (who has those just lying around?) and lacks a barrel jack to connect a wall wart adapter. [Jason Smith] mentions you can get around this by connecting your positive and ground wires directly to the conductor springs. But using a dummy battery makes it a bit easier to remove the adapter if you do want to use battery power.

Each of the orange dummy is a wooden dowel with a screw at each end. The screws are connected with a piece of jumper wire, shorting the two terminals. This completes the circuit in the battery compartment and allows him to power everything from the adapter cell at the bottom. The adapter uses an LM317 adjustable voltage linear regulator. He used fixed resistor values to dial in his target voltage. The equipment should be rather forgiving as battery voltage starts higher than the printed value and drops as the cells are used up.

This technique has been around for a long time. One of our favorites was a hack that converted an Apple Magic Trackpad to USB power.

Continue reading “Dummy Batteries Let You Use An AC Adapter”

Ditch That Boring Mouse For A Military-grade Trackball

military-grade-trackball

The bad thing about this type of hack is that now [Tomek Dubrownik] needs to cut a hole in his desk to house the thing. He got this military grade trackball working over USB. It’s old, and could be used as a blunt weapon. But as the video shows it still makes a great input device.

He found the hardware on Allegro — a Polish auction site similar to eBay — for just $20. The original circuitry didn’t make a lot of sense, but a bit of probing with the old oscilloscope let him establish connections to the encoders which are read by some TI 54xx parts. Apparently they use the same logic as 7400 parts but are military grade. He chose a ATmega32u4 development board for his replacement control board. That chip has native USB support so the rest is just a matter of passing data like an HID input device. His code even lets him use those pushbuttons to toggle between cursor movement and window scrolling.

[Tomek] translated his post into English after some prompting by friends at the Warsaw Hackerspace. Here’s the original in Polish if you’re interested.

Continue reading “Ditch That Boring Mouse For A Military-grade Trackball”

Using Electrical Conduit For A 3D Printer Frame

electrical-conduit-for-cnc-frame

We’re always on the lookout for parts that can be source locally and that don’t cost a bundle. This hack fits both of those criteria. [Lee Miller] came up with a way to use steel electrical conduit as a 3D printer frame. He recently finished building the device seen above, and has been showing it off at Solid State Depot, a Hackerspace in Boulder, Colorado where he is a member.

Look closely at the corners of the frame in this image and you’ll see the 3D printed parts that make up the clamping mechanism. Each has three components that screw together. The two gaps in between each have a rubber ‘O’ ring. When the plastic clamps are screwed together they squeeze the rings which hold the electrical conduit firmly. This also has the side benefit of dampening vibrations.

It’s certainly easy to find this type of conduit which is sold at every home store (and most hardware stores). Just make sure that you check that a piece is straight when you pick it out. The SCAD files for the parts are available from his Github repo.

Continue reading “Using Electrical Conduit For A 3D Printer Frame”

Telegraph Sounder Clicks Out Email Messages

telegraph-box-together

[Patrick Schless] is excited to show off the project he took on about nine months ago. After finding an antique telegraph sounder he wired it up to an Arduino to see if he could make it tick. The successful experiment laid the ground work for different hardware that would make it into a morse code email reader.

He doesn’t know much about the background of the old hardware, but driving it is relatively simple. It’s basically a magnetic relay so you need to have a transistor for switching and a flyback diode for protection. Once those components are in place it’s just a matter of toggling a bit. [Patrick] knew he wanted to pull messages from an online source, so he set his Arduino aside and grabbed a Raspberry Pi. It worked like a charm. His plan was to put this on a bookshelf in perpetuity so he went the extra mile, designing his own PCB and having it spun using the OSH Park service. The project is finished with this low-profile laser-cut base which houses all of the electronics.

Now if he wants to respond to his emails in Morse code he needs to build this keyboard.

Continue reading “Telegraph Sounder Clicks Out Email Messages”

Building A WiFi Enabled Nixie Counter

wifi-nixie-counter

[Kevin Ballard] built this Nixie counter on the company dime. Tubes like this are getting more and more difficult to find since they’re no longer being manufactured. But when the Bossman hands you a corporate credit card those kinds of concerns take a back seat to your parts-shopping impulses. Start to finished this WiFi enabled counter took six weeks to build.

Connecting the board to the internet was very easy thanks to the Electric Imp that drives it. The difficult part comes in building a driver board and sockets for the tubes. We don’t see a lot of detail on how he’s generating the high voltage. But you can get a good feel for the tube connectors from the picture. He’s using an adapter PCB from Kosbo which breaks the tube pins out to two rows of 0.1″ pitch pin headers. The acrylic base has a port for each made of pin sockets spaced by a thick chunk of acrylic. Wiring harnesses wrap around the back side of the base to mate with the driver hardware. It’s programmed to count some type of company metric (it was funded by the corporation after all). They must be fairly successful because those numbers are flying by in the demo video.

Continue reading “Building A WiFi Enabled Nixie Counter”

3D Printed Hand-cranked Digital Computer

What a beautiful thing it is to see this digital computer in action. [Chris Fenton] did an amazing job of designing and printing this mechanical digital computer. If you’re interested in one to call your own check out the source files he published this week.

[Chris’] design inspiration came from some research into Victorian Era mechanical looms. He adjusted the concept to build a punch card reader, starting with a capacity of three holes and moving to this design which can read ten holes. It provides just enough bits to address all three of the counters pictured above. Program the computer by inserting a punch card that is the size of a business card and crank away. The video below shows the process from afar… hopefully he’ll post a follow-up video with closer views of each piece in action.

This isn’t his first basic computing machine. Check out the electromechanical version from last year.

Continue reading “3D Printed Hand-cranked Digital Computer”

Arc Reactor Replica Could Have Been Crafted In A Cave

arc-reactor-replica

Following in the footsteps of [Tony Stark] this Arc Reactor replica was hand crafted using almost no power tools. From what we can tell in his build gallery, a cordless drill was his only departure from using pure elbow grease.

[DJ Maller] started his build by cutting out a disc of acrylic for the base plate. While we might have reached for a hole saw, he grabbed a framing square and laid out a center point and square cuts on the stock. Kudos for his use of an awl (we often take the Luddite approach of hammer and nail) to make an impression for his compass point to rest in. After using a coping saw to rough out the shape he sands the round up to the line with the drill and a sanding wheel.

After drilling holes and inserting LEDs he begins to build up the replica piece by piece. What looks like a recessed handle for a sliding closet doors makes up the center. The spring-like copper coils was produced by wrapping wire around a pen then stretching to the desired shape. He added a bicycle spoke wrench wrapped with copper for some additional visual appeal before finishing the decoration off with some storm door clips.

[via Reddit]