TP-Link Router Turned Into A DALI Automated Lighting Controller

dali-control-in-tplink-router

The members of Shackspace continue to put up impressive hacks based around the tiny TP-Link routers. This time around [Timm] has shoehorned a DALI controller inside the router case. This is a protocol we don’t remember hearing about before. The Digital Addressable Lighting Interface is a control network for commercial lighting. That way people responsible for taking care of large buildings can shut off all the lights at night (to name just one use). The new room at Shackspace has this style of controllers in its lights.

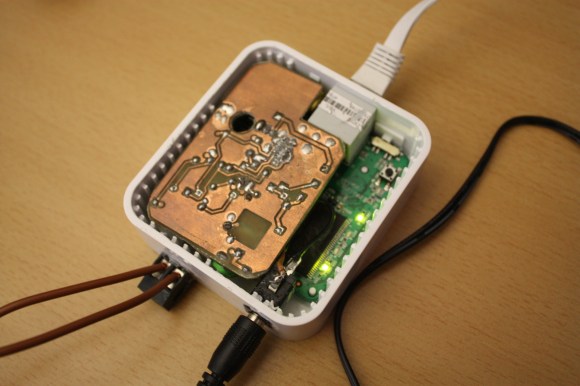
The two brown wires coming into the router make up the data bus for the DALI system. It connects to the add-on PCB which uses an Atmel AT90PWM316 microcontroller. The chip is specifically designed for DALI networks which made the rest of the project quite easy. It talks to the lights, the router talks to it, bob’s your uncle, and you’ve got network controlled lighting. Get this in a big enough building and you can play some Tetris.

In case you were wondering. Yes, this project has already been added to their TP-Link firmware generator.

Complicated IPhone Garage Door Opener

iphone-garage-door-opener

The round-about way this iPhone garage door opener was put together borders on Rube Goldberg. But it does indeed get the job done so who are we to judge? Plus you have to consider that the Apple products aren’t quite as hacker friendly as, say, Android phones — so this may have been the easiest non-Jailbreak way.

The main components that went into it are the iPhone, a Wemo WiFi outlet, and a 110V rated mechanical relay. But wait, surely it can’t be that simple? You’re correct, just for added subterfuge [Tall-drinks] rolled IFTTT into the mix.

You may remember hearing about If This Then That from the Alert Tube project. It’s a web-based natural language scripting service. Throw everything together and it works like this: The iPhone sends a text message which IFTTT converts to a Wemo command. A power cord connects the Wemo outlet to the 110V electrodes on the relay. The normally open connection of the relay is attached to the same screw terminals of the garage door opener as the push button that operates it. When the relay closes, the garage door goes up or down.

The biggest problem we have with this is the inability to know if your garage door is open or closed.

2013 LayerOne Badge Hacking Contest Winner

2013-LayerOne-badge-hacking-contest-winner

[Dynotronix] wrote in to share the news that he won the 2013 LayerOne badge hacking contest. In addition to the good news he included a description of his badge hack.

We got a good look at the hardware included on the badge several days ago. You may remember that it’s outfitted with footprints for 48 LEDs around the perimeter which are driven by two ICs. Looking at the image above it’s hard to miss the fact that [Dyno] didn’t populate any of that. He went right for the power of the XMEGA processor to analyze and generate signals.

But what specifically can you do with the signal this thing generates? Turns out a rather simple circuit can make it into a transmitter. [Dyno] concedes that it’s a remarkably finicky setup, but just a few components on a scrap of copper clad turned this into an FM transmitter. Check out the video where you can hear the sweeping alarm-type sounds pushed to an FM radio via his voltage controlled oscillator circuit which has a range of about fifteen feet.

Continue reading “2013 LayerOne Badge Hacking Contest Winner”

LED Mortar Board Battles Suns Brightness With 21W Of Power

[Jeremy Blum] aimed to be the brightest student at his Master’s graduation ceremony this spring. He designed an LED rig for his mortar board which should battle the sun’s intensity by using up to 21 watts of power. But he didn’t stop with eye-catching intensity. while he was at it he also included some interactive features so the guy behind him has a way to keep from going blind.

One thing that really caught our eye is the 3D printed parts he generated for the project. There’s a nice mounting plate for the LED side of things, and a wrist-mounted enclosure for the Raspberry Pi board. Wait, why does he need an RPi to drive some LEDs? We already mention interactivity which is facilitated by the Pi acting as a WiFi hotspot. Connect to the access point and choose a color. If you’re in the seat behind [Jeremy] you’ll want to choose black! All of this and is explained in his video presentation.

Continue reading “LED Mortar Board Battles Suns Brightness With 21W Of Power”

Already Impressive Wolverine Claws Now Energized With High Voltage

wolverine-claw-high-voltage

A few years back [James] built an utterly amazing set of Wolverine replica claws. They are held together by a bar that laces between his fingers so that when he’s gripping it you don’t see anything but the claws. Add to that the tail design which makes it look like they’re actually coming out of his skin and he’s made an amazing replica. But they’re also rather utilitarian as you can see in the demo/how-it-was-done video where he spears hay bails as they’re thrown at him from off camera. Machine shop fans are going to love learning how these were made.

More recently he decided to update the project after seeing our own Thor’s Hammer offering. He got down to business by salvaging a huge transformer from an old oil furnace. He has no idea what kind of voltage this thing puts out, but that doesn’t stop him from wiring it up to the pair of claws and letting the sparks fly. He even creates a Jacob’s Ladder effect by placing the claws at a narrow angle to each other.

Continue reading “Already Impressive Wolverine Claws Now Energized With High Voltage”

High Speed Photography With Friggin’ Lasers

[Bruce] built his own high-speed photography equipment for a fraction of the price it would have cost him to purchase it. He was inspired by a friend who showed him some example images. He headed into his shop and built an Arduino-based high-speed flash controller.

To capture an image like this one the camera is placed in a dark room and set for a long exposure. At just the right instant the flash is activating, capturing the image. In this case [Bruce] used an infrared laser diode pointed at a phototransistor to trigger the flash. When the droplet breaks the laser beam the Arduino triggers the flash after a calculated delay. It’s not specifically covered in his guide, but [Bruce] also mentions that this can be modified to use sound as a trigger. Here’s another sound-activated flash controller if you need inspiration.

The image at the top was made by dropping dye from a pipette into a pool of water. If you don’t have a pipette on hand you can head over to our LIFE blog to make one out of heat shrink tubing.

18-year-old Builds Functioning Submarine

teen-builds-submarine

[Justin Beckerman] built a functioning one-man submarine. The thing is, this isn’t the first one that he’s built. Looking through the projects on his website we find almost no information about this build, but he does show off one previous model, as well as a couple of unmanned underwater rover projects.

The pressure hull of the sub is made from corrugated drainage pipe. This isn’t a bad idea as the tube is engineered to be buried in the ground and carry the load of earth on top of it. It’s designed to go down just 30 feet, which explains the lack of half-dome caps on either end; the pressure just isn’t that great at that depth. The buoy floating to his left is his tether to the surface. Fresh air is pumped from here into the sub. He’s also included safety features like a 20-minute air tank in case he gets into a bind, and a quick opening top hatch. That hatch is a hemisphere of clear acrylic which lets him view what’s around him.

You’ll learn more from the two video clips he posted. The Fox 5 news interview includes a shot of one of the messiest work benches we’ve seen. A messy bench is the sign of constant project construction, right?

Continue reading “18-year-old Builds Functioning Submarine”