Pumping 1080p Video Out Of An FPGA

fpga-pumping-1080p

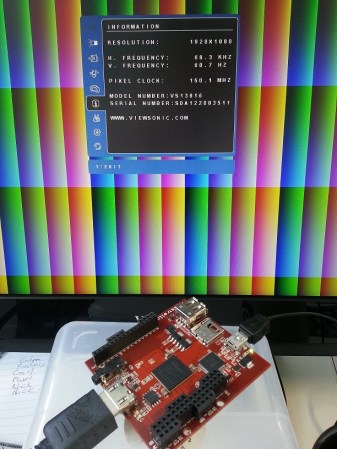
[Hamster] admits this 1080p HDMI hack for an FPGA doesn’t put a signal that’s fully up to specifications. But as you can see in the image above it does output a 1920×1080 image at 60 Hz, which is the size and frequency of full HD video. It falls just short due to some jitter, which may be just fine if this is only being used for early prototyping and will be replaced with a dedicated encoder later in the design process.

Here he’s chosen a Pipistrello board but thinks that any device which has a Spartan 6 chip with the differential pairs connected to an HDMI socket will work. The difficulty of the task comes in serializing four output channels at 1500 Mb/s each. Because of this just coding your logic isn’t going to work. After roughing out the design [Hamster] went back in and chose to manually place some of the components to ensure that data from each channel arrives at the same time.

While you’re messing with HDMI you may also want to give this overlay hack a try.

Hackerspace Develops Ways To Get Peeps To Spill Their Secrets

Peep-Electric-Chair-5

Whether you call it enhanced interrogation or torture, the subject is a lot less serious when the victim is a sugary confection. The LVL1 Hackerspace in Louisville, Kentucky recently held an event focused on getting Peeps — the bunny-shaped sugar-covered marshmallow treats — to spill their guts. Participants developed a range of tongue-in-cheek torture devices then demonstrated their functionality on the bunnies.

You shouldn’t be surprised that the event posting starts with Peep waterboarding. But from there the rigs do get a lot more creative. For instance, the electric chair above connects the bunny to a stun gun (there’s no mention of what that big set of capacitors has to do with this. There’s also an Iron Maiden which is really more of a Plastic Maiden. It subjects the marshmallow to multiple stab woulds using a plastic egg as an enclosure and a hair brush head as the spikes. You can’t mutilate Peeps without at least one being sent through a microwave. But perhaps our favorite is The Rack. A pair of them were built, one was laser cut and the other was constructed free-hand. Both are a whimsical take on a historically brutal implement.

Handwriting Suck? Build A Machine To Do It For You

calligraphy-machine

Children of the information age are doomed to have the worst handwriting just for lack of use if nothing more. But some students at Olin College harnessed technology to find a solution to that problem. Meet Herald, a CNC machine that can produce beautiful calligraphy.

The machine uses a gantry to move the writing tip along the X and Y axes. The flexible-nib calligraphy pen is mounted on a sprocket which rotates the tip onto the writing surface, taking care of the third axis. The rig was beautifully rendered from their CAD drawings, then tweaked to ensure the smoothest motion possible before the quintet of Sophomores began the physical build.

The drive hardware is very simple yet it produces great results. It uses an Arduino along with three stepper motor drivers. There are also limiting switches to protect the hardware from runaway code. The software interface designed by the team lets the user cut and paste their text, and select a font, font size, alignment, etc. It then converts the text to G-code and pushes it to the Arduino where the GRBL package takes care of business.

Don’t miss the device in action, writing out a [Langston Hughes] work in the clip after the break.

Continue reading “Handwriting Suck? Build A Machine To Do It For You”

Wireless Doorbell Battery Monitor

wireless-doorbell-battery-monitor

We know exactly what [Dan] is going through. We also bought a cheap wireless doorbell and are plagued by the batteries running down. When that happens, the only way you know is when people start pounding on the door because you’re not answering the bell. Well no more for [Dan]. He built a backup system which monitors the voltage of the batteries on the chime unit.

You can see the small bit of protoboard he used to house the microcontroller and the UI. It’s an ATtiny13 along with a green LED and a single push button. The idea is to use the chip’s ADC to monitor the voltage level of the pair of batteries which power the chime. When it drops below 3V the green LED will come on.

First off, we wish these things would come with better power supply circuits. For instance, we just replaced the CR2032 in an Apple TV remote and measured the voltage at 2.7V. That remote and the chime both run from a 3V source. Can’t they be made to work down to 1.8V? But we digress.

In addition to monitoring voltage [Dan’s] rig also counts the number of times the chime has rung. Every eight seconds it flashes the count in binary, unless he presses the red button to clear the count. This is shown in the video after the break. We guess he wants to know how many times this thing can be used before running the batteries down.

Seriously though, for a rarely used item like this how hard would it be to use ambient light harvesting to help save the batteries? Looking at some indoor solar harvesting numbers shows it might be impossible to only power this from PV, but what if there was a super-cap which would be topped off with a trickle from the panels but would still use the batteries when that runs down?

Continue reading “Wireless Doorbell Battery Monitor”

Shock Sword Works Best On Foes Who Fight With Multiple Blades

shock-sword

This project most certainly has some of Trailer Park Boys rolled into it. We say that because the living room is the only place this will ever been used and this guy’s reaction to getting shocked is exactly how [Ricky] would respond.

The sword on the left has an electronic stun mechanism built into it. it works by energizing two blades which are separated by nylon bolts and spacers. Look closely at the tip and you’ll see the blue glow which indicates high voltage. To shock your victim you have to touch them with both blades at the same time. This is demonstrated in one of the videos after the break. But the real pain comes when [Jonathan] — the guy who built the stun sword — touches it on either side with this pair of blades. His body completes the connection and his NSFW language tells the tale of how it feels.

This thing seems to pack a bit more of a punch than our own stun-gun enabled quadcopter.

Continue reading “Shock Sword Works Best On Foes Who Fight With Multiple Blades”

Fabricating Edible LEDs

fabricating-edible-LEDs

They’re edible, yes. But they don’t light up. That’s fine with us, since the process [Becky Stern] used to make these gummy candy LEDs taps into several techniques handy to have under your belt.

The first part shown in her video (embedded after the jump) is to make a mold for the candies. You probably have a few bags of LEDs in your parts bin. Those along with a trough made of foam core come together to create the form for the silicone mold. After mixing, pouring, and hardening, [Becky] peels the silicone off of the LEDs and sends it through the oven to make it food-safe. Mixing up the candy uses simple ingredients (gelatin, water, and ascorbic acid) but you’ll need to follow the methodology closely to get the taste and clarity you’re used to. Syringes are used to fill the tiny voids in the mold before adding leads which were 3D printed using PLA.

These will be a huge hit at your next hackerspace meeting!

Continue reading “Fabricating Edible LEDs”

Dynamic Bicycle Headlight Uses The Open Road As A Display

This thing is so cool it almost looks fake. But [Matt Richardson] isn’t a hoaxster. He actually built what might be called a heads-down display for your bicycle. He refers to it as a headlight because it borrows a similar function. It mounts on the handlebars and shoots light off the front of the bike. But it’s more than just a battery and a bulb, this uses a pico-projector to give that light some meaning. In the video after the break he shows it off on the streets of NYC.

So far he’s only displaying information that has to do with the speed of travel, but the proof is there just waiting for a brilliant new use. Feeding the projector is a Raspberry Pi board. For this prototype [Matt] mounted it, along with the portable cellphone charger which plays the role of the power source, on a hunk of hardboard strapped inside the bike frame.

If you’re thinking of doing this one yourself beware of the BOM price tag. That projector he’s using runs upwards of $400. We wonder if you could hack together a rudimentary replacement with an old cellphone screen and this diy film projector?

Continue reading “Dynamic Bicycle Headlight Uses The Open Road As A Display”