Wireless Fireworks Controller Includes Several Safety Features

[Craig Turner] wrote in to tell us about the wireless fireworks controller he just finished building. It has eight total channels and offers the kind of safety features we like to see when working with explosives.

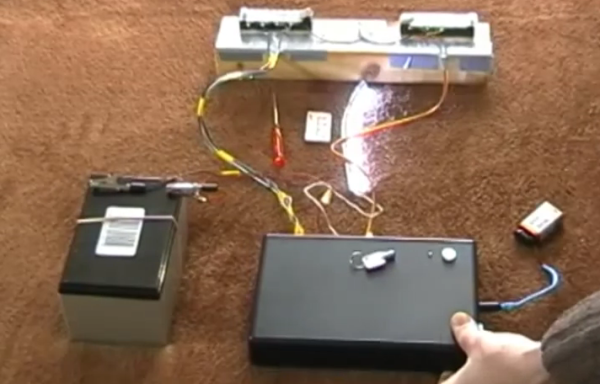
The image above details the launcher side of the project. The project box houses an Arduino which is powered by a 9V battery. To enable this base station the key lying on top of the project box must be inserted and turned to the on position. To the left is the 12V battery which is used to supply the igniters via a set of eight relays. In the demo video after the break [Craig] is using nichrome wire to demonstrate, but we’ve even see projects that actually burn up resistors to light the fireworks.

The system uses RF12 wireless modules to communicate with the control panel. That also has an Arduino, along with a number pad. After switching on the power the operator must enter a PIN code before the system will allow any of the fireworks to be launched.

Continue reading “Wireless Fireworks Controller Includes Several Safety Features”

Valentine’s Puzzle Box Makes You Work For What’s Inside

valentines-puzzle-box

Here’s a new take on a gift box which has been locked from the inside. I doesn’t rely on GPS coordinates or a real-time clock to unfasten the latch. Instead, the box itself acts as a puzzle. You follow the visual and audio clues, turning the box along three axes in order to input the unlock code.

There are three different difficulty settings. The easiest uses the LED heart to indicate which direction to turn the box next. This is accompanied by a beep for correct or a longer tone for incorrect movements. On the medium setting you can only go by the tones, but once you screw up the lights will aid you in getting back to where you where when making the mistake. The impossible setting doesn’t use the lights at all.

[Matt] took inspiration from some reverse geocache projects featured here on Hackaday. He already had an STM32F3 Discovery board on hand which he received as a sample. It’s driving all of the electronics inside, with the on-board gyroscope as the input device. Don’t miss the video after the break to see how well the thing works.

Continue reading “Valentine’s Puzzle Box Makes You Work For What’s Inside”

R2D2 Collects Valentine’s Cards Like A Boss

r2d2-valentines-card-box

Think back to your school days when each student would make a box which would receive Valentine’s cards from their friends. We have fond memories of buying cards with Teenage Mutant Ninja Turtles on them. We guess this tradition is still going strong. Instead of making a receptacle out of a shoe box  [Dr Franken Storer] helped his seven-year-old build this remote control R2D2 with sounds and lights. Yeah, it’s totally cheating. But who can begrudge a hacker dad a little fun?

The bot started as a desktop trash can. It features a domed top which looks just like the droid, but also has a hinged opening where the cards can be placed. To the lid he attached a tilt switch that triggers a Radio Shack sound player to provide the sounds. These sound modules are popular in a lot of projects like this doorbell hack. The final touch (aside from the droid decor on the outside) was to add a remote control car that lets his son drive R2 around.

We asked for more details and he delivered. You’ll find his lengthy description of the project after the jump.

Continue reading “R2D2 Collects Valentine’s Cards Like A Boss”

UDP Between STM32-F4 Discovery Boards

stm32-f4-udp

[The Backwoods Engineer] tested out a new accessory kit for the STM32-F4 Discovery board. The image above shows two boards communicating with the UDP protocol. Notice the extra PCB into which each Discovery board has been plugged. This is a third-party add-on which adds Ethernet, RS-232, SD card slot, and a connector for LCD or Camera. We’ve had one of these F4 Discovery boards on hand for a while and haven’t figured out a good way to connect external hardware to the huge dual pin-headers. This doesn’t solve the problem — the base board also includes dual headers to break-out all the pins — but having Ethernet, serial, and SD certainly reduces the need to add all that much more. The other drawback to the hardware is that the sample firmware is targeted at the IAR Embedded Workbench which is neither free, nor in the realm of affordable for hobbyists.

The NIC used on the baseboard has auto-crossover capabilities so the boards were connected using a regular Cat6 patch cable. This example has the boards constantly sending UDP packets with the module on the right reporting status information to a terminal via the serial connection.

Airsoft Turret Has Turn, Tilt, And Auto-feed To Keep Those BBs Flying

airsoft-turret-with-laser-cut-parts

Yet another project that proves you need to acquire a laser cutter. This Airsoft turret rotates, tilts, and includes a hopper for ammo.

All of the pieces were cut from acrylic. The base includes a bracket which keeps the large rotating gear level by sandwiching it between the layers. That and the tilt mechanism are pretty straight forward. The module responsible for loading the BBs is pretty neat though. It uses a gear with round teeth the same diameter as the ammo. Once a BB is picked up it is forced upward into the tubing that feeds the gun. Get the full picture from the demo video after the break.

The one thing [The Liquider] is wondering about is how to provide feedback for the tilt and rotate functions. We can’t think of an easier way than to use simple rotary encoders. The Arduino Mega he wishes to use as a driver will have no problem interfacing with reflectance sensors and the acrylic makes it simple to mount this type of black and white encoder wheel.

Continue reading “Airsoft Turret Has Turn, Tilt, And Auto-feed To Keep Those BBs Flying”

Cracking Open A 24-port Switch So You Don’t Have To

hp-procurve-ethernet-switch-teardown

[Kenneth Finnegan’s] post about this 24-Port HP ProCurve 2824 Ethernet Switch teardown was a delight to read. He’s taking an introduction to networking class at California Polytechnic State University. One of their labs included virtual machines shooting thousands of new MAC addresses at the thing all at once. Despite it’s ability to switch data at a blazing fast rate, it’s ability to deal with that many new hardware identifiers was less than impressive. He wanted to find out why and it just so happened he had one of these in his parts bin at home (which he refers to as if it’s a high-powered RPG character).

The mainboard is divided into three major blocks: the power supply, the switching hardware, and the processor that makes this a manged switch. Although he covers all of these pieces (and the switching stuff is very interesting to learn about) it is the processor section that was causing the aforementioned slowdown. It’s a 266MHz PowerPC chip with a measly 64 MB of RAM. Of course this doesn’t need to be any more powerful since all traffic from previously ‘learned’ MAC addresses gets handled by the switching block and never touches the processor portion.

Don’t miss the end of his post where he discusses how the filtering caps, and semi-isolated ground planes help to tame the beast created from all of this high-speed switching.

Beginner’s Android/Arduino Example Shows The Power Of App Inventor

This is a simple project. It uses an Android device to switch an LED driven by the Arduino. Connectivity is provided by the Bluetooth module inserted in the breadboard. But one look at the UI on the Android device and you might think this is anything but simple. The truth is that [Kerimil] didn’t spend forever learning Java and programming the app. Instead he’s showing off the power of  App Inventor to get your Android controls up and running fast.

Check out the third button down; when was the last time you added voice commands to your project? It’s worth clicking through to see just how simple that portion was. App Inventor — a Google cast-out that is now maintained by MIT — is a graphical tool that unlocks the power of an Android handset to those with the most basic of programming understanding. For instance, the voice controls shown off after the break are provided by a single bracket which uses conditional statements to ‘listen’ for the words on, off, and blink. You’ll find the voice recognition diagram after the break as well.

You could try to go completely graphical with this project. There’s the option of programming the Arduino side of the project in a similar way.

Continue reading “Beginner’s Android/Arduino Example Shows The Power Of App Inventor”