Great Junk-yard Find Leads To A Reclaimed Control Panel Project

Having the “can you believe somebody threw this away?” mentality has gotten us into some trouble through the years, but look what [Joshua] found at the scrap yard! It’s a door from a power conversion station and it contains fourteen indicator lights and a lot of other doodads. But since this is just the door, he needed a way to monitor the controls and drive the indicators. At the heart of the hack he used to get this up and running is a PIC 18F2550. It has no trouble driving the indicators thanks to a pair of ULN2803 darlington arrays which switch the higher 24 volt levels.

His writeup doesn’t mention the method used, but the panel also has a couple of meters at the top. In the video after the break you can clearly see that he’s got them both working. We’d bet there’s a plan for each of the buttons as well, since this will be prominently featured in their alien-invasion themed Halloween display this year.

Continue reading “Great Junk-yard Find Leads To A Reclaimed Control Panel Project”

An Odd Little Box

Here’s an odd little box that might get those creative juices flowing for the upcoming Halloween season. [Jeremy’s] creepy glowing box has a pair of ping-pong ball eyes which diffuse the red light from a pair of LEDs. Both the lid and they eyes move, and the whole thing is set up for wireless control.

The majority of the parts came from a toy RC helicopter that [Jeremy] had sitting in his junk bin. After close inspection he found that the electronics included to motor drivers for the two rotors, as well as two servo motors which worked to steer the aircraft. One of those servos has been repurposed to aim the gaze of they eyes left and right, the other servo is used to lift and close the lid of the box. This leaves the two motor controllers, one of which switches the LEDs on and off. The other doesn’t really have a purpose yet. He tried adding one wheel to the box, but turning that on just makes the whole thing crash to the floor. Check out what he’s done so far in the clip after the fold.

Continue reading “An Odd Little Box”

Why Build A CNC Mill When You Can Have A Chess Robot Instead?

[Patrick McCabe] enjoys the challenge of playing chess against the computer but he wasn’t satisfied with the flat experience of on-screen gaming. No problem, he just built his own gantry-style chess robot that he can play against. Don’t be confused, he still doesn’t have to touch the pieces, but instead uses the dedicated control board seen on the left of the image above. The robotic arm that is mounted on a gantry takes care of moves for both players.

It’s a pretty normal CNC build, using four stepper motors to slide the moving bits along precision rod. An Arduino Mega drives the system, with a PC doing the heavy lifting using a program called My Robot Lab.

We certainly like it that [Patrick] spent a little bit of time making the cabinet and visible parts look nice. Chess is a civilized game and unfinished parts would be out-of-place. We didn’t see it in his writeup, but the one feature we’re really hoping he has implemented is the ability to have the robot automatically reset the board at the beginning of a game.

As you might have guess, you’ll find embedded video after the break.

Continue reading “Why Build A CNC Mill When You Can Have A Chess Robot Instead?”

Serial Port JTAG Programmer

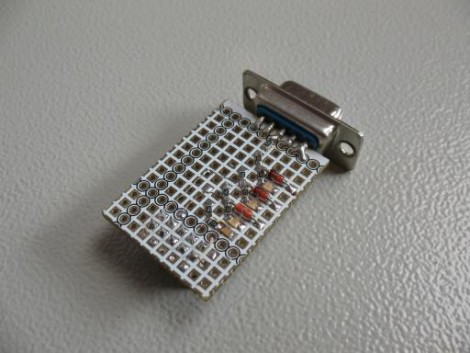
If you’re planning to do some hacking with CPLD or FPGA chips you’ll need a way to program them. JTAG is one of the options and here’s a cheap method that uses the serial port (translated).

This method requires only four signals (TDI, TMS, TCK and TDO) plus ground. But the problem is that an RS232 serial port operates with 12V logic levels and the JTAG side of the programmer needs to operate with the logic levels native to the device you’re programming. Commercial programmers use a level convert IC to take care of this for you, but that doesn’t mesh with the cheap goal of this project. Instead, [Nicholas] uses Zener diodes and voltage dividers to make the conversion. There is also an LED for each data signal to give some feedback if you’re having trouble.

You can use this along with a programming application that [Nicholas] whipped up using Visual Studio. It works well via the serial port, but he did try programming with a USB-to-Serial dongle. He found that this method slows the process down to an unbearable 5-minutes. Take a look, maybe you can help to get that sloth-like programming up to a manageable speed.

[Thanks Alex]

It’s Like… I Can Tell The Time Just By The Color, Man

[Alex] has reduced the resolution of his timepiece as a trade-off for speedy-readability. At least that’s what he claims when describing his color-changing clock. It uses a ShiftBrite to slowly alter the hue of the clock based on the current time. The concept is interesting: 12:00 starts off at white and slowly fades to green at 3:00, blue at 6:00, red at 9:00, and back to white by 12:00 to start the process over again. He has gotten to the point where he can get the time within about 15 minutes just with a quick look. But he did need to spend a few days acquiring the skill by having the color clock sit next to a traditional digital clock.

The build is pretty simple and we’d bet you already have what you need to make your own. [Alex] is really just proving a concept by using the ShiftBrite and an mBed, there’s no precision RTC involved here. So grab your microcontroller of choice, and an RGB LED of your own and see if you can’t recreate his build.

Of course you could always choose to build a color-based timepiece that’s even harder to read.

Hacking For Feline Enjoyment

[Dino] is staying true to his goal of hacking one project every week. This time around, he’s working on a toy that will amuse and delight his cats. The project centers around a mouse house that has two holes where mice can stick their heads out. When they do, a little LED lamp illuminates their appearance in hopes to catch the eye of your lazy kitty.

The mechanism that automates this device is quite clever and reminds us of the most useless machine. That is, the armature that holds a mouse on either end actuates a limiting switch in the middle of the box when it moves to expose one of the mice. Each of those mice is attached with a rod, along side a leaf switch that makes the mouse retreat when boinked on the head by the cat.

It only takes [Dino] about six minutes to walk us through the build in the video after the break. What follows is a walk through of the wiring and some playtime with the family pets. Despite the intended purpose, it looks like the dog is much more interested than the cat. Either way, it’s a winner in our book.

Continue reading “Hacking For Feline Enjoyment”

Making A 3D Printer Work Wirelessly

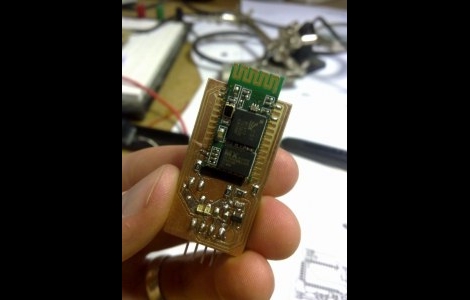
Looking for more ways to enhance his 3D printer, [JJ] decided to make it wireless. He got his hands on some $10 Bluetooth modules and figured this would be just the thing to make the link with his laptop.

They came as surface mount modules, so the first thing he had to do was develop a breakout board that he could patch into his Ultimaker 3D printer. This provided a nice opportunity as he needed to do some level converting to make the 3.3V module play nicely with his 5V CNC electronics. The first version of the board turned out well but he had really a poor communications range. The second version, which is pictured above, hangs the module’s antenna off the edge of the breakout board and works a lot better.

We’ve embedded a clip after the break that walks through the development of this board. [JJ] shared the Eagle CAD files as a megaupload link, but we’ve also mirrored the file after the break for your convenience.

Continue reading “Making A 3D Printer Work Wirelessly”