Easy, Secure HTTPS With An ESP8266

Security has always been an issue with IoT devices. Off the shelf devices often have terrible security while DIY solutions can be complicated, needing recompilation every time a website’s fingerprint changes. [Johannes] wrote in to let us know he’s been working on a way to make HTTPS requests easier to do on ESP devices.

The normal ways to do HTTPS with an ESP8266 is to either use Fingerprints, or to use client.setInsecure(). Fingerprints require the user to know exactly which pages the ESP will connect to and extract the Fingerprints from each of those websites. Since the fingerprints change yearly, this means the fingerprint will have to be re-extracted and the code recompiled each time a fingerprint changes. The use of client.setInsecure() is, obviously, insecure. This may not be an issue for your project, but it might be for others.

[Johannes’] solution is to extract the trusted root certificates and store them in PROGMEM. This allows access to any web page, but the root certificates do expire as well. As opposed to the fingerprints, though, they expire after 20 years, rather than every year, so the program can run for a long time before needing recompilation. This solution also doesn’t require any manual steps – the build process runs a script that grabs the certificates and stores them in files so that they can be uploaded to the SPIFFS written to PROGMEM to be used during HTTPS requests.

He’s come up with a fairly straightforward way to have your IoT device connect to whichever web page you want, without having to recompile every once in a while. Hopefully, this will lead to better security for your IoT devices. Take a look at some previous work in this area.


A DIY 10-bit Relay Adder

When it comes to understanding computers, sometimes it’s best to get a good understanding of the basics. How is data stored? How does the machine process this information? In order to answer these questions a bit more and start learning programming, [Nakazoto] built a 10-bit binary adder with relays.

The build is designed from the ground up, including the PCBs, which are milled using a CNC machine. There are six boards: the input board, sequencer board, 2 sum register boards, a carry register board and a 1-bit ALU board. The input board has 32 LEDs on it along with the switches to turn on each bit on or off. In total, 96 relays are used and you can hear them clacking on and off in the videos on the page. Finally, there is a separate switch that sets the adder into subtraction mode.

Usually, [Nakazoto]’s website is mostly about cars, but this is a nice diversion. The article has a lot of detail about both the design and build as well as the theory behind the adder. Other articles on binary adders on the site include this one which uses bigger relays, and this 2-bit adder which uses 555 timers.

Continue reading “A DIY 10-bit Relay Adder”

Reverse Engineering A Ceiling Fan Remote

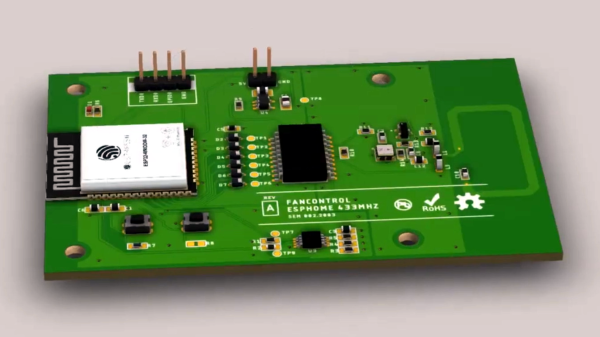
In the quest to automate everything in your home, you no doubt have things that aren’t made with home automation in mind. Perhaps your window AC unit, or the dimmer in your dining room. [Seb] has several ceiling fans that are controlled by remotes and wanted to connect them to his home automation system. In doing so, [Seb] gives a good overview of how to tackle this problem and how to design a PCB so he doesn’t have a breadboard lying around connected to the guts of his remote control.

There are several things [Seb] needs to figure out in order to connect his fans to Home Assistant, the home automation system he uses: He needs to determine if the circuit in the remote can be powered by 5 or 3.3 V, he needs to connect the circuit to an ESP32 board, and he needs to figure out if he can create a custom PCB that combines the circuit and the ESP32 into one. The video goes through each of these steps and shows the development of each along the way.

There’s a lot of info in the video, so it might need to be slowed down a bit to see all the details. There are some other reverse engineering of home automation gear on the site, here, or, you might want to build your own remote to control your automated devices.

Continue reading “Reverse Engineering A Ceiling Fan Remote”

The Drone That Can Play Dodgeball

Drones (and by that we mean actual, self-flying quadcopters) have come a long way. Newer ones have cameras capable of detecting fast moving objects, but aren’t yet capable of getting out of the way of those objects.  However, researchers at the University of Zurich have come up with a drone that can not only detect objects coming at them, but can quickly determine that they’re a danger and get out of the way.

The drone has cameras and accompanying algorithms to detect the movement in the span of a couple of milliseconds, rather than the 20-40 milliseconds that regular quad-copters would take to detect the movement. While regular cameras send the entire screens worth of image data to the copter’s processor, the cameras on the University’s drone are event cameras, which use pixels that detect change in light intensity and only they send their data to the processor, while those that don’t stay silent.

Since these event cameras are a new technology, the quadcopter processor required new algorithms to deal with the way the data is sent. After testing and tweaking, the algorithms are fast enough that the ‘copter can determine that an object is coming toward it and move out of the way.

It’s great to see the development of new techniques that will make drones better and more stable for the jobs they will do. It’s also nice that one day, we can fly a drone around without worrying about the neighborhood kids lobbing basketballs at them. While you’re waiting for your quadcopter delivered goods, check out this article on a quadcopter testbed for algorithm development.

Gravity-Defying Water Droplet Fountain Gets An Upgrade

When we last saw [isaac879]’s levitating RGB time fountain, it was made of wood which meant that it would absorb water and didn’t really show off the effect very well. His new version solves this problem with an acrylic case, new PCB and an updated circuit.

Like the original, this project drops water past strobing RGB LEDs creating an illusion of levitating, undulating colored water droplets. The pump at the top creates the droplets, but the timing has a tendency to drift over time. He thus implemented a PID controller to manage the pump’s drip rate, which was done by having the droplets pass by an infrared diode connected to an ATTiny85. The ’85 used the diode and PWM to control the pump motor speed and communicated to the Arduino over I2C.

The video shown below shows the whole process of designing and building the new time fountain. Everything from circuit and PCB design to 3D printing to assembly is shown along with narration describing what’s going on in case you want to build one yourself. If you do, all the files and components required are listed in the info section of the video.

There’s more that [isaac879] wants to do to improve the time fountain, but V2 looks great. It’s sleeker and smaller than the original and solves some of the design issues of the first. For more inspiration, check out some of the other levitating water fountain projects that have been posted over the years.

Continue reading “Gravity-Defying Water Droplet Fountain Gets An Upgrade”

The Internet Controls This Monster

What’s worse than unleashing a monster on the internet? Allowing the internet to control the monster! But that’s just what [8BitsAndAByte] did, created a monster that anyone on the internet can control. Luckily for us, this monster only talks.

This is a very simple project and most of the parts are off the shelf. Hardware wise the monster’s body is made out of a plastic flowerpot; its mouth is a bit of wood that covers the top of the flowerpot; its eyes, two halves of a plastic sphere painted white with some felt for irises. And then whole thing is covered in some blue fake fur.

Electronics wise, a Raspberry Pi is running the show and handling the text-to-speech is an AIY Voice Hat. A servo fits inside the flowerpot to open and close the monster’s mouth. On the software end of things, a bit of Python has been written that waits for a bit of text, sends it off to the Voice Hat’s text-to-speech module and moves the servo to open and close the mouth. The scary part, connecting the monster to the internet, is done with remo.tv, which is some open-source code hosted on GitHub specifically for allowing control of robots over the internet.

This is a neat little project which is simple enough that kids could build one themselves. The instructions and the python script are up on the Instructables page, and you can see the monster in action at its page on remo.tv. Perhaps [8BitsAndAByte] could add a couple of these internet controlled robot arms to the monster to create a monster that could create some real havoc!

Continue reading “The Internet Controls This Monster”

DIY Cassette Tape Guitar Delay

Digital delay pedals are pretty good nowadays and even the cheaper ones do a pretty good job at emulating the sound of old analog delay effects. And that’s good, because the original delay effects can run you a pretty penny. If you’re in to DIY electronics, though, analog delay effects can still be built without breaking the bank, and, as an example, [Matsound] has made a tape delay using an old tape deck and regular cassette tapes.

The core of the build is a portable 3-head cassette recorder, in this case a Marantz PMD430. The circuit has been around for a while – it was originally found in an issue of Stompboxology in the 90’s. The basic idea is that with a three-head recorder (erase, record, play) the distance between the record and play heads creates a delay and you increase this delay by slowing down the recorder’s motor. You combine the output from the recorder with the dry signal from your input and, viola, tape delay.

[Matsound] added a cool feature where you can control the speed of the motor with a control voltage, so if you connect it to a keyboard and produce different voltages from different keys, you get weird, spacey effects. The video gives an overview of the features and some details of the build process are in the video’s description.

A nice build built into a nice case and a great effect! Maybe you wouldn’t take it out gigging with you, but it sure sounds pretty good!  Other delay pedals have been mentioned on the site before, like this digital delay pedal and here’s another take on the cassette tape delay.

Continue reading “DIY Cassette Tape Guitar Delay”