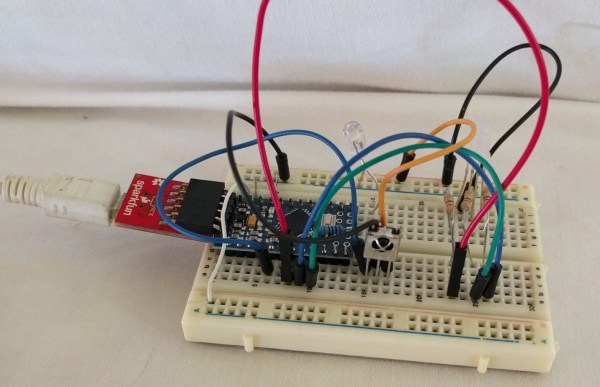
Your Audio Will Be Back, Right After This Commercial Break

[LittleTern] — annoyed by repetitive advertisements — wanted the ability to mute their Satellite Box for the duration of every commercial break. Attempts to crack their Satellite Box’s IR protocol went nowhere, so they thought — why not simply mute the TV?

Briefly toying with the idea of a separate remote for the function, [LittleTern] discarded that option as quickly as one tends to lose an additional remote. Instead, they’re using the spare RGYB buttons on their Sony Bravia remote — cutting down on total remotes while still controlling the IR muting system. Each of the four coloured buttons normally don’t do much, so they’re set do different mute length timers — customized for the channel or time of day. The system that sends the code to the TV is an Arduino Pro Mini controlling an IR LED and receiver, with a status LED set to glow according to which button was pressed.

Continue reading “Your Audio Will Be Back, Right After This Commercial Break”

Push Big Red Button, Receive Power.

As with the age-old panic after realizing you have left an oven on, a candle lit, and so on, a soldering tool left on is a potentially serious hazard. Hackaday.io user [Nick Sayer] had gotten used to his Hakko soldering iron’s auto shut-off and missed that feature on his de-soldering gun of the same make. So, what was he to do but nip that problem in the bud?

Instead of modding the tool itself, he built an AC plug that will shut itself off after a half hour. Inside a metal project box — grounded, of course — an ATtiny85 is connected to a button, an opto-isolated TRIAC AC power switch, and a ‘pilot’ light indicating power. After a half hour, the ATtiny triggers the opto-isolator and turns off the outlet, so [Sayer] must push the button if he wants to keep working. He notes you can quickly double-tap the button for a simple timer reset.

Continue reading “Push Big Red Button, Receive Power.”

Beating Life-Force Amulet

It’s one thing to see science-fiction slowly become reality, but quite another to take that process into your own hands. Inspired by a movie prop, [Eric Strebel] decided to build himself a 21st science-fiction artifact: a pulsing, life-force amulet.

At the — aheam — heart of this amulet is a blinking LED circuit which [Strebel] modified into a slow pulse with the help of his friends. To add to the surreal quality of the amulet, he sourced a stone from a local gem show, bringing his circuit along to get an idea of what the final product would look like. Once [Strebel] had shaped the stone to a more manageable size, he took a polyester filler mold of its rear face to use as a base from which to cast a durable resin housing for the circuit.

[Strebel] is using a pair of coin cell batteries which fit snugly behind the glowing LED, and in case he ever needs to get inside the amulet, he’s attached the stone to the rear with sew-on straps — super-gluing them to each piece. He went for a bit of an industrial look for the necklace — a braided oil line with a modified quick-release clasp that works like a charm.

How does this amulet stack up to one from the 23rd century? You be the judge!

A Grandfather Clock BarBot

As the saying goes, it’s five o’clock somewhere; when the clock finally strikes the hour, that same clock can pour you a drink thanks to redditor [Diggedypomme].

This bar-clock can dispense beverages with up to four different spirits and four mixers, and takes orders over voice, keyboard, or web-controls. A belt-driven drink loading platform pushes out through a spring-loaded door and once the vessel is in place and the order received, peristaltic pumps dispense the spirits while servos open taps for the mixers — a far easier method to administer the often carbonated liquids. A Raspberry Pi acts as this old-timer’s brain, an Arduino controls the lights, and a HAT to controls the servos. Here’s a more in-depth tour of what’s going on behind the bar, but check out the video after the break for a full run through of a few drink orders!

Continue reading “A Grandfather Clock BarBot”

Three Wires = One Motor

Here’s a quick build to show off fundamentals of electric current to new makers — or a cool party trick that might earn you a buck. [Jay] from the [Plasma Channel] shows off how you can make a simple motor with only three pieces of enameled wire in under five minutes.

Start with a roll of 26-guage — or thicker — magnet wire, and a pair of scissors or knife. For the base, wrap fifteen to twenty turns of wire around any spherical object about one and a half inches in diameter, leaving a few inches extra on both ends. Wrap those ends around your coil a few tines to secure it and straighten out the excess length — one will act as a support and the other will connect to your power source. Another piece of wire — similarly wrapped around the base coil — acts as the other support and the other terminal. Scrape off the wire coating from one side on both support wires and curl them into small loops. Halfway done!

Continue reading “Three Wires = One Motor”

HandHolo: A Homebrew ARG

Taking a dive into VR or augmented reality — once, dreamed-of science fiction — is not only possible for the average consumer, but crafting those experiences is as well! Hackaday.io user [kvtoet]’s HandHolo is a homebrew method to cut your teeth on peeking into a virtual world.

This project requires a smartphone running Android Oreo as its backbone, a Bluetooth mouse, a piece of cardboard and a small mirror or highly reflective surface. The phone is slotted into the cardboard housing — prototype with what you have! — above the mouse, and the mirror angled opposite the screen reflects the image back to the user as they explore the virtual scene.

Within Unity, [kvtoet]’s used a few scripts that access phone functions — namely the gyroscope, which is synchronised to the mouse’s movements. That movement is translated into exploration of the virtual space built in Unity and projected onto the portal-like mirror. Check it out!

Continue reading “HandHolo: A Homebrew ARG”

Putting The Pi In Piano

Working on a PhD in composition, [Stephen Coyle] spends a fair bit of time at his electric keyboard. Setting himself up to work can be a bit of a task, so he felt he could improve the process and make it easy as Pi.

Finding it an odious task indeed to use notation software, connecting his laptop to his keyboard is a must — avoiding a warren of wires in the move is a similar priority. And, what if he could take advantage of the iPad’s unique offerings too? Well, a Raspberry Pi Zero W running Ravelox — an RTP MIDI protocol — makesĀ  his music available on his network to record on whichever device he pleases.

Continue reading “Putting The Pi In Piano”