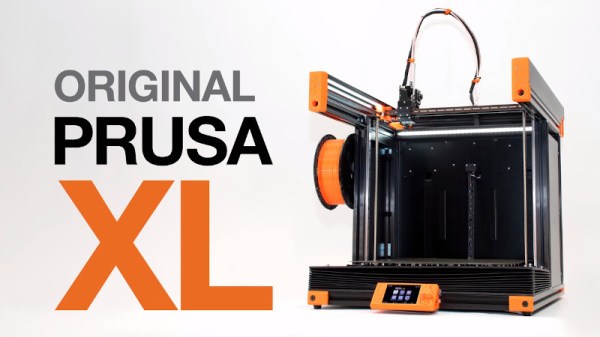
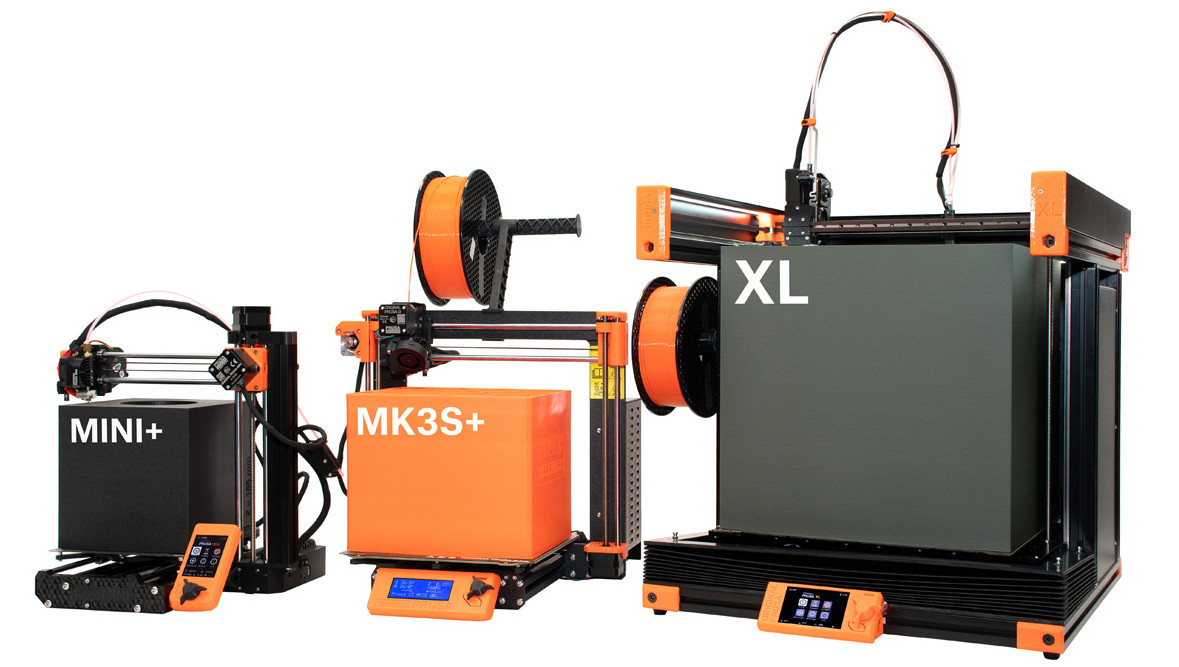
3D Printing Toothpaste In The Name Of Science

While we don’t often see them in the hobbyist community, 3D printers that can extrude gels and viscous liquids have existed commercially for years, and are increasingly used for biological research. [Ahron Wayne] has recently been working with such a printer as part of a project to develop a printed wound dressing made of honey and blood clotting proteins, but for practice purposes, wanted to find a cheaper and more common material that had similar extrusion properties.

The material he settled on ended up being common toothpaste. In the video below you can see him loading up the cartridge of a CELLINK INKREDIBLE+ bioprinter with the minty goop, which is then extruded through a thin blunt-tip needle by compressed air. After printing out various shapes and words using the material, often times directly onto the bristles of a toothbrush, he’s come up with a list of tips for printing similarly viscous substances.

First and foremost, go slow. [Ahron] says the material needs a moment to contract after being extruded if it’s going to have any hope of supporting the next layer of the print. Thick layer heights are a necessity, as is avoiding sharp curves in your design. He also notes that overhangs must be avoided, and though it probably goes without saying, clarifies that an object printed from toothpaste will never be able to support anything more than its own weight.

In addition to the handful of legitimate DIY bioprinters that have graced these pages over the years, we’ve seen the occasional chocolate 3D printer that operated on a similar principle to produce bespoke treats, so the lessons learned by [Ahron] aren’t completely lost on the hacker and maker crowd. Who knows? Perhaps you’ll one day find yourself consulting this video when trying to get a modified 3D printer to lay down some soldering paste.

Continue reading “3D Printing Toothpaste In The Name Of Science”

Spilled OJ Does A Number On Zelda Game Boy Cartridge

When [Taylor Burley] first opened up the cartridge for The Legend of Zelda: Oracle of Seasons, it certainly didn’t look like it had been dunked in corrosive orange juice. But looks can be deceiving, and while the game’s owner certainly did an admirable job of cleaning up the surface of the PCB, the cartridge was no longer functional. Clearly, this was a sticky situation.

After removing all of the components from the PCB, [Taylor] was quickly able to piece together what had happened. Despite the vigorous cleaning the game received after the spill, juice had found its way under each IC on the board. Left to sit in these nooks and crannies for who knows how long, the juice started to eat away at the traces on the PCB. Getting the game back up and running would naturally require considerable board repairs, but they don’t call him Solderking for nothing.

Corrosion lurking under each chip.

In the video below, you can see [Taylor] methodically scraping away the corrosion on the board before he starts recreating damaged connections with solid 30 gauge wire. Using tweezers and viewing the action through a digital microscope, he deftly bends the wire around to fit the shapes of the original traces and tacks the new conductors down with solder. He even goes ahead and repairs the traces that go to various test points on the cartridge; it’s a completely unnecessary extravagance, but we’re certainly not complaining. There’s a relaxing quality to watching him work, so we were in no rush to see his latest video end.

After fixing the board back up, he replaces all the components and takes it for a test drive on an original Game Boy Color. Confirming that Link’s 2001 outing is working as expected, he finishes the job with a few coats of spray-on conformal coating. With any luck, the next time this particular cartridge has to go face-to-face with some spilled juice, it will roll right off.

This isn’t the first time we’ve seen [Taylor] laboriously rebuild a Game Boy cartridge, and it certainly isn’t the first time we’ve seen him pull off some particularly impressive feats of soldering, either. His work always reminds us that patience and a steady hand can really do wonders.

Continue reading “Spilled OJ Does A Number On Zelda Game Boy Cartridge”

Adding Wireless Charging To The Switch Lite

The Nintendo Switch is a monstrously popular machine, and it’s had no difficulty raking in the bucks for the Japanese gaming giant, but there’s no denying that it’s technologically a bit behind the curve. Until the long-rumored “Pro” version of the Switch materializes, industrious gamers like [Robotanv] will simply have to make up for Nintendo’s Luddite ways by hacking in their own upgraded hardware.

In this case, [Robotanv] wanted to add Qi wireless charging to his Switch Lite. He figured that if all of his other mobile devices supported the convenient charging standard, why not his portable gaming system? Luckily, the system already supports the increasingly ubiquitous USB-C, so finding an aftermarket Qi receiver that would connect to it was no problem. He just needed to install it into the handheld’s case.

After liberating the Qi receiver from its protective pouch enclosure to get it a bit thinner, [Robotanv] taped it to the inside of the system’s case and ran thin wires to the rear of the USB-C port. As luck would have it, Nintendo was kind enough to put some test pads for the power pins right behind the port, which made for an ideal spot to connect the charger.

At first he only connected the positive and negative lines from the charger, but quickly realized he also had to connect the CC pin to get the juice flowing. After that, it was just a matter of buttoning the system back up. All told, it looks like a pretty simple modification for anyone who’s not bashful about taking a soldering iron to their $199 console.

We’ve seen these Qi receivers retrofitted into devices before, and it remains an excellent way to add the feature not only to commercial products, but to your own projects.

Continue reading “Adding Wireless Charging To The Switch Lite”

3D Printed Adapter Puts Slides In Their Best Light

If you’ve got old family photos on slides there’s an excellent chance you’ve considered digitizing them at one point or another, but perhaps didn’t know the best way of going about it. In that case, this 3D printed adapter designed by [Rostislav Persion] that lets you photograph slides with a standard DSLR may be exactly what you were waiting for.

The idea is simple enough, you place the slide inside the adapter, get your focus right, and snap a picture. But of course, you’ve also got to provide some illumination. In this case, the camera is mounted on a tripod and pointed at an appropriate light source. Once you’ve experimented a bit and got the image backlit the way you want it, you can lock everything in place and easily power through a stack of vintage family memories in no time.

For such a straightforward concept, we really appreciate the little details in the execution. For example, rather than just sliding a 3D printed cylinder over the DSLR’s lens, [Rostislav] came up with a foam-padded “shim” that’s strong enough to hold the adapter on without marring anything. The two-part slide spacer that features a bit of springiness to hold everything tight is also a very nice touch.

An approach like this should work nicely for the amount of slides most families are likely to have, but if you’re in a position where you need to digitize thousands of images, some automation would certainly help things along.

Hackaday Podcast 139: Furter Burner, Glowing Potato Peeler, Hacked Smartwatch, And The Last Atlas

Hackaday editors Tom Nardi and Elliot Williams bring you up to speed on the most interesting stories of the week. Hackaday’s Remoticon and Germany’s Chaos Communication Congress are virtual again this year, but the Vintage Computer Festival will be live. We’ll also talk about ocean-going drones, the recreation of an old-school light bulb with a potato peeler, cheap smart watches with hidden potential, and sanding down shady modules to figure out just how you’ve been scammed. Stick around for some thoughts on turning real-estate signs into a handy prototyping material, and to find out why some very impressive Soviet tech is getting the boot from America’s space program.

Take a look at the links below if you want to follow along, and as always, tell us what you think about this episode in the comments!

Direct download (52.775158 MB)

Continue reading “Hackaday Podcast 139: Furter Burner, Glowing Potato Peeler, Hacked Smartwatch, And The Last Atlas”

Vintage Computer Festival East Reboots This Weekend

We don’t have to tell the average Hackaday reader that the last two years have represented a serious dry spell for the type of in-person events that our community has always taken for granted. Sure virtual hacker cons have their advantages, but there’s nothing quite like meeting up face to face to talk shop with like-minded folks and checking out everyone’s latest passion project.

Luckily for classic computer aficionados, especially those on the East Coast of the United States, the long wait is about to end. After being forced to go virtual last year, Vintage Computer Festival East will once again be opening their doors to the public from October 8th to the 10th at the InfoAge Science & History Center in Wall, New Jersey. Attendees will need to wear a mask to gain access to the former Camp Evans Signal Corps R&D laboratory, but that’s a small price to pay considering the impressive list of exhibits, presentations, and classes being offered.

In fact, it’s shaping up to be the biggest and best VCF East yet. The Friday classes cover a wide range of topics from CRT repair to implementing a basic video controller with a FPGA, and the list of speakers include early computer luminaries such as Michael Tomczyk, the Product Manager for the VIC-20, and Adventure International founder Scott Adams. A little birdie even tells us that if you bring your copy of Back into the Storm, our very own Bil Herd will be sign it for you after his talk on the history of the Commodore wraps up Saturday evening.

If you’d rather get hands-on you can always take a walk over to the Computer Deconstruction Laboratory, InfoAge’s on-site hackerspace. Glitch Works will be on hand with several popular kits such as the XT-IDE, an 8-bit ISA adapter that lets you connect (relatively) modern drives to classic machines, and the R6501Q/R6511Q Single Board Computer. A bit rusty with the iron and would rather start on something a little easier? Not to worry. Neil Cherry, a staple of the Hackaday comment section since before we switched to color pictures, will be instructing hackers young and old in the ways of the flux during his all-day soldering classes.

Of course, no VCF trip is truly complete until you’ve searched for treasure in the consignment room. The space has been expanded for 2021, and considering how long folks have had to clean out their attics and garages thanks to the pandemic, we’re expecting a bumper crop of interesting hardware to wade through. If the turnout for the VCF Swap Meet in April was any indication, we’d suggest bringing some extra cash with you.

As a proud sponsor of the 2021 Vintage Computer Festival East, Hackaday will naturally be bringing you a first-hand account of the overall event as well as a deeper look into some of the incredible exhibits on display in the very near future. But words and pictures on a page can only go so far. If you’ve grown tired of virtual events and are looking to peek your head out, we can guarantee a trip to InfoAge this weekend will be well worth the gas money for anyone within driving distance.

Investigating A Defective USB Power Bank Module

Call us old fashioned, but we feel like when you buy a piece of hardware, the thing should actually function. Now don’t get us wrong, like most of you, we’re willing to put up with the occasional dud so long as the price is right. But when something you just bought is so screwed up internally that there’s no chance it ever could have ever worked in the first place, that’s a very different story.

Unfortunately, that’s exactly what [Majenko] discovered when he tried out one of the USB-C power bank modules he recently ordered. The seemed to charge the battery well enough, but when he plugged a device into the USB output, he got nothing. We don’t mean just a low voltage either, probing with his meter, he became increasingly convinced that the 5 V pin on the module’s IP5306 chip literally wasn’t connected to anything.

So close, yet so far away.

Curious to know what had gone wrong, he removed all the components from the board and started sanding off the solder mask. With the copper exposed, his suspicions were confirmed. While they did route a trace from the chip to the via that would take the 5 V output the other side of the board, it wasn’t actually connected.

This is a pretty blatant bug to get left in the board, but to be fair, something similar has happened at least once or twice to pretty much everyone who’s ever designed their own PCB. Then again, those people didn’t leave said flaw in a commercially released module…

Continue reading “Investigating A Defective USB Power Bank Module”