Weird Phosphor Conversion LEDs Found In Cheap LED String

[Tim] recently found himself tinkering with a cheap string of LEDs. Far from an advanced, IC-controlled addressable set, these were merely a string with LEDs of four colors that could be switched on and off. However, digging in to the LEDs themselves turned up a curious find.

The LEDs were set up in a parallel/anti-parallel fashion. The two power lines ran the length of the string, with all the LEDs installed across them. If polarity was applied in one direction, the red and yellow LEDs would light up, in the other, the blue and green LEDs would light together.

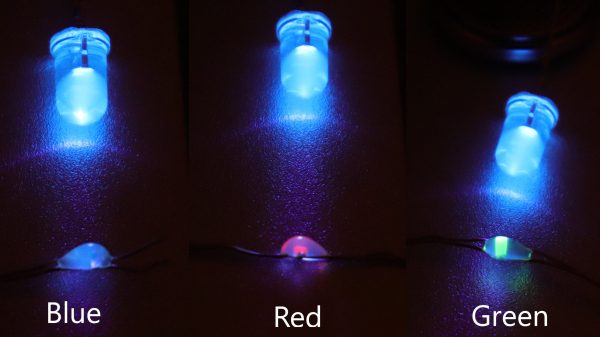
This raised a question for [Tim], as typically, different LEDs light up at different forward voltages and this can cause issues when running different color LEDs in parallel together. What he instead found was that all the LEDs were actually blue LEDs in their fundamental construction. However, the red, yellow, and green LEDs had all been given a phosphor coating. In these devices, when the blue LED underneath lit up, the phosphor converted the light into the desired color. [Tim] was able to confirm this behaviour by illuminating the phosphor manually using an external UV-A LED.

It’s an interesting choice, but it’s certainly one way of making a multicolored string of LEDs. If you wanna get fancier though, consider studying this tutorial on working with addressable LED strings!

[Thanks to J Peterson for the tip!]

Tiny Ethernet Cable Arms Race Spawns From Reddit Discussion

If you’ve had any dealings with Cat 5 and Cat 6 cable, and let’s be honest, who hasn’t, you’ve probably wrestled with lengths anywhere from 1 meter to 25 meters if you’re hooking up a long haul. Network admins will be familiar with the 0.1 m variety for neat hookups in server cabinets. However, a Reddit community has recently taken things further.

It all started on r/ubiquiti, where user [aayo-gorkhali] posted a custom-built cable just over 2 inches long. The intention was to allow a Ubiquiti U6-IW access point to be placed on a wall. The tiny cable was used to hook up to the keystone jack that formerly lived in that position, as an alternative to re-terminating the wall jack into a regular RJ45 connector.

Naturally this led to an arms race, with [darkw1sh] posting a shorter example with two RJ-45 connectors mounted back to back with the bare minimum of cable crimped into the housings. [Josh_Your_IT_Guy] went out the belt sander to one-up that effort, measuring just over an inch in length.

[rickyh7] took things further, posting a “cable” just a half-inch long (~13 mm). In reality, it consists of just the pinned section of two RJ-45 connectors mounted back to back, wired together in the normal way. While electrically it should work, and it passes a cable tester check, it would be virtually impossible to actually plug it into two devices at once due to its tiny length.

We want to see this go to the logical end point, though. This would naturally involve hacking away the plastic casings off a pair of laptops and soldering their motherboards together at the traces leading to the Ethernet jack. Then your “cable” is merely the width of the solder joint itself.

Alternatively, you could spend your afternoon learning about other nifty hacks with Ethernet cables that have more real-world applications!

Classic IPods Are Super Upgradeable In 2022

The classic iPod was the MP3 player to beat back in the day, loaded with storage and with its characteristic click-wheel interface. [Ellie] had an iPod Video laying around, one of the more capable models that came out near the end of the product’s run, and set out upgrading it for duty in the pandemic-wracked badlands of 2022. 

The iPod in question was a 5.5th generation model, prized for being the last to feature the Wolfson DAC with its good audio quality. [Ellie] used the ever-helpful iFixit guide to learn how to disassemble the device safely. Careful hands and a spudger are key to avoid marring the pressed-together metal case.

Once opened, an iFlash Quad board was installed inside that lets the iPod use up to four micro SD cards for storage instead of the original hard disk drive. With two 512 GB cards installed, [Ellie] won’t be short of storage. A new battery was then subbed in, along with a fancy clear front casing for the aesthetic charm of it all.

After the hardware modifications were complete, the iPod needed to be restored with iTunes to start working again. She then installed the open source Rockbox firmware, which opens up the capabilities of the hardware immensely. Perhaps best of all, it can play DOOM! Alternatively, you can use the clickwheel to control the volume on your MacBook if you so desire.

[Ellie’s] project goes to show that modifying an iPod these days can be a fun weekend build thanks to the great software and hardware now available. It’s wonderful to see that the platform still has such great support years after it has been discontinued. If you really want to look back though, take a gander at the early prototype of Apple’s breakout MP3 player.

You Can Send MIDI Over I2C If You Really Need To

The Musical Instrument Digital Interface has a great acronym that is both nice to say and cleanly descriptive. The standard for talking to musical instruments relies on a serial signal at 31250 bps, which makes it easy to transmit using any old microcontroller UART with a settable baud rate. However, [Kevin] has dived into explore the utility of sending MIDI signals over I2C instead.

With a bit of hacking at the Arduino MIDI library, [Kevin] was able to get the microcontroller outputting MIDI data over the I2C interface, and developed a useful generic I2C MIDI transport for the platform. His first tests involved using this technique in concert with Gravity dual UART modules. After he successfully got one running, [Kevin] realised that four could be hooked up to a single Arduino, giving it 8 serial UARTS, or, in another way of thinking, 8 MIDI outputs.

At its greatest level of development, [Kevin] shows off his I2C MIDI chops by getting a single Raspberry Pi Pico delivering MIDI signals to 8 Arduinos, all over I2C. All the Arduinos are daisy-chained with their 5V and I2C lines wired together, and the system basically swaps out traditional MIDI channels for I2C addresses instead.

There’s not a whole lot of obvious killer applications for this, but if you want to send MIDI data to a bunch of microcontrollers, you might find it easier daisy-chaining I2C rather than hopping around with a serial line in the classic MIDI-IN/MIDI-THRU fashion.

We’ve seen [Kevin]’s work before too, like the wonderful Lo-Fi Orchestra. Video after the break.

Continue reading “You Can Send MIDI Over I2C If You Really Need To”

Epoxy Resin Night Light Is An Amazing Ocean-Themed Build

We’ve all seen those “river” tables where a lovely old piece of tree is filled with some blue resin to create a water-like aesthetic. This project from [smartyleowl] takes that basic idea, but pushes it further, and the result is a beautiful build that is as much a diorama as it is a simple lamp.

First up, an appropriate rough piece of unprepared wood is chosen to create a cliff for the underwater scene. Speckles of UV-reactive blue powder are scattered on to the wood and some little plastic coral and marine plants are stuck down as well. A mold is then constructed around the wood using acrylic. Small whale and diver figurines are dangled in place, and blue resin poured in to complete the underwater scene. Once the resin has hardened, it’s polished to a clear sheen and its edges are nicely beveled. It’s then placed on a illuminated base which lights the scene from below, giving it a somewhat ethereal underwater quality.

It’s not a complicated project by any means, but it’s a great example of the beautiful things one can create with the creative application of colored resin. Producing a lamp that looks this good obviously takes some skill, of course – getting a bubble-free resin pour and a nice shiny finish on the wood isn’t easy. However, there’s no reason you can’t start learning today! Video after the break.

Continue reading “Epoxy Resin Night Light Is An Amazing Ocean-Themed Build”

Machining Waveguides For 122 GHz Operation Is Delicate Work

Millimeter-wave Radars used in modern cars for cruise control and collision avoidance are usually designed to work at ranges on the order of 100 meters or so. With some engineering nous, however, experimenters have gotten these devices sending signals over ranges of up to 60 km in some tests. [Machining and Microwaves] decided to see if he could push the boat out even further, and set out machining some waveguide combiner cavities so he could use the radar chips with some very high-performance antennas.

Precision-machined components are required to successfully use these 122 GHz components for long-range transmissions.

The end goal of the project is to produce a 53 dBi antenna for the 122GHz signal put out by the mmWave radar chips commonly found in automotive applications. Working at this frequency requires getting tolerances just so in order to create an antenna that performs well.

Plenty of fine lathe work and cheerful machining banter later, and the precision waveguide is done. It may not look like much to the untrained eye, but much careful design and machining went on to make it both easy to attach to the radar and parabolic antenna system, and to make it perform at a high enough level to hopefully break records set by other enterprising radio experimenters. If that wasn’t all hard enough, though, the final job involved making 24 of these things!

There aren’t a whole lot of microwave antenna-specific machining channels on YouTube, so if you’ve been thirsty for that kind of content, this video is very much for you. If you’re more interested in antennas for lower frequencies, though, you might find some of our other stories to your liking. Video after the break.

Continue reading “Machining Waveguides For 122 GHz Operation Is Delicate Work”

Color Dot Puzzle Will Wrinkle Your Brain

2022 is a good year for puzzles, and if you’re getting tired of Wordle, you might be after a new challenge. This color puzzle from [Sebastian Coddington] could be just what you’re looking for. 

[Sebastian] describes the 4×4 Color Dot Puzzle as a sort of combination of the ideas behind the Rubik’s Cube and the 15 puzzle. The aim is to arrange the 16 colored tiles on the board to form four single-colored 2×2 squares in the overall 4×4 board. The puzzle is 3D printed, using 6 colors of filament – black for the body of the puzzle, white for the control sticks, and yellow, green, red, and blue for the individual tiles.

We haven’t seen any mathematical proofs of how to beat the game, but we’re sure [Sebastian] has gotten good at beating the puzzle having designed it himself. According to tipster [Michael Gardi], who knows a thing or two about 3D printing games himself, the puzzle makes for a fun little mind teaser.

If you’re more of a jigsaw person, consider this advanced illuminated build.