Ask Hackaday: What’s Your Worst Soldering Job?

Soldering! It’s the primary method for attaching one component to another in the world of electronics. Whether you’re free-forming a circuit, attaching connectors to cables, or populating a PCB, you’ll eventually find yourself doing some soldering, whether by hand, reflow, or maybe even a fancy wave soldering machine.

It’s a fundamental skill that nevertheless remains one of the biggest hurdles for newcomers to overcome when diving into the electronics hobby. Difficult jobs with tiny components or with large heat sinks can up the challenge for even well-practiced hands. Thus, today we ask the question: What’s your worst soldering job?
Continue reading “Ask Hackaday: What’s Your Worst Soldering Job?”

Pulling Off A CRT Transplant Doesn’t Have To Be Tricky!

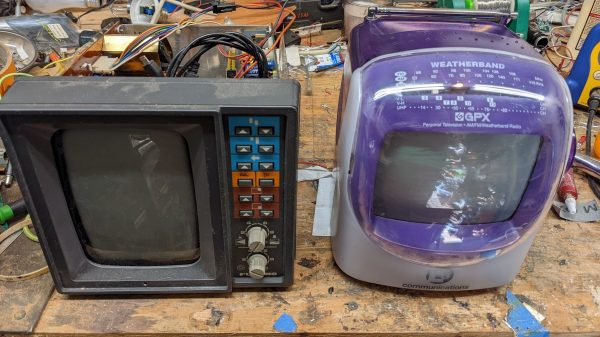
Whether it’s an engine swap in an old car or pulling a hard drive out of an old computer, we often find ourselves transplanting bits from one piece of hardware to another. [Emily Velasco] recently attempted this with a pair of CRTs, and came away with great success.

The donor was an old 1980s fishing sounder, which came complete with a rather fetching monochrome amber CRT display. [Emily]’s goal was to transplant this into the body of a early 2000s portable television. The displays were of a similar size and shape, though the Toshiba CRT from the 80s used a lot more glass in its construction.

The tube socket in the TV used to hook up the display matched the old CRT perfectly, so there were no hassles there. A bit of soldering was all that was needed to hook up the yoke, and [Emily] was ready to test. Amazingly, it powered up cleanly, displaying rolling amber static as you’d expect, given that analog television stations have been off the air for some time now.

After some perseverance, a VCR playing Mystic Pizza on VHS was able to deliver a video signal to the TV, proving that everything was working well. The next stage of the project is to get the television electronics to fit inside the 1980s fishing sounder housing, as it’s the more attractive of the two. Things were just built differently back in those days!

We’ve seen some other great vintage display swaps before, too. Video after the break.

Continue reading “Pulling Off A CRT Transplant Doesn’t Have To Be Tricky!”

Coin Cell Eliminator Does More Than Save Batteries

Coin cells are useful things that allow us to run small electronic devices off a tiny power source. However, they don’t have a lot of capacity, and they can run out pretty quickly if you’re hitting them hard when developing a project. Thankfully, [bobricius] has just the tool to help.

The device is simple – it’s a PCB sized just so to fit into a slot for a CR2016 or CR2032 coin cell. The standard board fits a CR2016 slot thanks to the thickness of the PCB, and a shim PCB can be used to allow the device to be used in a CR2032-sized slot instead.

It’s powered via a Micro USB connector, and has a small regulator on board to step down the 5 V supply to the requisite 3 V expected from a typical coin cell. [bobricius] also gave the device a neat additional feature – a pair of pads for easy attachment of multimeter current probes. Simply open the jumper on the board, hook up a pair of leads, and it’s easy to measure the current being drawn from the ersatz coin cell.

If you’re regularly developing low-power devices that use coin cells, this tool is one that could save a lot of mucking about in the lab. [bobricius] has them available on Tindie for those eager to get their hands on one. We’ve seen similar designs before too, albeit pursued in a different way!

Building A High-Capacity Linear Servo Actuator

Linear actuators are useful things, moving things in straight lines rather than annoying circles like so many motors. [Retsetman] recently built a linear servo actuator of his own design with accurate positional control.

The design relies on a carriage that moves along a threaded rod, perhaps the most rudimentary design of linear actuator. A large brushed DC motor is used to turn the threaded rod through a 3D-printed 9:1 herringbone geartrain, shifting the actuator back and forth. End stop switches are used to disengage the motor to avoid damage to the mechanism. Feedback is via a ten-turn potentiometer driven off the output geartrain to match the range of the actuator to the rotational range of the pot.

The final build has a stroke of approximately 100 mm, and can lift and hold a 15 kg weight with ease. In a pull test, the actuator failed at a load just shy of 100 kg. If you’re looking for something smaller, though, you can try building a linear actuator out of old DVD drive parts instead. Video after the break.

Continue reading “Building A High-Capacity Linear Servo Actuator”

Infinity Mirror Hypercrystal Is As Beautiful As It Sounds

Sometimes, we feature projects that are full to the brim with advanced functionality or solve some tricky little problem for the end-user. Other times, we feature stuff that just looks super damn cool, and the Infinity Mirror Hypercrystal is firmly in that latter category.

This show-stopping build comes to us from [Inanna Malick], who put together the design using algorithmic and generative art techniques she’s been working on for years. The form is a non-symmetrical, non-platonic solid, with each of its eight faces laser cut from mirrored acrylic. Plywood sections are used to hold together the structure.

Initially, the build was illuminated from within by white LEDs, but [Inanna] wasn’t satisfied with the look, which was too rooted in regular human technology. They were instead covered up with transparent dichroic tape, creating the lurid shifting colors that do so much to add to the mystery of the legendary Hypercrystal.

The result is an infinity mirror piece that looks more advanced, more alien, and more luridly enticing than most we’ve ever seen. The dichroic shift placed on the LEDs goes a long way to elevating this sculpture to new aesthetic heights. Video after the break.

Continue reading “Infinity Mirror Hypercrystal Is As Beautiful As It Sounds”

PendulumSynth Ties Music And Physics Together

Many musicians will be familiar with the metronome, a pendulum charged with generating a rhythmic tick to keep one’s performance in regular time. With PendulumSynth, [mrezanvari] takes the same basic pendulum but uses it in an altogether different musical way.

The build relies on a 10-inch plastic ball to serve as the weighted end of the pendulum, stuffed with a STM32F411CE BlackPill board, a BNO085 IMU, and an nRF radio module for sending out data for external processing. The pendulum’s motion is turned into MIDI data or CV for output to musical hardware which handles actually generating the output sounds.

The system operates in a variety of modes. Gravity mode outputs continuous MIDI data and CV relative to the continuous motion of the pendulum, while DIV3 mode tracks the pendulum’s motion and outputs 3 regular trigger points that correspond as such.

The combination of the intuitive physical nature of the pendulum and its sheer large size makes for an enticing musical exhibit. We’ve seen some other great musical installation pieces before, too. Video after the break.

Continue reading “PendulumSynth Ties Music And Physics Together”

Sending MIDI Wirelessly With The NRF24L01

MIDI is a standard known by musicians and instruments all over the world. The basic twist on regular serial has helped studios around the world to work more efficiently. [Kevin] wanted to try sending MIDI data wirelessly, but rather than the typical Bluetooth solution, decided to use the humble nRF24L01 instead.

The circuitry used is simple: [Kevin] simply wired up two Arduino Unos with nRF24L01 radio modules, which communicate over SPI. Alternatively, an even quicker solution is to use a Keywish Arduino RF Nano, which packs a nRF24L01 on board. One Arduino can then be hooked up to a MIDI OUT port on an instrument, and it will send out MIDI signals wirelessly. The second Arduino can then be plugged into a MIDI IN port and repeat out what it receives over the air.

The real work was in the firmware, which takes MIDI data and packages it in a suitable form to send out over the nRF24L01. The system can operate in a one-to-one mode, emulating a single MIDI cable, or a multicast mode, where one sender transmits information to many receivers.

It’s a neat hack and one we could imagine would be useful in some fun performance situations. We’ve seen others do work on wireless MIDI interfaces for Eurorack hardware, too. Video after the break.

Continue reading “Sending MIDI Wirelessly With The NRF24L01”