3D Printing Steel Parts At Home Via Special Filaments

Rocket engines are great for producing thrust from fire and fury, but they’re also difficult to make. They require high-strength materials that can withstand the high temperatures involved. [Integza], however, has tried for a long time to 3D print himself a working rocket engine. His latest attempt involves printing an aerospike design out of metal.

Even steel couldn’t hold up to the fury of the rocket exhaust!

The project relies on special metal-impregnated 3D printer filaments. The part can be printed with a regular 3D printer and then fired to leave just the metal behind. The filament can be harsh, so [Integza] uses a ruby nozzle to handle the metal-impregnated material. Processing the material requires a medium-temperature “debinding” stage in a kiln which removes the plastic, before a high-temperature sintering process that bonds the remaining metal particles into a hopefully-contiguous whole. The process worked well for bronze, though was a little trickier for steel.

Armed with a steel aerospike rocket nozzle, [Integza] attempts using the parts with his 3D printed rocket fuel we’ve seen before. The configuration does generate some thrust, and lasts longer than most of [Integza]’s previous efforts, though still succumbs to the intense heat of the rocket exhaust.

Overall, though, it’s a great example of what it takes to print steel parts at home. You’ll need a quality 3D printer, ruby nozzles and a controllable kiln, but it can be done. If you manage to print something awesome, be sure to drop us a line. Video after the break.

Continue reading “3D Printing Steel Parts At Home Via Special Filaments” →

Making A Left-Handed NES Controller

The controller for the original Nintendo Entertainment System is a classic, but perhaps not best known for its adherence to good ergonomic principles. Regardless, it can grow awkward to use for long stretches of time. To help alleviate this, [Taylor] whipped up an easy way to convert a NES controller to left-handed operation.

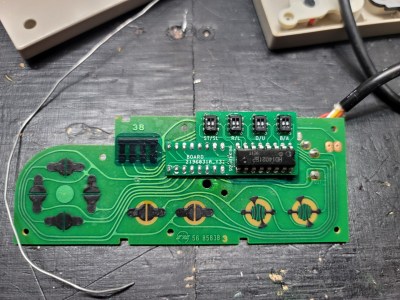
The mod board in question, installed on a NES controller PCB.

The crux of the hack is simple, with the controller’s buttons swapped left-to-right to enable the controller to be flipped upside down. In this orientation, the D-pad is used by the right hand and the action buttons by the left–the opposite of the usual way. Thus, left and right on the D-pad must be switched, as well as A and B, so all the controls are otherwise in a logical layout.

This is achieved through the use of a little mod board of [Taylor]’s own design. The original HD14021BP chip is desoldered from the controller’s PCB, and installed in the mod board instead. The modboard can then be soldered back into the controller, rerouting the traces to swap the buttons. There’s also a version that [Taylor] designed that can flip between right-handed and left-handed operation thanks to some onboard DIP switches.

It’s a tidy hack that could save the thumbs of some dedicated Tetris players. Alternatively, you can always make your own NES controller from scratch. Video after the break.

Continue reading “Making A Left-Handed NES Controller” →

China MagLev Train Aspirations Boosted By New 600 Km/h Design

Maglev trains have long been touted as the new dawn for train technology. Despite keen and eager interest in the mid-20th century, development has been slow, and only limited commercial operations have ever seen service. One of the most well-known examples is the Shanghai Maglev Train which connects the airport to the greater city area. The system was purchased as a turnkey installation from Germany, operates over a distance of just 30.5 km, and according to Civil Engineering magazine cost $1.2 billion to build in 2001. Ever since, it’s served as a shining example of maglev technology — and a reminder of difficult and expensive maglev can be.

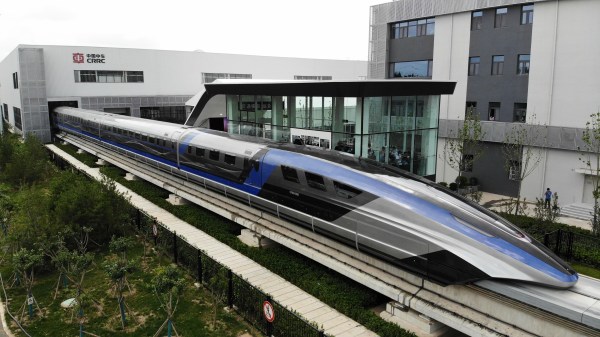
However, China has fallen in love with high-speed rail transport in the last few decades and has invested heavily. With an aggressive regime of pursuing technology transfers from foreign firms while building out the world’s largest high-speed rail network, the country has made great progress. Now, Chinese rail transit manufacturer, CRRC Corporation, have demonstrated their newest maglev train, which hopes to be the fastest in the world.

Continue reading “China MagLev Train Aspirations Boosted By New 600 Km/h Design” →

A New Flying Car Illustrates The Same Old Problems

For almost as long as there have been cars and planes, people have speculated that one day we will all get around in flying cars. They’d allow us to “avoid the traffic” by flying through the air instead of sitting in snarling traffic jams on the ground.

The Klein Vision AirCar hopes to be just such a panacea to our modern traffic woes, serving as a transformable flying car that can both soar through the air and drive on the ground. Let’s take a look at the prototype vehicle’s achievements, and the inherent problems with the underlying flying car concept.

It Flies and Drives

The AirCar is a somewhat futuristic looking, yet simultaneously dated, vehicle. It’s a two-seater with a big bubble canopy for the driver and a single passenger. At the rear, there’s a propeller and twin-boom tail, while the folding wings tuck along either side of the vehicle in “car” mode. At the flick of a switch, the wings fold out and lock in place, while the tail extends further out to the rear. The conversion from driving mode to flight mode takes on the order of a few minutes. The powerplant at the heart of the vehicle is a 160-horsepower BMW engine which switches between driving the wheels and the propeller as needed.

Unlike some concepts we’ve explored in the past, the AirCar has successfully demonstrated itself as a working flying car without incident. Additionally, it did so as a single vehicular package, without removable wings or other such contrivances. On June 28th, 2021, it successfully flew from an airport in Nitra, Slovakia, down to the neighbouring city of Bratislava in 35 minutes – roughly half the time it takes by car. Company founder Stefan Klein was behind the controls, casually driving the vehicle downtown after the successful landing. Continue reading “A New Flying Car Illustrates The Same Old Problems” →

A SNES Music Player You Can Control With A Browser

Listening to chiptunes on an emulator or software-based player is fine, but sometimes you just gotta have that real hardware charm. [Kazhuu] is one such enthusiast who feels this way, and set about building a hardware player for SNES chiptunes that can be controlled from a browser.

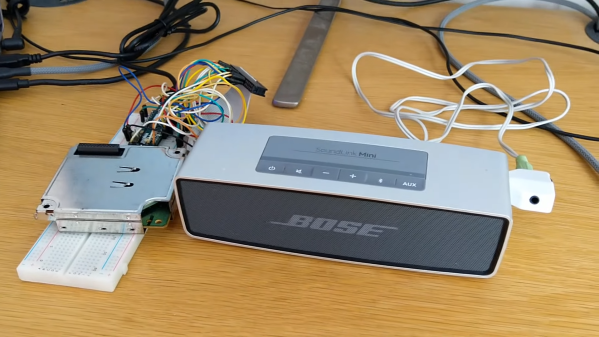
The build relies on an Arduino Micro to control the SNES Audio Processing Unit (APU), featuring the Nintendo S-SMP as produced by Sony and designed by Ken Kutaragi. Yes, the father of the PlayStation designed the capable wavetable synthesis chip in the Super Nintendo, and it’s that same hardware that [Kazhuu]’s project interfaces with modern hardware.

With the Arduino’s IO lines hooked up to the APU, song data can be piped out to the Arduino over a serial connection to a PC. This can be handled by a Python script, or more intuitively via a browser-based front-end. This uses WebUSB in order to take input from the browser and then send data out over the USB-serial connection to the Arduino.

It’s a neat demonstration of both working with vintage Nintendo sound hardware and how to code modern browser applications to work with embedded systems. If you’re a SEGA kid, though, you might prefer this build instead. Video after the break.

Continue reading “A SNES Music Player You Can Control With A Browser” →

Giant CNC Machine Measures A Full Cubic Meter

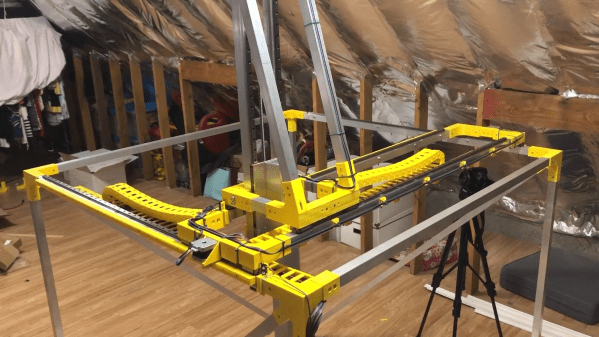
There are plenty of designs for table-top 3D printers, engravers, and general CNC machines out there. However, if you wanna build big things and build them fast, sometimes you need a machine that can handle bigger jobs. This gigantic 1x1x1 m 5-axis CNC machine from [Brian Brocken] absolutely fits the bill.

The build relies on 3D-printed components and aluminium tubing to make it accessible for anyone to put together. [Brian] notes that 25×25 mm tubing with a 2 mm wall thickness does an okay job, but those aiming to minimize deflection would do well to upgrade to 5 mm thickness instead. Stepper motors are NEMA 23 size, though the Y-axis uses a pair of NEMA 17s. This is necessary to deal with the immense size of the machine. Control is thanks to an Arduino Mega fitted with a RAMPS board, running the Marlin firmware.

The plan is to use the machine to test out a variety of CNC machining techniques. It could make for a great maxi-sized 3D printer, and should be able to handle some basic 5-axis milling of very soft materials like foams. This might seem silly on the face of it, but it can be of great use for mold making tasks.

We’ve seen giant CNC routers built before, too, and they can readily be put to great use. Video after the break.

Continue reading “Giant CNC Machine Measures A Full Cubic Meter” →

Cool Binary Clock Uses Old-School LEDs And A Fancy Graphic PCB

Ah, the 5mm LED. Once a popular choice, they’ve been supplanted in modernity by smaller SMD components and/or more capable RGB parts in recent years. However, they’re still able to do the job and are a great way to give your project that proper homebrew look. [Ian Dunn] chose those very parts to produce his 4017 Decade Binary Clock.

The clock uses only digital logic ICs to tell the time – there are no microcontrollers here! After four or five iterations over almost a whole year, [Ian] was finally able to coax the circuit into reliable operation. As you’d expect, it relies on a 32.768 kHz crystal to provide a stable clock. Fed into a 4060 binary ripple counter, that clock is divided down 14 times to deliver a 2Hz square wave. This then goes through a 4027 flip flop to get the desired 1Hz signal. From there, a bunch of extra logic handles counting the seconds, minutes, and hours, and resetting the counters as appropriate.

The PCB that houses the project is printed on directly by a flatbed inkjet printer, which [Ian] purchased when inspired by our previous article on how to get your PCBs made at the mall. He didn’t actually use it to make the PCB in this case, but the flatbed printer does a great job of putting graphics on the board.

The result is quite an attractive look that might surprise a few electronics enthusiasts who haven’t seen a graphic printed board before. It’s a technique we think could be used to great effect on conference badges, too. If you’ve experimented with similar techniques, be sure to drop us a line!