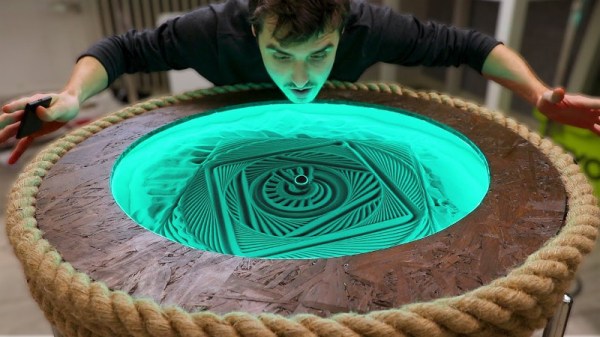
Sand Plotter Built With 3D Printer Parts

Sand plotters are beautiful machines. They can make endless patterns, over and over again, only to wipe away their own creation with each new pass. Having seen the famous Sisyphus sand sculpture online, [Simon] decided to make his own.

The build came together quickly, thanks to [Simon]’s well-stocked workshop and experience with CNC motion platforms. The frame was built out of wood, with a combination of hand-cut and lasercut parts. After fabric-wrapping the outer rim turned out poorly, rope was substituted instead for a stylish, organic look. LEDs were installed inside to light the sand for attractive effect. The metal ball is moved through the sand via a magnet attached to an XY platform mounted on the back of the table. The platform is built out of old 3D printer parts, with a Creality CR10S Pro chosen for its ultra-quiet stepper drivers. Initial attempts to make the system near-silent were hung up by the crunching sound of the ball rolling over the sand; this was fixed by instead mounting the ball on a foam pad. While the ball is now dragged instead of rolling, the effect is one of blissful quiet instead of crunching aggravation.

The final build is incredibly attractive, and something we’d love to have as a coffee table as a conversation piece. We’ve seen [Simon]’s work around here before, too – with the water-walking RC car a particular highlight. Video after the break.


Continue reading “Sand Plotter Built With 3D Printer Parts” →

Smart Power Delivery For Long LED Strips

Addressable LED strips, most commonly using the WS2812B, have revolutionized the pursuit of the glowiest and flashiest of builds. No longer does a maker have to compromise on full RGB color or number of LEDs due to the limitations of their chosen microcontroller, or fuss around with multiplexing schemes. However, the long strips of bright LEDs do have an issue with voltage drop on long runs, leading to dimming and color irregularities. Thankfully, [Jan Mrázek] has come up with a useful solution in the form of the Neopixel Booster.

The device consists of a small PCB which packs a 5 volt regulator capable of putting out up to 4 amps. It’s designed with pads that match typical Neopixel strips, such that it can be neatly soldered in every 50cm or every 60 LEDs or so. Each booster PCB is fed with a set of fat power wires, at between 6-18 volts. This allows electricity to be fed to the full length of the strip at higher voltage, and thus lower current, greatly reducing resistive power losses. By having several regulators along the length of the strip, it helps guarantee that the whole length of a long run is receiving plenty of voltage and current and can light up the correct color as desired.

It’s a well thought out solution to a frustrating problem, and [Jan’s] efforts on the design front mean that a 5 meter long waterproof strip can be converted in around about an hour. We can imagine this could be manufactured into strips in future, too. If you’re wondering what to do with all those LEDs, consider making yourself a custom display.

Baby Yoda Becomes Personable Robot

Baby Yoda has been a hit character in Disney’s The Mandalorian, but does not actually exist in real life as far as we know. Instead, [Manuel Ahumada] set about building a robotic replica, complete with artificial intelligence.  (Video, embedded below.)

The first step was to build a basic robotic simulcra of Baby Yoda, which [Manuel] achieved by outfitting a toy with servos, motors and a Raspberry Pi. With everything hooked up, Baby Yoda was able to move his head and arms, and scoot around on wheels, all under the control of a Bluetooth gamepad. With that sorted, [Manuel] added brains in the form of a smartphone running Intel’s OpenBot machine learning platform. This allows Baby Yoda to track and follow people it sees on its smartphone camera, and potentially even navigate real-world spaces with future upgrades.

It’s a fun build, and we’d love to see the bot let loose at a convention to explore and make friends. We’ve covered OpenBot before, and look forward to seeing it used in more builds. Video after the break.

Continue reading “Baby Yoda Becomes Personable Robot” →

Growing Opals In The Lab

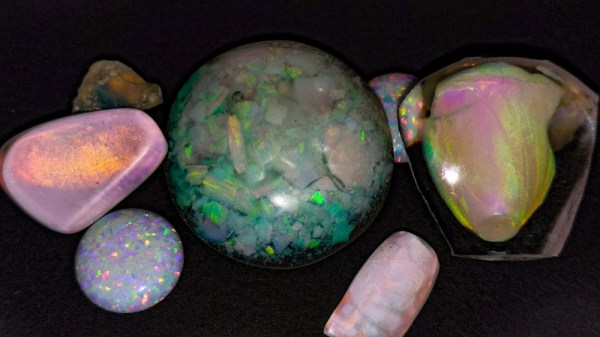
Opals are unique amongst gemstones, being formed from tiny silica nanospheres arranged in precise structures that give them their characteristic shifting color when seen from different angles. [The Thought Emporium] loves a challenge, so set about growing some himself.

It’s not the hardest gemstone synthesis ever, but it’s no cakewalk either. The process requires tetraethyl orthosilicate, or TEOS, which can be difficult to find, but the rest of the chemicals required are commonly available. The initial phase involves mixing the TEOS with reactants to form nanoscale silica spheres in the range of 200-350 nanometers wide. With the spheres in solution, the mixture must then be carefully dried in such a way as to create the right structure to produce opal’s famous color effects. At this stage, industrial producers add further silica to stabilize the matrix, though [The Thought Emporium] wasn’t able to find literature that explained how to do this. Instead, he relied on resin, which while imperfect, did allow the specimens to be stabilised and shown off for the purposes of the video.

The video notes that many of the steps in this process were perfected decades ago, but remain held as trade secrets, making replication an exercise in experimentation. Nonetheless, success was had in producing recognisably opalescent specimens, and we can’t wait to see further refinement of the DIY process.

We’ve seen similar work from [The Thought Emporium] before, exploring structural color and holograms. Video after the break.

Continue reading “Growing Opals In The Lab” →

Dangerous Greeting Cards You Probably Shouldn’t Send Anyone

Regular paper greeting cards are pricey for what they are, and of course the annoying musical variety are even more so. If you really want to go all out, however, you’ve got to go custom made. That’s what [Xyla] and [Ian] did, though we’d stop short of recommending you build or send these to anyone!

Two variants of the “dangerous cards” were built. One repurposed an electric shocking circuit from a handheld buzzer, tucking it inside a shiny Disney greeting card. Using a switch from a musical greeting card, when opened, the shocking circuit is activated. With the circuit connected to aluminium tape electrodes hidden in the shiny foil design, when the user opens the card, they receive a painful shock. The flamethrowing variant was triggered by the same mechanism, though instead sent power to an electric match, shooting a fireball with flash cotton when the card was opened.

These cards make excellent pranks, though we’d be wary about sending them by mail for obvious reasons. We’ve seen [Xyla’s] work before too, with her glowing kayak a particular highlight. Video after the break.
Continue reading “Dangerous Greeting Cards You Probably Shouldn’t Send Anyone” →

The V-Bomber Ejector Seat Controversy

Once upon a time, bailing out of a plane involved popping open the roof or door, and hopping out with your parachute, hoping that you’d maintained enough altitude to slow down before you hit the ground. As flying speeds increased and aircraft designs changed, such escape became largely impossible.

Ejector seats were the solution to this problem, with the first models entering service in the late 1940s. Around this time, the United Kingdom began development of a new fleet of bombers, intended to deliver its nuclear deterrent threat over the coming decades. The Vickers Valiant, the Handley Page Victor, and the Avro Vulcan were all selected to make up the force, entering service in 1955 through 1957 respectively. Each bomber featured ejector seats for the pilot and co-pilot, who sat at the front of the aircraft. The remaining three crew members who sat further back in the fuselage were provided with an escape hatch in the rear section of the aircraft with which to bail out in the event of an emergency.

Continue reading “The V-Bomber Ejector Seat Controversy” →

Lego Heist Bot Steals Keys

Breaking and entering is a felony offense, and one that risks the interloper receiving serious bodily harm for the trouble. Sending in a robot instead is an attractive alternative. While we doubt any actual intention to use their creation for evil, [Brick Experiment Channel] have nonetheless built a viable heist bot out of Lego.

The robot in question is actually two, that work together to execute their mission. Once lowered in the house, the scissor lift bot drives into position next to a coffee table. It then lifts its companion bot into position by extending its motor-driven linear actuators. The recovery bot then drives out onto the table, snatches a set of keys with its arm, and returns to the lift bot, before exiting the house. It’s all achieved with the use of the SBrick, a third-party Lego accessory which allows remote control of Lego motors over Bluetooth. A wireless camera also helps out with vision for the platform.

Lego really does make it easy to build quick, functional mechanisms without a whole lot of fuss. We’ve seen it employed in all sorts of ways, like this handy film scanner. Video after the break.

Continue reading “Lego Heist Bot Steals Keys” →