Paper Glows Up With This Origami Wall Piece

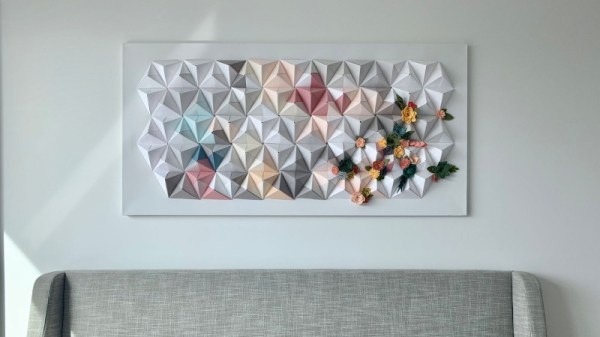
[Charlyn] recently found herself dissatisfied with the blank expanse of her bedroom walls. Deciding to take matters into her own hands, she set out to build this exquisite origami wall sculpture.

The piece was inspired by a work originally created by [Coco Sato], which she saw on Design Sponge. Materials were sourced, and [Charlyn] began the arduous process of cutting and folding the many, many pieces of paper that would make up the final piece. There were some missteps along the way, which served as a lesson to test early and test often, but a cup of tea and perseverance got the job done.

With the paper components completed, she looked to the electronics. Ten Neopixel LEDs were hooked up to a Particle Photon, giving the project easy IoT functionality. Thanks to IFTTT, the display can be controlled via Google Home, either glowing to create a relaxing vibe, or shutting off when it’s time to sleep. There’s also a smattering of flowers decorating the piece, somewhat of a [Charlyn] trademark.

The LEDs shine from behind the paper structure, creating a subtle, attractive glow. We’re big fans of the combination of LEDs with origami, and hope to see more projects using the material as an effective diffuser. You can even experiment with conductive materials to take things further. Video after the break.

Continue reading “Paper Glows Up With This Origami Wall Piece” →
Tumble Polisher Smooths Parts With Ease

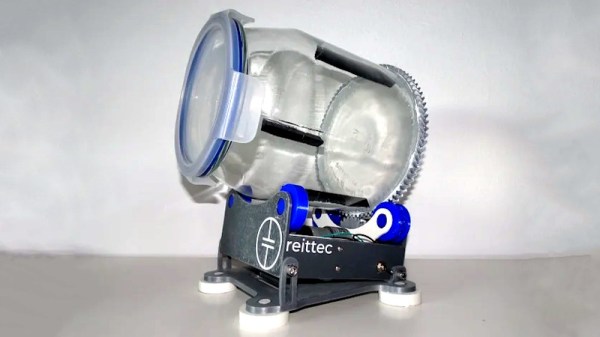
When you’re 3D printing parts, it’s easy to create pieces with all manner of complex geometry. However, you’re often stuck dealing with unsightly layer lines and other surface imperfections. [reitter_m] chooses to get around this through the use of a tumble polisher of his own design.

The polisher uses a drum made out of a glass jar sourced from IKEA. A 3D printed gear is printed to size, and then fitted around the outside. This allows the drum to be turned by a motor fitted into the base of a 3D printed cradle. A simple gear motor is used to spin the drum nice and slowly, powered by a 12 V, 500 mA supply.

It’s a build that uses readily available parts, and should be a cinch to recreate by anyone with a 3D printer. The later revision uses an even more common IKEA jar, making it even easier to copy the build no matter where you are in the world. It even uses herringbone gears which gives it a very offbeat look. We’ve seen other hacked tumbler projects too, like this one built around an old case fan. Video after the break.

Electric Unicorn Is Our Kind Of Rideable

When [Charlyn] took a unicorn rocking horse in to work, it was an instant hit. Naturally, the people wanted more, and suggested it needed electric propulsion. Naturally, she rose to the challenge, and Rocky the Unicorn got a motorized upgrade.

The build consists of a frame built out of PVC pipes, hooked up with Formufit fittings. These are a great way to build useful structures out of PVC pipe, and made the build a cinch. The frame has a footrests for the rider, and the rocking horse already has a comfortable seat. For propulsion, a hoverboard is installed in the base, with the frame sporting a pair of casters to avoid tip over. Twin PVC handles are used to interface with the footplate of the hoverboard, allowing the user to drive and steer, as well as turn on the spot. A bouquet of fake flowers round out the aesthetic and hide some of the zipties.

It goes to show that PVC pipe can be an excellent material for quick, fun projects – all you need is the right fittings to make it all happen! It’s also fun to see a hoverboard used in such a way that doesn’t end with severe injuries.  Unicorns always bring a nice flair to a project, too. Video after the break.

Continue reading “Electric Unicorn Is Our Kind Of Rideable” →

Alexa Controls This Savage Pumpkin

Traditionally, pumpkins are carved during the holiday of Halloween to represent malicious and frightening beasts. Flying in the face of this is [minihannah]’s carving of Adam Savage, which she’s calling a hero pumpkin. It’s a fun twist on the custom, and of course, it’s packing WiFi too.

The build starts with a carving of the typical orange winter squash cultivar, using artwork cribbed from the cover of Mr. Savage’s biography. Inside, there’s a bunch of LEDs, all under the control of an adafruit feather M0, which talks to the broader internet over WiFi. The pumpkin can be controlled by Alexa, thanks to the combination of Adafruit.IO and IFTTT.

It’s a fun little Internet of Things build, and one that’s ready for the modern smarthome, where you’re already used to yelling at the lights to switch off. We’d love to see a similar Billy Corgan build, if only for the pun. If you give it a go, be sure to drop us a line. Video after the break.

Continue reading “Alexa Controls This Savage Pumpkin” →

A Simple Auger Pet Feeder

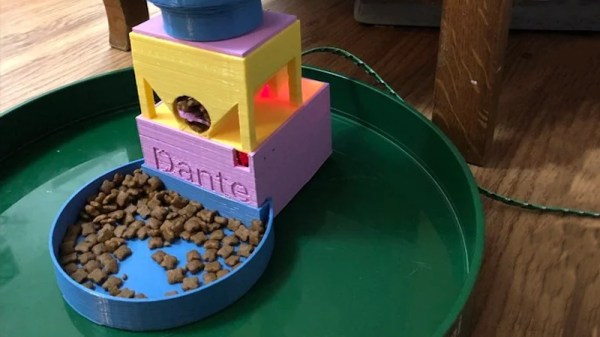
Pet feeders are a popular maker project. One can speculate that this shows the great self-confidence common to the maker set, who are willing to trust their own work to keep their animal companions alive for many days at a a time. [Darren Tarbard] is one such maker, who put together this simple auger build.

The project consists of a hopper for dry pet food, into which a screw auger is inserted. Both parts are 3D printed, making them easy to produce at home for the average maker. The build was designed specifically around the parts [Darren] had to hand, namely a 28BYJ-48 stepper motor, which is charged with turning the auger. Running the show is an Arduino, which can be run with whatever suitable timing code is necessary to feed the particular pet in question. There’s also a remixed version that adds a larger food storage dish on top for longer periods of unattended operation, created by [szuchid].

It’s a basic build, but one that would be readily achievable by most makers with little more than some junkbox components and a roll of filament. Of course, if your pet prefers wet food, you might need a different design. Video after the break.

Continue reading “A Simple Auger Pet Feeder” →

Magic Acrylic Makes This Ring Stand Out

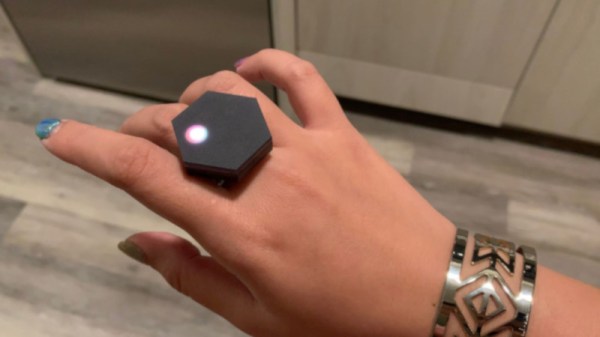
LEDs look great no matter how you use them, but sometimes you want to hide them from direct view. [Charlyn] found a great way to do that, using a special material designed just for the purpose.

[Charlyn] built a ring as a piece of fashion jewelry, hooking up a Gemma M0 microcontroller to a Neopixel Jewel, which packs 7 individual LEDs. The hardware is secreted away inside an enclosure featuring both 3D-printed and lasercut parts.

Rather than openly show off the electronics, it’s all hidden away inside. Instead, a piece of black Chemcast LED acrylic is used, which allows LED light to shine through, while otherwise appearing opaque. Those interested in learning more can check out the product details on the manufacturer site.

It’s a great way to make a subtle costume piece that only reveals its flashier side when you so decide. We’ve seen badges use similar techniques on PCBs to great effect, too. Video after the break.

Continue reading “Magic Acrylic Makes This Ring Stand Out” →

74-Series Clock Gets A MEMS Heart

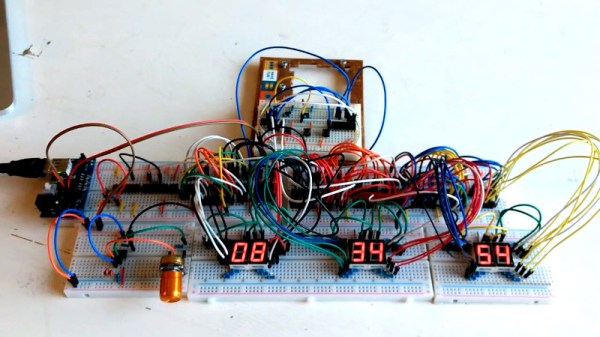
[Erik van Zijst] has had a long career as a programmer, but lacked an understanding of what was happening at a bare metal level. After building a few logic gates out of transistors to get a feel for electronics, he set out to build a working clock using 74-series logic. Naturally, it was quite the adventure. 

The project starts out as many do on the breadboard. The requisite BCD counters and 7-segment displays were sourced, and everything was connected up with a cavalcade of colorful hookup wires. A 32.768 KHz crystal was pressed into service to generate the clock signal, divided down to get a 1Hz output to drive the seconds counter that would then run the entire clock. [Erik] then had to learn some more practical electronics skills, to deal with debouncing buttons for the time setting circuit.

With the clock now functional, [Erik] decided to take things further, aiming to build something more robust and usable. An automatic brightness control was created using a 555 to run a crude PWM dimmer for the LEDs. Additionally, a PCB was designed to replace the temporary breadboard setup. This led to problems with the oscillator that [Erik] couldn’t quite figure out. Rather than continue on the same path, he changed tack, instead replacing the quartz crystal with a modern MEMS oscillator that solved the problem.

It’s a great look at how to construct a working clock from bare logic, and one that serves to remind us just how complex even a seemingly simple device can be. We’ve seen other from-scratch builds before too, like this 777-transistor clock, or this attractive stacked design. Video after the break.

Continue reading “74-Series Clock Gets A MEMS Heart” →