We Ruined Status LEDs; Here’s Why That Needs To Change

Ah, the humble status LED. Just about every piece of home electronics, every circuit module, and anything else that draws current seems to have one. In the days of yore, a humble indicator gave a subtle glow from behind a panel, and this was fine. Then the 1990s happened, and everything got much much worse.

It’s Not The Technology, It’s How You Use It

With great brightness, comes great responsibility.

The 1990s brought us much good: Nirvana, Linux, and of course the blue LED. Much like “Teen Spirit”, the latter quickly fell into overuse: the technology rapidly became the sigil of all that was new and great, much to the ocular pain of the buying public.

This decision ranks up there for stupidity with other such questionable choices as hiring a rental car at the airport, or invading Russia in the winter. A status LED, most would agree, is there to indicate status. It need only deliver enough light to be seen when observed by a querying eye. What it need not do is glow with the intensity of a dying star, or illuminate an entire room for that matter. But, in the desperate attempts of product designers to appear on the cutting edge, the new, brighter LED triumphed over all in these applications. Continue reading “We Ruined Status LEDs; Here’s Why That Needs To Change” →
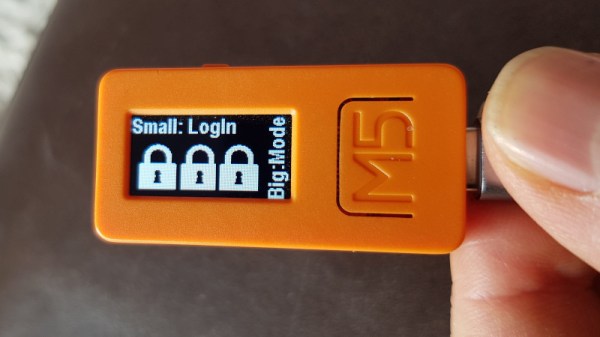
Password Keeper Uses Off-The-Shelf Formfactor

With every website these days demanding the creation of an account, it can become difficult to remember so many logins. Each password should ideally be unique, lest a leak from your fantasy football game cost you thousands in stolen bitcoins. To help, [vcch] developed a password vault, using an interesting off-the-shelf platform.

The platform in question is the M5stickC, which packs an ESP32, color LCD, and battery into an attractive orange enclosure. It’s even got USB-C, making it a tool with an eye on the future. It serves as a quick way to get a basic IOT project up and running, without having to fuss about designing your own enclosure or basic power supply hardware.

On this platform, [vcch] created a tool to make keeping track of passwords easy. The PassStrong, as it’s called, can store a huge number of passwords, and communicates with the host PC over Bluetooth. The interface makes good use of the LCD, displaying the current mode and function of each button on the device for the user. It’s capable of working in both QWERTY and AZERTY environments, which should appeal to European users.

The M5StickC is a perfect choice in this regard, packing enough buttons and the required Bluetooth hardware to get the job done. No need to spend any time integrating modules – simply open the box and get to coding. We expect to see more developments in this space in future, and look forward to the efficiency gains this will bring to all kinds of projects!

Lil’ ESP32 Bot Does Remote Surveillance, And It’s Easy

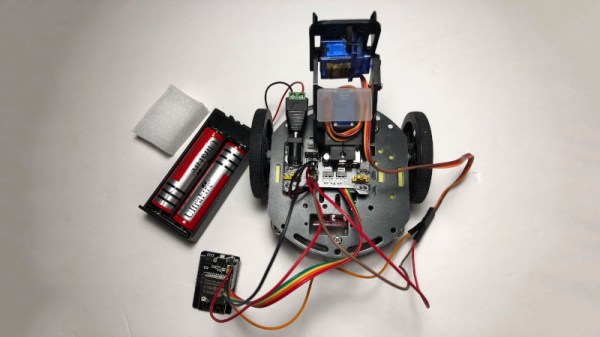
Digital cameras have been around for a long time, as have small remote control robotics platforms. However, combining the two has really only come into its own in the last decade or so, as more bandwidth has become available to the home tinkerer. This ESP32-CAM surveillance bot is a great example of what was once hard becoming trivially easy.

It’s a case of standing on the shoulders of giants. The ESP32-CAM is a device that allows one to stream live video images over a network using existing example code. In this case, it’s combined with an L298N DC motor driver which allows the Adafruit robot platform to be steered like a tank via its two wheels. A pair of SG90 servos then serve as a pan/tilt mechanism to further improve the robot’s field of view.

If you aimed to attempt this back in 2010, you’d have spent six months figuring out how to get a microcontroller to talk to a small camera module. Only then could you consider solving the multitude of other problems presented by getting the video feed off the bot to somewhere useful. These days, you can order a bunch of parts online and have it up and running in a couple hours. This project from 2013 serves as an example of how much things have changed in the intervening years. Video after the break.

Continue reading “Lil’ ESP32 Bot Does Remote Surveillance, And It’s Easy” →

MNIST Clock Uses Famous Training Database

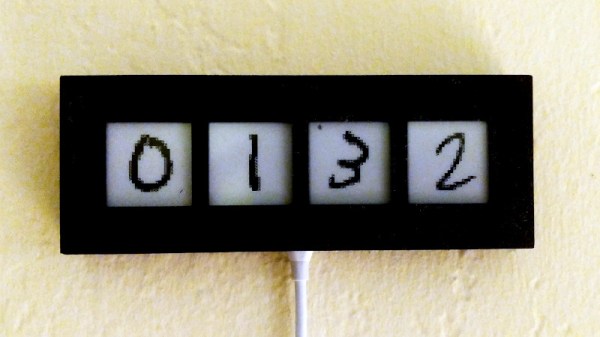
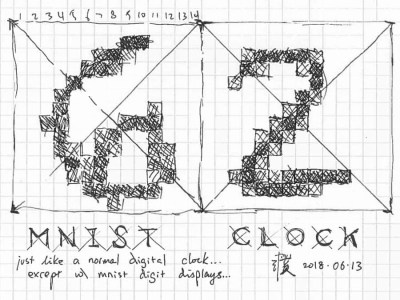
When training neural networks to recognise things, what you need is a big pile of training data. You then need a subsequent pile of testing data to verify that the network is working as you’d expect. In the field of handwriting recognition, the MNIST database is commonly used to train networks on handwritten numerals. After [Evan Pu] mentioned it would be fun to use this data to create a clock, [Dheera Venkatraman] got down to work.

The original sketch which inspired the build.

The MNIST database contains 60,000 training images, and 10,000 test images. [Dheera] selected an ESP32 to run the project, which packs 4MB of flash storage – more than enough to store the testing database at 196 bytes per numeral. This also gives the project network connectivity, allowing the clock to use Network Time Protocol to stay synchronised – thus eliminating the need for an external RTC. Digits are displayed on four separate e-ink displays, which fits well with the hand-drawn aesthetic. It also means the clock doesn’t unduly light up the room at night.

It’s a fun project that will likely draw a knowing chuckle from those working in the field of handwriting recognition. We’d love to have one on our desk, too. If you’re thinking of attempting a build yourself, check out our recent contest for more inspiration!

Adding A Digital Readout To A Wood Lathe

The benefit of living in the modern era is that there are plenty of affordable machine tools on the market for the budding maker. However, to meet lower price points, products often forgo some of the nice-to-have features that make working easier. Of course, if you’ve got the skills to do it yourself, this needn’t be a problem, as [Zach] demonstrates.

[Zach] enjoyed using his wood lathe, but it didn’t come with a digital readout. Thankfully, retrofitting one was an easy, straightforward project. After a little research, a Hall effect sensor was chosen to detect the rotational speed of the lathe. The spindle was thus fitted with several magnets to trigger the sensor, allowing for higher resolution than just using a single device. An Arduino Nano was then used to monitor the output of the Hall effect sensor, displaying the rotational speed on a set of 7-segment displays. The project was then given its own custom PCB, and a nice 3D printed enclosure to fit it to the body of the lathe.

It’s a project that shows how easy it is to add functionality to basic machine tools using maker components. It also serves to demonstrate the value in giving a project a proper enclosure, to enable it to survive in a workshop environment. We’ve seen other hacky DRO mods before, too. Video after the break.

Continue reading “Adding A Digital Readout To A Wood Lathe” →

Foxie Clock Works In Two Ways

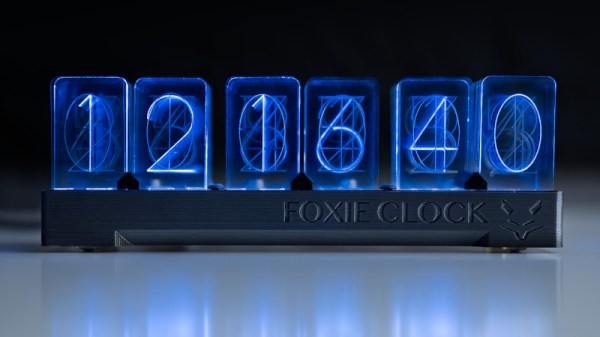
Nixie tubes are a hacker favorite for their warm glow and elegant, mid-century numerals. They’re also a pain to drive, demand high voltages, and aren’t exactly cheap and easy to come by. Never mind, for there are other ways to go – as [Alex Fox] demonstrates with the Foxie Clock.

The Foxie clock gets its name from its creator, in a portmanteau with the famous Nixie tubes. Rather than going with gas-filled extravagances, instead, acrylic pieces are engraved with similar numerals to the old technology. These are edge-lit by what appear to be WS2812 addressable LEDs, or similar. This led [Alex] to realise that the clock could also be configured to display in an alternate mode, instead creating numerals using the individual RGB LEDs as segments behind a frosted acrylic panel.

It’s a versatile project that ended up working as a clock in two unique yet appealing ways. We’re a sucker for a quality retro typeface, so are firmly on Team Edge-Lit, but sound off in the comments which you think is best. Others have attempted similar builds, too. And remember, if you can’t get your hands on one part, it always pays to experiment!

A Cheap And Easy GoPro Mount For Model Rocketry

Launching model rockets is fun, but the real meat of the hobby lies in what you do next. Some choose to instrument their rockets or carry other advanced payloads. [seamster] likes to film his flights, and built a nosecone camera package to do so. 

A GoPro is the camera of choice for [seamster]’s missions, with its action cam design making it easy to fire off with a single press of a button. To mount it on the rocket, the nosecone was designed in several sections. The top and bottom pieces are 3D printed, which are matched with a clear plastic cylinder cut from a soda bottle. Inside the cylinder, the GoPro and altimeter hardware are held in place with foam blocks, cut to shape from old floor mats. The rocket’s parachute is attached to the top of the nose cone, which allows the camera to hang in the correct orientation on both the ascent and descent phases of the flight. Check out the high-flying videos created with this setup after the break.

It’s a simple design that [seamster] was able to whip up in Tinkercad in just a few hours, and one that’s easily replicable by the average maker at home. Getting your feet wet with filming your flights has never been easier – we’ve certainly come a long way from shooting on film in the 1970s.

Continue reading “A Cheap And Easy GoPro Mount For Model Rocketry” →