The Way Of The PCB Artist: How To Make Truly Beautiful Circuit Boards

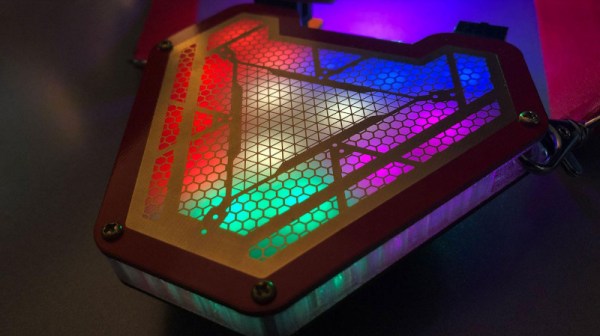
Getting your own PCBs made is a rite of passage for the hardware hacker. Oftentimes, it’s a proud moment, and many of us choose to immortalise the achievement with a self-aggrandizing credit on the silk screen, or perhaps a joke or personal logo. However, as far as artistically customized PCBs go, the sky really is the limit, and this is the specialty of [TwinkleTwinkie], whose Supercon talk covers some of the pitfalls you can run into when working at the edges of conventional PCB processes. 

[TwinkleTwinkie]’s creations are usually badges of one type or other — they’re meant to be worn on a lanyard around your neck, as a pin, or as a decoration added to another badge. The whole point is the aesthetic, and style is just as important as functionality. With diverse inspirations like Futurama, Alice in Wonderland and the shenanigans of the GIF community, his badges blend brightly colored boards with a big helping of LEDs and artistic silkscreening to create electronic works of art.

Keeping PCB Fab Houses from Upsetting the Artwork

These days, PCB fab houses offer more choice than ever, in terms of silkscreens, soldermask colors, and other options.  However, fundamentally, their primary concern is to produce reliable, accurate, electronically functional boards — and it’s something that can cause problems for #badgelife hackers designing for more aesthetic reasons.
Continue reading “The Way Of The PCB Artist: How To Make Truly Beautiful Circuit Boards” →
A Simple POV Globe Via APA102

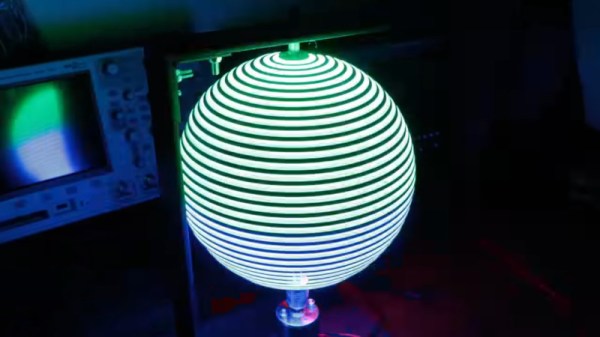
POV builds come in all shapes and sizes, and typically rely on LEDs for their high light output and fast response time. With this in mind, [Great Scott] grabbed some LED strip off the shelf and set about whipping up a POV LED globe.

Being a spinning POV build, it’s necessary to consider how to get power to the rotating elements. [Great Scott] decided to go with a simple solution of putting a LiPo battery on the rotating assembly, which runs the LEDs and Arduino Nano at the heart of the operation. The LEDs in question are of the APA102 type, making them readily addressable and capable of a wide color gamut. It’s all spun by a simple brushed DC motor, running from a separate supply at the base of the platform.

It’s very much a hacker build, held together with duct tape and zipties. Despite this, it looks tidy when in operation, as all of the important hardware is hidden at the centre of the globe. There’s a bit of a vibration problem, but [Great Scott] reckons this can be fixed with some frame modifications.

We’d love to see the build run some more advanced operations, like a representation of the Earth, or some kind of sun clock. If you’re interested in learning more about POV displays, we’ve got the primer you need. Video after the break.

Continue reading “A Simple POV Globe Via APA102” →

HiFi Audio On The Commodore 64 – 48KHz, Yo!

Prior to the development of CD-quality audio hardware in the mid-1990s, home computers and consoles typically made do with synthesized music. Due to the storage and RAM limitations of the time, there weren’t a whole lot of other practical options. If you’re willing to ignore practicality, however, you can do some wonderful things – such as playing high-quality audio on a Commodore 64!

The project is the work of [Antonio Savona], who set out to play hi-fi audio on a Commodore 64 using only period-correct hardware. That means no 16MB RAM expansions, and no crazy high-capacity carts. The largest carts of the era were just 1MB, as produced by Ocean, and [Antonio] intended to cram in a full 90 seconds of music.

Targeting a sample rate of 48 KHz with 8-bit samples would mean the cartridge could only fit 20 seconds of raw audio into its 1MB of storage. This wasn’t good enough, so the audio would have to be compressed, with the target being a 4:1 ratio to reach the 90 second goal. With the C64’s CPU running at just 1MHz, there are just 21 clock cycles to deal with each sample when playing at 48 KHz.

Obviously, [Antonio] had set quite the challenge, and some masterful assembly coding was used to get the job done. The final result has the audio sounding impressively good, given that it’s being pumped out by a 6502 that is surely sweating to get the job done.

We love a good C64 hack around these parts, and it’s now even possible to build a new one from scratch if that’s your particular itch. Video after the break.

Continue reading “HiFi Audio On The Commodore 64 – 48KHz, Yo!” →

Titanium Coating Is Actually Pretty Straightforward

[Justin] enjoys tinkering in his home lab, working on a wide variety of experiments. Recently, he’d found much success in coating objects with thin layers of various metals with the help of a DC sputtering magnetron. However, titanium simply wouldn’t work with this setup. Instead, [Justin] found another way.

As it turns out, coating with titanium is quite achievable for even the garage operative. Simply run current through a titanium wire, heating it above 900 degrees in a vacuum. This will create a shower of titanium atoms that will coat virtually anything else in the chamber. [Justin] was able to achieve this with little more than some parts from Home Depot, a vacuum pump, and a cheap glass jar. He was able to produce a nice titanium oxide finish on a knife blade, giving that classic rainbow look. Coating crystals was less straightforward, but the jet black finish achieved was impressive nonetheless.

[Justin] plans to upgrade his vacuum rig further, and with better process control, we’d expect even better results. The earlier work is also very relevant if you’re interested in creating fine coatings of other materials. Video after the break. Continue reading “Titanium Coating Is Actually Pretty Straightforward” →

Guitar Hero Controller Gets A New Musical Life

Guitar Hero was a big deal, right up until it wasn’t. The best efforts of the video game industry couldn’t resurrect the once-off rush of enthusiasm for rhythm gaming, and thrift stores around the globe are now littered with little plastic instruments. [Analog Sketchbook] decided to give one of these guitars for the Wii a new life, repurposing it as a synth controller.

The build is a straightforward one, thanks to the prevalence of modern maker solutions to electronic problems. Hooking up to the guitar is a solved problem, with an Adafruit Nunchucky breakout board allowing the Guitar Hero controller to be connected via jumper wires to the Raspberry Pi’s IO pins.

Communication is via I2C, and is easy to work with in Pure Data, running on the Pi. [Analog Sketchbook] created a patch that runs a synthesizer, controlled by the buttons and controls on the guitar itself. With this setup, you could create any number of different routines to allow the guitar to be played differently. We’d love to see a chiptune-esque arpeggio patch, or something that plays fat FM synth tones a la the Genesis, but that’s just our opinion. The sky really is the limit here, with plenty of grunt on the Pi for various forms of synthesis.

It’s a fun build that gives new life to an otherwise forgotten gaming accessory. We’ve seen them repurposed before too, as far back as 2010. Video after the break.

Continue reading “Guitar Hero Controller Gets A New Musical Life” →

Choosing The Right Battery For Your Electric Vehicle Build

Many a hacker has looked at their scooter, bike, or skateboard, and decided that it would be even better if only it had a motor on it. Setting out to electrify one’s personal transport can be an exciting and productive journey, and one that promises to teach many lessons about mechanical and electronic engineering. Fundamentally, the key to any build is the battery, which has the utmost say in terms of your vehicle’s performance and range. To help out, we’ve prepared a useful guide on selecting the right battery for your needs.

One Chemistry To Rule Them All

Batteries come in all shapes and sizes, and a variety of different chemistries that all have their own unique properties and applications. When it comes to small electric vehicles, it’s desirable to have a battery with a low weight, compact size, plenty of current delivery for quick acceleration, and high capacity for long range.

30 years ago, options were limited to lead acid, nickel cadmium, and nickel metal hydride batteries. These were heavy, with low current output, poor capacity, and incredibly slow charge times. Thankfully, lithium polymer batteries have come along in the meantime and are more capable across the board. Offering huge discharge rates, fast charging, light weight and high capacity, they’re undeniably the ultimate choice for a high performance electric vehicle. They’re also wildly popular, and thus cheap, too!

There are some hangups, however. It’s important to keep all the cells in a pack at the same voltage in order to avoid cells back-charging each other. This can cause damage to the pack, or even explosions or fire. Maintaining the battery voltages to avoid this is called “balancing”. It can be handled in various ways, depending on the exact style of battery you’re using, as we’ll cover later.

Additionally, lithium batteries do not like being over-discharged. As a rule of thumb, it’s a good idea not to let your batteries drop below 3.0 V per cell. Failure to keep this in check can lead to ruining a pack, hurting its maximum capacity and ability to deliver current.

There are thankfully ways around these issues, and which ones you use depends on the battery you choose for your application. Continue reading “Choosing The Right Battery For Your Electric Vehicle Build” →

Reading Light Not Quite Powered By Your Favorite Hot Beverage

Thermoelectric devices are curious things, capable of generating electricity via the Seebeck effect from a temperature differential across themselves. The Seebeck effect does not produce a huge potential difference, but when employed properly, it can have some useful applications. [MJKZZ] decided to apply the technology to build a reading light, powered by a hot cup of coffee.

The build is based around four Peltier modules, 40mm x 40mm in size, sandwiched between a pair of copper sheets. The modules are wired in series to create a greater output voltage, and an aluminium heatsink is fitted to one side to create a higher temperature differential. The set-up produces just 230 mV from human body temperature, but over 8 volts when warmed directly with a heat gun. Boiling water in a mug produces a more restrained 2.1V output.

On its own, this voltage is a little weak to do anything useful. Thus, the electricity from the Peltier modules is fed through a joule thief, which helps step up the voltage to a more useful range to run an LED. With a mug of coffee on the copper plate, the assembly isn’t quite able to light the LED enough to allow the user to read comfortably. However, it flickers into life just a touch, demonstrating the basic concepts in action.

While it’s not the most practical build, and it’s likely to cool your coffee faster than you’d like, it’s a fun project that serves to educate about the mechanics of the Seebeck effect and using Peltier devices to generate it. Another fun application is to use them in a cloud chamber. Video after the break.

Continue reading “Reading Light Not Quite Powered By Your Favorite Hot Beverage” →