Colorizing Images With The Help Of AI

The world was never black and white – we simply lacked the technology to capture it in full color. Many have experimented with techniques to take black and white images, and colorize them. [Adrian Rosebrock] decided to put an AI on the job, with impressive results.

The method involves training a Convolutional Neural Network (CNN) on a large batch of photos, which have been converted to the Lab colorspace. In this colorspace, images are made up of 3 channels – lightness, a (red-green), and b (blue-yellow). This colorspace is used as it better corresponds to the nature of the human visual system than RGB. The model is then trained such that when given a lightness channel as an input, it can predict the likely a & b channels. These can then be recombined into a colorized image, and converted back to RGB for human consumption.

It’s a technique capable of doing a decent job on a wide variety of material. Things such as grass, countryside, and ocean are particularly well dealt with, however more complicated scenes can suffer from some aberration. Regardless, it’s a useful technique, and far less tedious than manual methods.

CNNs are doing other great things too, from naming tomatoes to helping out with home automation. Video after the break.


Continue reading “Colorizing Images With The Help Of AI” →

If You Can’t Buy The Keyboard You Want, Build It Instead

The great thing about being a maker is that when the market fails to meet your needs, you can strike out on your own. [GuzziGuy] did just that, building a bespoke mechanical keyboard that’s stylish to boot.

The aim was to create a keyboard well suited to working without a mouse, and with a keypad on the opposite side to suit a left-hander’s predilections. The case consists of an aluminium top plate with an attractive walnut base, both cut on a Workbee CNC machine. Keycaps are sourced from YDMK and Amazon, with the parts chosen giving the build a striking early 1980s workstation look.

The keys are handwired to a series of DuPont connectors for easy disassembly. These hook up to an Elite-C controller, a USB-C remix of the popular Arduino Pro Micro. Based on the ATmega32U4, it’s got native USB HID functionality, making it perfect for keyboard builds.

The fit and finish is what really makes this project, going to show that a few hours well spent on the CNC can turn you out a beautiful project. As far as mechanical keyboards go, your imagination really is the limit!

A Mechanical Shutter Release For A Digital Camera

Most digital cameras these days come with some kind of electronic remote shutter release. Various solutions exist, using USB cables, smartphone apps, or dedicated remotes. [Steloherd] wasn’t happy with the options available for his Ricoh GRII, though, so built a rig to do things the old fashioned way.

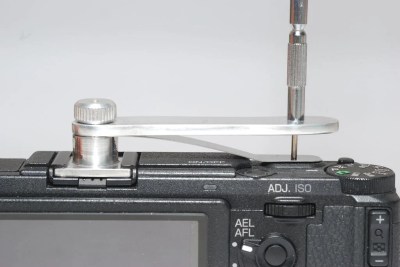
The spring plate helps protect the shutter button from damage.

[Steloherd] wanted to use an old-school mechanical release cable, so devised a way to use it to trigger the Ricoh’s standard shutter button. A small aluminium bracket was created, attached to the hot shoe on top of the camera via a mounting foot from a standard flash accessory. A spring plate was then created to help spread the load from the mechanical release pin, ensuring it triggers the camera effectively without damaging anything.

Installing the mechanical release proved difficult, as the DIN standard calls for an obscure M3.4 conical tapped thread. Rather than muck about finding rare tooling, [Steloherd] simply recut the thread on the release cable to a straight M3x0.5, and did the same for the bracket.

Overall, it’s a tidy hack, and one that could be adapted to other cameras fairly easily. Other methods we’ve seen involve such odd choices as linear actuators harvested from air fresheners, if you’d believe it. As always, if it works, it works!

Harmonic Analyzer Does It With Cranks And Gears

Before graphic calculators and microcomputers, plotting functions were generally achieved by hand. However, there were mechanical graphing tools, too. With the help of a laser cutter, it’s even possible to make your own!

The build in question is nicknamed the Harmonic Analyzer. It can be used to draw functions created by adding sine waves, a la the Fourier series. While a true Fourier series is the sum of an infinite number of sine waves, this mechanical contraption settles on just 5.

This is achieved through the use of a crank driving a series of gears. The x-axis gearing pans the notepad from left to right. The function gearing has a series of gears for each of the 5 sinewaves, which work with levers to set the magnitude of the coefficients for each component of the function. These levers are then hooked up to a spring system, which adds the outputs of each sine wave together. This spring adder then controls the y-axis motion of the pen, which draws the function on paper.

It’s a great example of the capabilities of mechanical computing, even if it’s unlikely to ever run Quake. Other DIY mechanical computers we’ve seen include the Digi-Comp I and a wildly complex Differential Analyzer. Video after the break.

Continue reading “Harmonic Analyzer Does It With Cranks And Gears” →

How To Design A BGA Breakout Module

Surface mount devices can take some adjusting to for hackers primarily used to working with through-hole components. Despite this, the lure of the hottest new parts has enticed even the most reticent to learn to work with the technology. Of course, time rolls on and BGA parts bring further difficulties. [Nate] from SparkFun worked on the development of the RedBoard Artemis, and broke down the challenges involved.

The RedBoard Artemis is an Arduino-compatible devboard built around the Ambiq Apollo3 chip. In addition to packing Bluetooth and 1 MB of Flash, it’s also capable of running TensorFlow models and using tiny amounts of power. The chip comes in an 81-Ball Grid Array at 0.5mm pitch, which meant SparkFun’s usual PCB fabrication methods weren’t going to cut it.

An initial run of prototype boards was run using 4 layers, blind and buried vias, and other fancy tricks to break out all the necessary signals. While this worked well, it was expensive and inefficient. The only part of the board that needed such fabrication was around the chip itself; the rest of the board could be produced with cheaper 2-layer methods. To improve this for mass production, instead, an SMD module was created to house the Apollo3, which could then be dropped into new designs on cheaper boards as necessary.

[Nate] does a great job of explaining the engineering involved, as well as sharing useful tips for others going down a similar path. So far, this is just part 1, with future posts promising to cover the RF shield design and FCC certification process. [Nate] has always been keen to share his wisdom, and we can’t wait to see what comes next!

This Handheld C64 Design Study Needs To Be Made

The Commodore 64 remains the best selling home computer of all time, and is unlikely to be toppled anytime soon. It continues to inspire a diehard community of makers and hackers to this day. [Cem Tezcan] is one of those people, and his design study of a handheld C64 is utterly droolworthy.

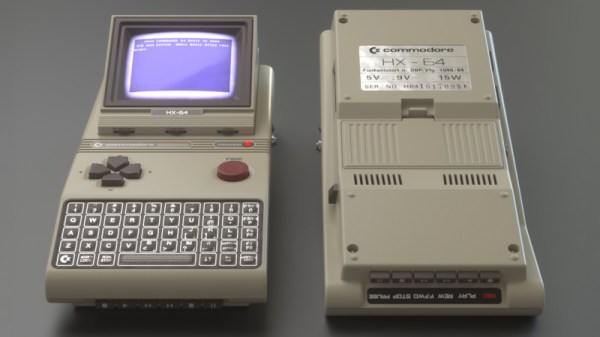
It’s quite likely that you’d run out of power before the cassette finished loading, but hey, we can dream.

The study includes renders of the device from several angles, as well as a basic blueprint outlining the various components. It features period accurate hardware, using a membrane keyboard, micro-cassettes for data storage, and a 3.5″ CRT. Other nice touches are the big red textured FIRE button, and a horrible early 80s 3.5mm jack.

The C64 hardware of the time required both 12 V and 5V power, and the current draw of even a small CRT would be high. It’s likely such a handheld would have battery life measured in minutes. It’s a wonderful picture of what could have been, though we suspect that such a design would have pushed the limits of the technology of the time.

However, electronics has matured since, and we sit here rather comfortably in 2019. We’d love to see the best handheld C64 that the community can muster, and with 3D printers and FPGAs on hand, it’s an eminently achievable feat. Bonus points to anyone who can make a microdatasette interface, too. All submissions to the tips line, and meanwhile, consider how easy it is to build a new C64 from scratch. Happy hacking!

Double Pendulum Uses Custom Slip Rings

Rotating mechanisms can be a headache when it becomes necessary to deliver power through them. [Igor Brkic] faced just such a challenge when creating his double-pendulum build, and solved it with a little DIY.

The project is known as KLAATNO, inspired by the Croatian word for pendulum, klatno. It’s a mechanical installation piece, consisting of a power-assisted pendulum, with a second pendulum fitted at the end of the swinging arm. A 24 volt geared motor is used to drive the assembly. It’s controlled by an Arduino Pro Mini, which measures the back EMF from the motor terminals to determine the speed and direction of the motor’s movement.

To make the installation more visually striking, EL wire was installed on the swinging arms of the twin pendulums. This required the transfer of power to the rotating assembly, which was achieved through the use of custom made slip rings. Copper sheet is used in combination with a flexible metal wire sourced from a guitar string. It’s not as low-friction as [Igor] would like, but it gets the job done.

It’s a fun installation that would be perfectly at home in the common area of any university engineering building. Of course, our favorite pendulums are of the siege weapon variety. Video after the break.

Continue reading “Double Pendulum Uses Custom Slip Rings” →