Bluetooth Automation Remote Hangs Around

Using your smartphone to control your home automation system gives you a lot of flexibility. But for something as simple as turning the lights on and off, it can be a pain to go through the whole process of unlocking your phone, choosing the right browser page or app, and then finally hitting the button you need. It’d be much simpler if it could all be done at the touch of a single, physical button – but phones don’t have many of those anymore. [falldeaf] brings the solution – a four-button Bluetooth remote for your smartphone that’s wearable, to boot.

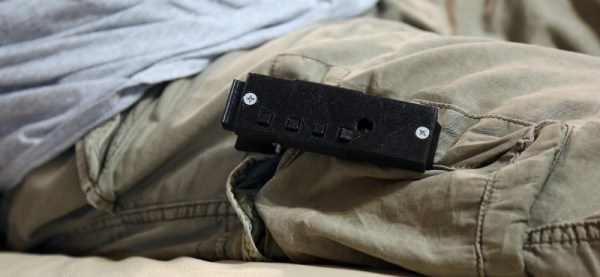
The project is built around the RFDuino, an Arduino platform used for quickly and easily building Bluetooth compatible projects. So far, so simple – four buttons wired into a microcontroller with wireless capability onboard. The real trick is the 3D-printed clothespin style case which allows you to clip the four-button remote onto your clothes. [falldeaf]’s first attempt was a palm-mounted setup that they found got in the way of regular tasks; we agree that the wearable version offers a serious upgrade in utility.

The smartphone side of things is handled with a custom app [falldeaf] coded using PhoneGap. This is where actions for the buttons can be customized, including using the buttons to navigate a menu system to enable the user to select more than just one function per button. It adds a high level of flexibility, so you can create all kinds of macros to control your whole home automation system from your button clip.

It’s really great to see a project that considers ergonomics and usability above and beyond just creating the baseline functionality. Follow this train of thought and you’ll find yourself enjoying your projects in the use phase well beyond the initial build. Another great example is this self-charging electrically heated jacket. Video after the break.

Continue reading “Bluetooth Automation Remote Hangs Around”

Shark With Frickin’ LED Tells People Not To Bother You

Everybody is busy these days, but sometimes it’s hard to tell. What with teleconferences being conducted over tiny Bluetooth headphones and Skype meetings where we seem to be dozing in front of the monitor, we’ve lost some of the visual cues that used to advertise our availability. So why not help your colleagues to know when to give you space with this shark themed WiFi-enabled meeting light?

Why a shark and not a mutated intemperate sea bass? Only [falldeaf] can answer that. But the particulars of the build are well-documented and pretty straightforward. A Photon runs the show, looking for an Outlook VFB file to parse. An RGB LED is used to change the color of the translucent 3D printed shark based on whether you’re in a meeting, about to step into one, or free. The case is 3D printed as well, although [falldeaf] farmed the prints out to a commercial printing outfit because of the size and intricacy of the parts. He did fabricate a nice looking wood base for the light, though.

There are plenty of ways to tell people to buzz off, but this is a pretty slick solution. For those in open floor plan workspaces, something like this IoT traffic light for you and your cube-mates might be in order.

Hackaday Links: November 24, 2013

hackaday-links-chain

We love home theater hacks and this one especially since it is also part of a larger home automation project. [Falldeaf] use Z-Wave wireless home automation and includes mains switching for his television. The only problem being that when power is switch back on the TV remains in the standby state. His solution was to use an ATtiny85 to detect power, then push the IR code to turn the TV on after a short delay.

[Pjkim] wanted to prototype using the Tiva Launchpad on his Mac. He managed to get a toolchain up and running that includes the TivaWare libraries. He put together a guide that shows how to set up Eclipse and Energia for the Tiva family. If you haven’t heard of Energia check out the Github Readme.

Most folks have a smartphone and you can bet that the handsets are Bluetooth enabled. But we think there is still a low percentage who are connecting their smartphone audio to wireless speakers. [Anton Veretenenko] shows how you can use some cheap KRC-86B modules from Ali Express to make your own wireless speakers. He’s even powering his hack with a single 18650 Li-Ion cell.

Taking a turn away from electronics we got a chuckle out of [CADFood’s] plan to make pearls with his bicycle. He used DesignSpark Mechanical to model what amounts to a bicycle powered ball mill. It attaches to his spokes and after taking a hammer to some oyster shells he loads them up and goes for a ride. Well actually he needs to go for a bunch of rides. The idea is that about six months of bicycling will yield a cache of pearls. [Thanks Holger]

We enjoyed this article on how designing powered scooters is changing engineering education. We’re happy to see that hacking is starting to be widely accepted as a functional and effective way to gain and pass on knowledge.

If you have access to a 3D printer you can own some of the relics from the Smithsonian. They’ve been 3D scanning some pieces in their collection and you can download the models.

And finally, [GravityRoad] is working on building a delta-bot arm to use as part of a performance art project. Check out one of the most recent development videos and if that gets you interested there’s much more on the website. [Thanks Charles]


Hackaday Links: November 17, 2013

hackaday-links-chain

If you purchased a knock-off FM transmitter and were unhappy with its broadcast range [Thiagohersan] shows how to double the range with a simple transistor amplifier circuit. He also hacked it for used without the 12V car socket.

[Patrick Herd] had a project that required him to strip about twenty Mindstorm batteries from their plastic enclosures. It’s not too tough getting into them but it does require drilling out the plastic rivets. He made a jig and used a CNC mill to automate the process.

Speaking of CNC, [Bertho] added some abstraction to distance himself from what he calls the “50+ years archaic syntax and grammar that G-code programs have”. The project is a meta-compiler for G-Code.

If you need a cold one and don’t have a HaDuino on hand you’ll thank yourself for hacking together this five-cent workbench bottle opener.

Just make sure you do all the lathe work for a custom speaker enclosure before you start pounding back those brewskis. Not only does [Shaun’s] creation look modern and stylish, but it boasts more than enough power to bump some tunes.

Here’s a project that adds LED feedback to your XBMC installation. It uses a Raspberry Pi to run the media center software, and a script to monitor it and actuate the lights on an Adafruit add-on board. At first glance you may not think much of it, but this is all the logic control you need to automate your viewing room. Who doesn’t want a home theater that automatically dims once you’ve made your viewing selection?

And finally, [08milluz] snagged some reactive electronics in the form of Disney’s Mickey Mouse ears. Apparently they glow different colors at live shows and based on where they are worn within the park. He did a complete teardown to show off the hardware within. It turns out to be controlled by an MSP430 which are known for their low power consumption. [Thanks Spikeo55]

Web Based Automation Courtesy Of Raspberry Pi

web-based-automation-via-rpi

This project is a great example of the Raspberry Pi’s ability to eclipse Arduino when it comes to interaction. [Fall Deaf] mentions that he used to use an Arduino board with an Ethernet shield to add extensible interactivity to his project. But this one, which is a home automation lamp project, uses a Raspberry Pi instead. The concepts end up being very similar. But the cost of the hardware is less and the coding work is arguably orders of magnitude easier.

Don’t get us wrong, the hardware is fundamentally different. When you move from Arduino to RPi you lose some I/O pins and the low level control of them isn’t quite as straight-forward. But you also don’t have to program the thing in C. The Linux kernel handles the low level control which means you can write your scripts using Python. Because Python is an interpreted language the testing and debugging is much faster — no need to flash new code, just run the script again.

This project used the RPi GPIO to drive a strip of LEDs which use the WS2801 protocol. The board includes a NIC which makes it a snap to use as a web server. The smart phone controls seen above are served up from the Pi using jQuery. Right now there’s a cord running out of the lamp. But there should be plenty of room to use a screw-in outlet adapter and to hide the RPi and its PSU inside.

The board still has enough juice to drive other automation features too, like acting as a web radio server.

Continue reading “Web Based Automation Courtesy Of Raspberry Pi”

Ambilight Clone Has Meaningful Amount Of Resolution

james-bond-ambilight-clone

We don’t have an Ambilight clone on our own home theater, but seeing this one in action makes us wonder if we shouldn’t add it to the ever-growing list of projects we need to tackle (right below that POV display we’ve been putting off for years). [Falldeaf] built the colored light augmentation system using a set of WS2801 controlled LED pixels. There are a lot of them, and this results in the ‘meaningful resolution’ we mentioned in the title. The image on the screen is the opening to a James Bond film. You’ll remember that the camera shot down a rifle barrel follows him as he walks across the screen. There’s enough LEDs here to have to the light follow him across the screen as well. This is a nice touch that we don’t see in every Ambilight clone project.

A frame of fake-wood angle bracket holds each LED pixel in place. The entire assembly attaches to the VESA mounting holes on the back of the television. An Arduino addresses the lights while the Boblight package processes the video to acquire the lighting instructions. We think the hue is a bit off, but otherwise it’s a solid offering.

We’re still hoping the Microsoft IllumiRoom becomes a thing.

Continue reading “Ambilight Clone Has Meaningful Amount Of Resolution”

Flexible Web Interface Makes The Universal Remote Nearly Perfect

[Fall Deaf] built an Arduino based universal remote control system. It uses a shield which has both an IR receiver and transmitter. This gives it the tools to learn codes from your existing remotes and play them back in order to control the devices. This functionality is really nothing new, but we think the user interface he developed for the system is absolutely fantastic!

Software is web-based. You can simply point a remote at the Arduino and push a button. The receiver will store the code which can later be assigned to a virtual button. The image above shows the channel-up option being created; it will be added to the list once confirmed. From there any web enabled device – smart phone, tablet, netbook, etc – can be used as the remote for the system. The only feature we think is missing is the ability to alter the layout of the buttons, with larger areas for the most frequently used commands.

After the break you can see a demonstration of this system, as well as the one extra feature we haven’t touched on yet. [Fall Deaf] included a Piezo element in the hardware design which lets him knock on his coffee table to use the remote if a smart-device isn’t close at hand.

Continue reading “Flexible Web Interface Makes The Universal Remote Nearly Perfect”