Adding Stereo VU Meters To A Turntable

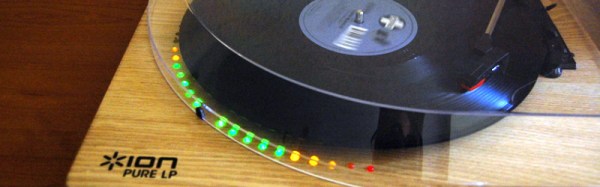
A pleasing development for those with an interest in audio equipment from decades past has been the recent resurgence in popularity of vinyl records. Whether you cleave to the view that they possess better sound quality or you simply like the experience of a 12″ disk with full-size cover art and sleeve notes, you can now indulge yourself with good old-fashioned LPs being back on the shelves.

[Michael Duerinckx] is a fan of older trance records, and has an Ion Pure LP turntable which is fortunately for him not such an exclusive piece of audio equipment that it can’t be readily hacked. The hack he’s applied to it is a relatively simple one but nonetheless rather attractive, he’s added a set of LED VU meters in a ring round the edge of the platter.

Behind the LEDs is the trusty LM3915, an integrated circuit which will no doubt be familiar to any reader whose earlier life was spent among 1970s and 1980s audio gear. Internally it’s a stack of comparators and a resistor ladder, and it simply turns on the required number of outputs to match the level on its input. He’s put a pair of them on a little PCB with an associated PSU regulator, and mounted the LEDs in a row of holes drilled in the MDF base board of the turntable following the edge of the platter. Power and audio come from the turntable’s circuit board, which contains a preamplifier and the USB audio circuitry. A traditional turntable with a low-level output would not be able to drive an LM3915 directly.

This is a relatively straightforward project and the turntable itself isn’t necessarily the most accomplished on the market, but it’s very neatly executed and looks rather pretty.

Turntable projects are not as common as you’d expect here at Hackaday, but we’ve had a few. There was this concrete example for instance, and a very pretty one using layered plywood.

Courtesy of SoMakeIt, Southampton Makerspace.

Camera Restricta Ensures Original Photography

Proper documentation is important, and when traveling it is commonly achieved via photography. Redundant documentation is often inefficient, and the Camera Restricta — in a commentary on the saturation of photographed landmarks and a recent debate on photographic censorship in the EU — aims to challenge the photographer into taking unique photographs.

Camera Restricta has a 3D-printed body, housing a smartphone for gps data, display and audio output, while an ATTiny85 serves to control the interdicting function of the camera. When the user sets up to take a picture using Camera Restricta, an app running on the phone queries a node.js server that trawls Flikr and Panoramio for geotagged photos of the local area. From that information, the camera outputs a clicking audio relative to the number of photos taken and — if there are over a certain number of pictures of the area — the screen trips a photocell connected to the ATTiny 85 board, retracting the shutter button and locking down the viewfinder until you find a more original subject to photograph.

Continue reading “Camera Restricta Ensures Original Photography”

Bandsaw Tension Gauge Uses Raspberry Pi And Load Cell

No matter what material you’re cutting, getting the blade tension right is one of the keys to quality cuts on the bandsaw. Unfortunately, most bandsaws come with only a rudimentary tension gauge, and while there are plenty of tricks for measuring blade tension indirectly, nothing beats a digital blade tension gauge for repeatable results.

Despite being an aftermarket accessory for his beefy Hitachi CB-75F bandsaw, [Stephen B. Kirby]’s Pi-based tension guide looks like an OEM product. Housed in a sturdy case and sporting a sealed membrane keypad and four-line LCD display, the interface electronics are pretty straightforward. The tricky bit is sensing the amount of tension on the bandsaw blade. For that task, [Stephen] mounted a load cell in place of the original tensioning spring. A few adapters helped that job, and with a little calibration, the gauge is capable of displaying the tension by measuring the force over the cross-sectional area of the current blade.

We really like it when electronics can bring a new level of precision to old-school hardware, whether it’s a simple DRO for a manual lathe or a more accomplished build like [Stephen]’s. Sometimes adding new silicon can make old iron a little easier to use.

Talking Arduino Tells GoPro What To Do

It’s 2017 and even GoPro cameras now come with voice activation. Budding videographers, rest assured, nothing will look more professional than repeatedly yelling at your camera on a big shoot. Hackaday alumnus [Jeremy Cook] heard about this and instead of seeing an annoying gimmick, saw possibilities. Could they automate their GoPro using Arduino-spoken voice commands?

It’s an original way to do automation, for sure. In many ways, it makes sense – rather than mucking around with trying to make your own version of the GoPro mobile app (software written by surfers; horribly buggy) or official WiFi remote, stick with what you know. [Jeremy] decided to pair an Arduino Nano with the ISD1820 voice playback module. This was then combined with a servo-based panning fixture – [Jeremy] wants the GoPro to pan, take a photo, and repeat. The Arduino sets the servo position, then commands the ISD1820 to playback the voice command to take a picture, before rotating again.

[Jeremy] reports that it’s just a prototype at this stage, and works only inconsistently. This could perhaps be an issue of intelligibility of the recorded speech, or perhaps a volume issue. It’s hard to argue that a voice control system will ever be as robust as remote controlling a camera over WiFi, but it just goes to show – there’s never just one way to get the job done. We’ve seen people go deeper into GoPro hacking though – check out this comprehensive guide on how to pwn your GoPro.

The DIY Luggable PC

If you haven’t gone laptop shopping recently, you’re in for a big shock when you do. Recent consumer laptops are thin, powerful, surprisingly inexpensive, and Apple’s latest MacBook Pros even have a fantastic ‘Touch Bar’ – a touch-sensitive OLED display where the function keys should be. The greatest laptops ever made are available right now, and they don’t cost much, either.

Unfortunately, the laptop as a platform is inherently a compromise. If you want a discrete CPU, or if you simply want to choose your own parts, you’re relegated to a desktop build. The middle ground between extensibility and portability isn’t really covered by case manufacturers, and even the rare ‘LAN party’ cases rarely have a handle.

[Roger] is taking steps to solve this problem. He’s designed a 3D printable luggable PC. Yes, now you can have a GTX 1080 and a 22-core Xeon in a form factor you can carry around. It’ll fit in the overhead bin on your next flight, and yes, the monitor is included.

The construction of this DIY luggable PC should be familiar to anyone who built a 3D printer in 2011. It’s made out of threaded rods, with brackets for an LCD panel, ATX power supply, motherboard, and SSDs. Since this is effectively a modular system, you can load this case up with hardware. The included monitor in [Roger]’s build is taken from an old laptop and driven through an eBay “LCD Controller Board”.

While a luggable PC might be a very niche use case, it is still one that’s vastly underserved. I recently built a new battlestation, and after searching for a case like this for a few months, I eventually gave up, caved in, and bought whatever Linus told me to buy. You simply cannot buy an ATX case that has a monitor bolted to the side, and [Roger]’s build is the first DIY solution we’ve seen.

All the files to replicate this project are linked to on the [Roger]’s Hackaday.io project, and this would be an excellent basis for a community-based project to build an Open Hardware luggable PC enclosure. A few days ago, [Roger] brought this PC out to the Hackaday LA January meetup. He brought to the meetup on the train, providing more than enough evidence this is a truly portable PC. Check out the pics from the meetup below.

The Power Glove Ultra Is The Power Glove We Finally Deserve

How do you make the most awesome gaming peripheral ever made even more bad? Give it a 21st-century upgrade! [Alessio Cosenza] calls this mod the Power Glove Ultra, and it works exactly as we imagined it should have all those years ago.

The most noticeable change is the 3D-printed attachment that hosts the Bluetooth module, a combination USB charger and voltage booster, and a Metro Mini(ATmega328) board. On top of a 20-hour battery life, a 9-axis accelerometer, gyroscope, and compass gives the Power Glove Ultra full 360-degree motion tracking and upgrades the functionality of the finger sensors with a custom board and five flex sensor strips with 256 possible positions for far more nuanced input. [Cosenza] has deliberately left the boards and wires exposed for that cyberpunk, retro-future look that is so, so bad.

Continue reading “The Power Glove Ultra Is The Power Glove We Finally Deserve”

These Five Hackaday.io Members Just Won Fancy New CircuitPython Boards

Just a few hours ago, we had a HackChat over on Hackaday.io with Adafruit discussing CircuitPython, their new extension to the MicroPython codebase. During the chat, the folks at Adafruit took questions and asked participants in the chat what they’d like to build with some cool new hardware. These CircuitPlayground M0 Express boards are brand new, unreleased hardware. Really cool stuff.

The winners of these unreleased boards, and the projects they’ll be using them for are: [RaidDude8] for a light painting system, [gelatinousslime] for a ‘magic wand’ for his daughter that reacts to gestures, [Neon22] for a multiuser game using Neopixels, [turbinenreiter] for a gravity demonstrator using Neopixels and the accelerometer, and [todbot] for a Powermate knob USB HID clone.

During the chat, The folks at Adafruit talked about their additions to MicroPython. It’s a rework of the API, provides better support for more platforms, and extends the entire thing to microcontrollers.  If you like Python and want to get into microcontrollers, this one is for you.

If you missed the chat, you can still check out Adafruit’s live stream right here, or the transcript right here. Below, you can check out Lady Ada awarding the new boards after the break.

We have a few more HackChats coming up in the next few weeks, one with [Sprite_TM], inevitably discussing why he won’t do a crowdfunding campaign for his tiny, tiny Game Boy, an RF talk with [Jenny List], and a chat with Sparkfun. You can check out the upcoming HackChats here. Want to get in on the action? Request to join the HackChat and you’re in.

Continue reading “These Five Hackaday.io Members Just Won Fancy New CircuitPython Boards”