Test Pattern Generator For SCART And RGB TVs

CRTs don’t last forever, and neither do the electronics that drive them. When you have a screen starting to go wonky, then you need a way to troubleshoot which is at fault. A great tool for that is a pattern generator, but they’re not the easiest to come by these days. [baritonomarchetto] needed a pattern generator to help repair his favourite arcade machine, and decided to make his own DIY Portable RGB CRT Test Pattern Generator.

One of the test patterns available from the device. This TV appears to be in good working order.

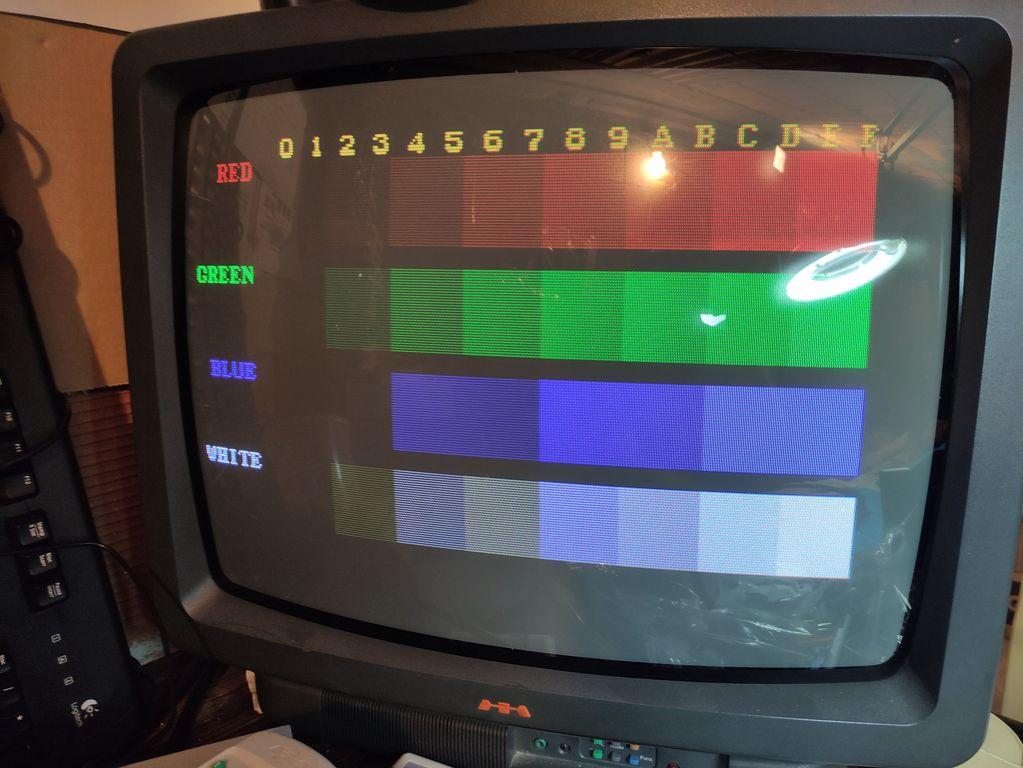
While he does cite [Nicholas Murray]’s RP2040 test pattern generator as a starting point (which itself builds on the PicoVGA library once featured here), he couldn’t just build one. That worthy project only outputs VGA and because [baritonomarchetto] is in Europe, he needed a SCART connector. Since he’s working on arcade machines, he needed non-SCART RGB signals, too. The arcade signals need to be at higher voltages (TLL level) than the RGB signal you’d find in SCART and VGA.

The upshot is while he’s using [Nicholas]’s code for the RP2040, he’s rolled his own PCB, including a different resistor ladders to provide the correct voltages depending on if he’s dealing with a home TV or arcade CRT. To make life easier, the whole thing runs off a 9V battery.

If you’re wondering what the point of these test patterns is, check out this 1981-vintage pattern generator for some context from the era. If a digital replica doesn’t float your boat, it is possible to recreate the original analog circuitry that generated these patterns back when the CRT was king.

Dual RGB Cameras Get Depth Sensing Powerup

It’s sometimes useful for a system to not just have a flat 2D camera view of things, but to have an understanding of the depth of a scene. Dual RGB cameras can be used to sense depth by contrasting the two slightly different views, in much the same way that our own eyes work. It’s considered an economical but limited method of depth sensing, or at least it was before FoundationStereo came along and blew previous results out of the water. That link has a load of interactive comparisons to play with and see for yourself, so check it out.

A box of disordered tools at close range is understood very well, and these results are typical for the system.

The FoundationStereo paper explains how researchers leveraged machine learning to create a system that can not only outperform existing dual RGB camera setups, but even active depth-sensing cameras such as the Intel RealSense.

FoundationStereo is specifically designed for strong zero-shot performance, meaning it delivers useful general results with no additional training needed to handle any particular scene or environment. The framework and models are available from the project’s GitHub repository.

While products like Microsoft’s Kinect have struggled to keep the consumer’s attention, depth sensing remains an enabling technology that opens possibilities and gives rise to interesting projects, like a headset that allows one to see the world through the eyes of a depth sensor.

The ability to easily and quickly gain an understanding of the physical layout of a space is a powerful tool, and if a system like this one can deliver such fantastic results with nothing more than two RGB cameras, that’s a great sign. Watch it in action in the video below.

Continue reading “Dual RGB Cameras Get Depth Sensing Powerup”

Printable Pegboard PC Shows Off The RGB

Sometimes it seems odd that we would spend hundreds (or thousands) on PC components that demand oodles of airflow, and stick them in a little box, out of sight. The fine folks at Corsair apparently agree, because they’ve released files for an open-frame pegboard PC case on Printables.

According to the write-up on their blog, these prints have held up just fine with ordinary PLA– apparently there’s enough airflow around the parts that heat sagging isn’t the issue we would have suspected. ATX and ITX motherboards are both supported, along with a few power supply form factors. If your printer is smaller, the ATX mount is per-sectioned for your convenience. Their GPU brackets can accommodate beefy dual- and triple-slot models. It’s all there, if you want to unbox and show off your PC build like the work of engineering art it truly is.

Of course, these files weren’t released from the kindness of Corsair’s corporate heart– they’re meant to be used with fancy pegboard desks the company also sells. Still to their credit, they did release the files under a CC4.0-Attribution-ShareAlike license. That means there’s nothing stopping an enterprising hacker from remixing this design for the ubiquitous SKÅDIS or any other perfboard should they so desire.

We’ve covered artful open-cases before here on Hackaday, but if you prefer to hide the expensive bits from dust and cats, this mid-century box might be more your style. If you’d rather no one know you own a computer at all, you can always do the exact opposite of this build, and hide everything inside the desk.

Some Useful Notes On The 6805-EC10 Addressable RGB LED

LEDs are getting smaller and smaller, and the newest generations of indexable RGB LEDs are even fiddlier to use than their already diminutive predecessors. [Alex Lorman] has written some notes about the minuscule SK6805-EC10 series of LEDs, which may be helpful to those wanting to learn how to deal with these in a more controlled manner.

Most hardware types will be very familiar with the 5050-sized devices, sold as Neopixels in some circles, which are so-named due to being physically 5.0 mm x 5.0 mm in the horizontal dimensions. Many LEDs are specified by this simple width by depth manner. As for addressable RGB LEDs (although not all addressable LEDs are RGB, there are many weird and wonderful combinations out there!) the next most common standard size down the scale is the 2020, also known as the ‘Dotstar.’ These are small enough to present a real soldering challenge, and getting a good placement result needs some real skills.

[Alex] wanted to use the even smaller EC10 or 1111 devices, which measure a staggering 1.1 mm x 1.1 mm! Adafruit’s product page mentions that these are not intended for hand soldering, but we bet you want to try! Anyway, [Alex] has created a KiCAD footprint and a handy test PCB for characterizing and getting used to handling these little suckers, which may help someone on their way. They note that hot air reflow soldering needs low temperature paste (this scribe recommends using MG Chemicals branded T3 Sn42Bi57Ag1 paste in this application) and a very low heat to avoid cracking the cases open. Also, a low air flow rate to prevent blowing them all over the desk would also be smart. Perhaps these are more suited to hot plate or a proper convection oven?

As a bonus, [Alex] has previously worked with the slightly larger SK6805-1515 device, with some good extra notes around an interesting nonlinearity effect and the required gamma correction to get good colour perception. We’ll leave that to you readers to dig into. Happy soldering!

We’ve not yet seen many projects using these 1111 LEDs, but here’s one we dug up using the larger 1515 unit.

RGB LED Display Simply Solves The Ping-Pong Ball Problem

A few years ago [Brian McCafferty] created a nice big RGB LED panel in a poster frame that aimed to be easy to move, program, and display. We’d like to draw particular attention to one of his construction methods. On the software end of things there are multiple ways to get images onto a DIY RGB panel, but his assembly technique is worth keeping in mind.

The diameter of ping pong balls is a mismatch for the spacing of LEDs on a strip. The solution? A bit of force.

The technique we want to highlight is not the fact that he used table tennis balls as the diffusers, but rather the particular manner in which he used them. As diffusers, ping-pong balls are economical and they’re effective. But you know what else they are? An inconvenient size!

An LED strip with 30 LEDs per meter puts individual LEDs about 33 mm apart. A regulation ping-pong ball is 40 mm in diameter, making them just a wee bit too big to fit nicely. We’ve seen projects avoid this problem with modular frames that optimize spacing and layout. But [Brian]’s solution was simply to use force.

Observing that ping-pong balls don’t put up much of a fight and the size mismatch was relatively small, he just shoved those (slightly squashy) 40 mm globes into 33 mm spacing. It actually looks… perfectly fine!

We suspect that this method doesn’t scale indefinitely. Probably large displays like this 1200 pixel wall are not the right place to force a square peg into a round hole, but it sure seemed to hit the spot for his poster-sized display. Watch it in action in the video below, or see additional details on the project’s GitHub repository.

Continue reading “RGB LED Display Simply Solves The Ping-Pong Ball Problem”

Very Tiny Cube Has 384 RGB LEDs

When it comes to making things that glow, there are two ways to stand out from the crowd. You can make something very big, or something very small. [DIY GUY Chris] has done the latter, producing a tiny LED cube that he says is the world’s smallest.

As is so often the way, the build relies on tiny WS2812B-compatible LEDs in a 1 mm x 1 mm form factor. They’re mounted on a series of teeny interlocking PCBs that come together to build a cube that’s just 8 cubic centimeters in volume. Power is courtesy of a small lithium-ion cell that lives inside the cube. Data and power signals flow around the cube via solder connections along the edges of the faces of the cube.  Running the show is an ATmega328P, the same microcontroller you’d find in an Arduino Uno. It’s responsible for sending out commands to the LEDs to create various animations.

We can’t speak to [Chris’s] claim about being the world’s smallest, but it is small. We’ve seen other builds in a similar vein, like this barely-larger D20 with a full 2400 LEDs, though. Video after the break.

Continue reading “Very Tiny Cube Has 384 RGB LEDs”

Upgraded Raster Laser Projector Goes RGB

We’ve covered a scanning laser project by Ben Make’s Everything last year, and now he’s back with a significant update. [Ben]’s latest project now offers a higher resolution and RGB lasers. A couple of previous versions of the device used the same concept of a rotating segmented mirror synchronised to a pulsed laser diode to create scanlines. When projected onto a suitable surface, the distorted, pixelated characters looked quite funky, but there was clearly room for improvement.

More scanlines and a faster horizontal pixel rate

The previous device used slightly inclined mirrors to deflect the beam into scanlines, with one mirror per scanline limiting the vertical resolution. To improve resolution, the mirrors were replaced with identically aligned mirrors of the type used in laser printers for horizontal scanning. An off-the-shelf laser galvo was used for vertical scanning, allowing faster scanning due to its small deflection angle. This setup is quicker than then usual vector galvo application, as the smaller movements require less time to complete. Once the resolution improvement was in hand, the controller upgrade to a Teensy 4 gave more processing bandwidth than the previous Arduino and a consequent massive improvement in image clarity.

Finally, monochrome displays don’t look anywhere near as good as an RGB setup. [Ben] utilised a dedicated RGB laser setup since he had trouble sourcing the appropriate dichroic mirrors to match available lasers. This used four lasers (with two red ones) and the correct dichroic mirrors to combine each laser source into a single beam path, which was then sent to the galvo. [Ben] tried to find a DAC solution fast enough to drive the lasers for a proper colour-mixing input but ended up shelving that idea for now and sticking with direct on-off control. This resulted in a palette of just seven colours, but that’s still a lot better than monochrome.

The project’s execution is excellent, and care was taken to make it operate outdoors with a battery. Even with appropriate safety measures, you don’t really want to play with high-intensity lasers around the house!

Here’s the previous version we covered, a neat DIY laser galvo using steppers, and a much older but very cool RGB vector projector.

Continue reading “Upgraded Raster Laser Projector Goes RGB”