Old TV To RGB

As CRT televisions have faded from use, it’s become important for retro gaming enthusiasts to get their hands on one for that authentic experience. Alongside that phenomenon has been a resurgence of some of the hacks we used to do to CRT TV sets back in the day, as [Adrian’s Digital Basement] shows us when he adds an RGB interface to a mid-1990s Sony Trinitron.

Those of us lucky enough to have lived in Europe at the time were used to TVs with SCART sockets by the mid-1990s so no longer needed to plumb in RGB signals, but it appears that Americans were still firmly in the composite age. The TV might have only had a composite input, but this hack depends on many the video processor chips of the era having RGB input pins. If your set has a mains-isolated power supply then these pins can be hooked up with relative ease.

In the case of this little Sony, the RGB lines were used by the integrated on-screen display. He takes us through the process of pulling out these lines and interfacing to them, and comes up with a 9-pin D connector with the same pinout as a Commodore monitor, wired to the chip through a simple RC network and a sync level divider. There’s also a switch that selects RGB or TV mode, driving the OSD blanking pin on the video processor.

We like this hack just as much as we did when we were applying it to late-80s British TV sets, and it’s a great way to make an old TV a lot more useful. You can see it in the video below the break, so get out there and find a late-model CRT TV to try it on while stocks last!

Unsurprisingly, this mod has turned up here a few times in the past.

Continue reading “Old TV To RGB”

Portable ESP32 RGB Lasershow Has All The Trimmings

Perhaps there was a time when fancy laser effects were beyond those without the largest of bank accounts, but today they can be created surprisingly easily. [Corebb] shows us how with a neat unit using an off the shelf RGB laser module and mirror module, driven by a ESP32 with software designed to make it as easy as possible to use.

The video below the break is in Chinese so you’ll have to turn on the subtitles if you’re an Anglophone, and it takes us through the whole process. It’s mounted in an SLA 3D printed enclosure which neatly holds all the parts. The ESP32 module drives a couple of DACs which in turn drive the galvanometer motors through a pair of amplifiers.

Then the software allows all sorts of custom displays for your creative expression, including uploading quick sketches over WiFi. Beyond pretty patterns we see it mounted on a bicycle for a head-up display of speed and navigation info. Even if it does fall off and break at one point we can see that could be an extremely useful accessory.

All the code can be found in a GitHub repository should you wish to try for yourself. Meanwhile we’ve covered a lot of laser projector projects here in the past, including most recently this one using stepper motors in place of galvanometers.

Continue reading “Portable ESP32 RGB Lasershow Has All The Trimmings”

Lighting Up Glue Stick Bicycle Tyres With RGB

Being visible to motorists is a constant concern for cyclists, but we doubt [The Q] will have this problem with his RGB LED illuminated tires made from glue sticks.

The project started with a set of 3D-printed tire molds that bolt to the standard wheels. A bot of melted glue sticks is poured into the mold, allowed to cool, and the mold sections are removed with the help of a heat gun after cooling. We doubt the weight and hardness make the tires particularly practical, but you can’t make normal tires glow from the inside. 

The idea to illuminate the tires probably came after molding, because they had to be cut off to fit the LEDs. [The Q] built a simple hot wire jig with a piece of nichrome wire between two screws and used it to cut a few millimeters from the inside of the tire and fit a sleeved RGB LED strip in the wheel. Power come from a set of three 18650 batteries housed with a wireless controller in a 3D printed hub-mounted enclosure.

Like [The Q]’s hubless and partial wheel bicycles, it’s a definite head-turner, with function following form. 

Continue reading “Lighting Up Glue Stick Bicycle Tyres With RGB”

Share Screen To RGB Panel With Pi Pico W

RGB LEDs are great for adding a bit of color to your life, and it’s even more satisfying to use a matrix of them as a graphic display. [bitluni] built an RGB LED display with Pi Pico to which you can share a pixelated version of your PC’s screen.

[bitluni] wanted to gain some experience with MicroPython on the Raspbery Pi Pico W, and had previously used WebSockets to transmit display data over WiFi. Unfortunately, the available MicroPython WebSockets implementation didn’t leave enough RAM for the rest of the code. Instead, he set up a simple HTTP server on the Pico that receives the pixel data as a POST request. This makes for a slow refresh rate but still looks great, especially with the 3D printed rear-projection frame.

To send display data from the computer, [bitluni] uses a simple locally hosted HTML page that takes the Pico’s IP address, and prompts you to select the display or window you want to share. It uses JavaScript to grab the display data, generate the required low-res pixel values, and send the POST request.

This looks like a fun weekend project to add to your lab or home and only costs about $20 in parts. It’s basically a scaled-down version of his giant ping pong ball wall display.

Continue reading “Share Screen To RGB Panel With Pi Pico W”

RGB 7-Segment Display Module Glows In All The Colours

While 7-segment displays are all well and good, they’re considered a bit old hat these days. This project from [Matt Deeds] brings them screaming into the future, though, sporting every color under the rainbow.

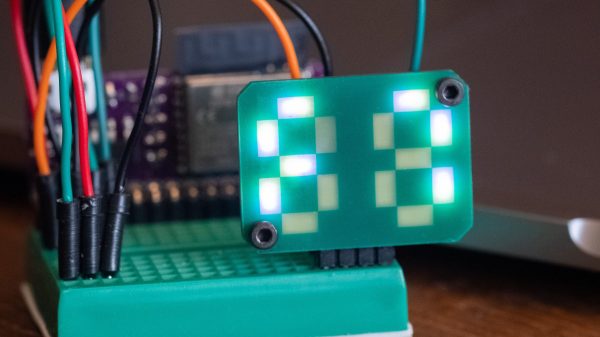
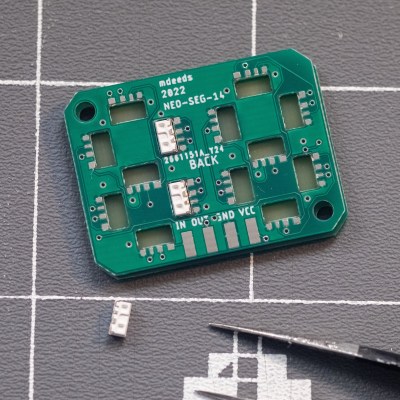
[Matt’s] build consists of a PCB filled with SK6812 side-mount LEDs, laid out in a typical 7-segment pattern. Each PCB features two 7-segment digits. The SK6812 LEDs can be driven in the same way as the famous WS2812B addressable LEDs, though they have the benefit of being more stable in color and brightness over a range of supply voltages.

With the LEDs installed, and a second PCB used solely as a diffuser by leaving out sections of solder mask, it’s a compact 7-segment solution at just 2.7 mm thick. The bonus is that each segment can be set to a different color thanks to the nature of the addressable RGB LEDs. Going too ham in this regard will make the displays difficult to read, but it can be used to easily display green, red, or yellow numbers, for example, to create a visual guide to a numerical range.

It’s a great build, and we love to see 7-segment displays re-imagined in different ways – even mechanically! It also takes fewer pins to drive compared to the old way of doing things in the non-addressable LED era. If you’ve got your own neat 7-segment projects under development, please do let us know!

Easy Network Config For IoT Devices With RGBeacon

When you’re hooking up hardware to a network, it can sometimes be a pain to figure out what IP address the device has ended up with. [Bas Pijls] often saw this problem occurring in the classroom, and set about creating a simple method for small devices to communicate their IP address and other data with a minimum of fuss.

[Bas] specifically wanted a way to do this without adding a display to the hardware, as this would add a lot of complexity and expense to simple IoT devices. Instead, RGBeacon was created, wherin a microcontroller flashes out network information with the aid of a single RGB WS2812B LED.

In fact, all three colors of the RGB LED are used to send information to a computer via a webcam. The red channel flashes out a clock signal, the green channel represents the beginning of a byte, and the blue channel flashes to indicate bits that are high. With a little signal processing, a computer running a Javascript app in a web browser can receive information from a microcontroller flashing its LEDs via a webcam.

It’s a neat hack that should make setting up devices in [Bas]’s classes much easier. It needn’t be limited to network info, either; the code could be repurposed to let a microcontroller flash out other messages, too. It’s not dissimilar from the old Timex Datalink watches which used monitor flashes to communicate!

Big RGB LED Cube You Can Build Too

LED cubes are really nothing new, many of us consider the building of a good sized one almost an electronics rite of passage that not so many manage to find the time or have the skill to pull off. It’s our pleasure to draw your attention to a lovely build, showing all the processes involved, the problems and the solutions found along the way.

Building a small cube is somewhat of a trivial affair, especially without considering PWM colour mixing, however as simple maths will illustrate, as you increase the number of LEDs on each side, the total number will quickly get quite large. More LEDs need more power and increase control complexity considerably. A larger matrix like this 16 x 16 x 16 LED build, has a total of 4096. This would be a nightmare to drive with plain RGB LEDs, even with cunning multiplexing, but luckily you can buy indexable LEDs in a through-hole package similar to the ubiquitous WS2812-based SMT LEDs you see around. These are based on the PD9823 controller, which can be programmed as if they were a WS2812, at least according to this analysis. Now you can simply chain a column of LEDs, with the control signal passed from LED to nearest neighbour.

Early on in the video build log, you will note there are four power supply modules needed to feed this juice. If we assume each LED consumes 60 mA on full-white (the data for this product link shows a peak value of 100 mA) that is still a total of 246 A or around 1 kW of power. The video does shows a peak power measurement of around this figure, for the whole array on full white, so the maths seems about right.

Control is via a Teensy 4.0 using the FlexIO function of the IMXRT1060RM CPU, and a bunch of 74AHCT595 shift registers giving 32 channels of up to 1000 LEDs per channel if needed. Roughly speaking, using the DMA with FlexIO, the Teensy can drive up to 1 Million LED updates per second, which works out about 32 channels of 100 LEDs per channel updated at 330 frames/sec, so plenty of resource is available. All this is with almost no CPU intervention, freeing that up for handling the 2.4-inch LCD based UI and running the animations, which looks pretty darn slick if you ask us. You can checkout the description of the firmware in the firmware section of the GitHub project. 3D printed jigs allowed for bending and clipping the LEDs leads as well as fixing and aligning the LED column units, so there really is enough detail there to allow anyone so inclined reproduce this, so long as you can swallow the cost of all those LEDs.

For a different approach to LED cubes, checkout this sweet panel based approach, and here’s a really small 4x4x4 module for those with less space to spare.

Continue reading “Big RGB LED Cube You Can Build Too”