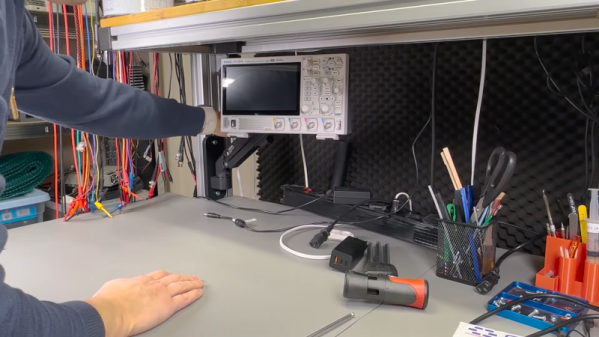
Streamlining The Toolchain

Sometimes I try to do something magical, and it works. Most of the time this happens because other people have done a good part of the work for me, and shared it. I just cobble a bunch of existing tools into a flow that fits my needs. But the sum of all the parts is often less than the whole, when too many of the steps involve human intervention. Tools made for people simply keep the people in the loop.

For instance, I wanted to take a drawing that my son made into a stamp, by way of a CNC machine and whatever scrap wood we have kicking around in the basement. It’s easy enough, really. Take the photo, maybe use a little tweaking in GIMP to get the levels right, export it into Inkscape for the line detection and maybe even make the GCode right there, or take it off to any convenient SVG-to-GCode tool.

While this works straight out of the box for me, it turns out that’s because I have experience with all of the sub-tools. First, it helps a lot if you get the exposure right in the first place, and that’s not trivial when your camera’s light meter is aiming for grey, but the drawing is on white paper. Knowing this, you could set it up to always overexpose, I guess.

Still, there’s some experience needed in post-processing. If you haven’t played around with both image processing and image editing software, you don’t know how they’re going to interact. And finally, there are more parameters to tweak to get the CNC milling done than a beginner should have to decide.

In short, I had a toolchain up and running in a jiffy, and that’s a success. But in terms of passing it on to my son, it was a failure because he would have to learn way too many sub-tools to make it work for him. Bummer. I’m left wondering if I can streamline all of the parts to work together well enough, or whether I’m simply needed in the loop.

Plotter Churns Out Labels With Roll Of Tape

Like it or not, organizing your workspace from time to time is a necessary chore. Labels can go a long way towards taming the most unruly of benches, but writing them out by hand isn’t exactly ideal. Looking for something a bit neater, [sandy] built a simple pen plotter to write labels on a roll of tape.

Pen plotter writing on roll of masking tape

The plotter uses the usual 3D printer components like steppers, drivers, belts, and rails. The tape holder is printed with flexible arms for a tight grip, and a servo is used to raise and lower the pen while writing.

The custom control board includes an Arduino Nano clone and a pair of stepper drivers, and an optional Bluetooth module and can be configured for a variety of machine control applications. A pair of Android apps are used to generate and send the G-code from a phone to the GRBL firmware loaded on the Arduino.

This seems to fall in the category of “entry-level” custom automation tools which help to save some time and effort on repetitive tasks without blowing the budget. We would include the various component tape cutters we’ve seen in this category, as well as smart build platform for manual PCB assembly

The controller being held in its creator's hand after the modification's been done. The controller is painted in blue-white-black camo-like style. Analog sticks are sticking out where the buttons used to be

Oops! All Analog Sticks

Knowing his friend is a first-person shooter enthusiast, [Solderking] came up with a unique modified XBox controller as a gift. Tongue in cheek, you could argue that this controller is fully analog, as all of the buttons have been removed and replaced with analog sticks — each stick emulating four different buttons with its four different directions.

For this mod, he picked a controller known to have button connections available on testpoints. The controller’s buttons are digital inputs, but a bit of additional resistance wasn’t a problem for the IC in charge. Having tested that to be extra sure, he started the rebuilding work. As any self-respecting one-off mod, the bulk of this project involved JB Weld, point-to-point soldering of wires and taking a Dremel to the shell. That said, this project pays attention to detail, with portions of potentiometer track material carefully scraped off so that contact couldn’t be made in center position, and 3D printed spacers keeping the looks within the “gift-worthy” boundary.

After finishing the controller, [Solderking] tested it to confirm that it was absolutely atrocious to use, and breathed a sigh of relief, with yet another mod well done. We’ve already covered a few of his other fun efforts, like this Pokemon Ruby Nintendo cartridge restoration project where some delicate soldering was called for, or this broken mouse turned 12-key macropad.

Continue reading “Oops! All Analog Sticks”

3D Printing A Prosthetic-Compatible Golf Club

Relearning an old sport, or starting a new one, can be challenging for amputees. Besides the obvious physical aspects, custom prosthetics or adaptors might need to be made and fitted, which can be very expensive. With the power of 3D printing and some machining, [Ian Davis] was able to build a custom prosthetic golf club to get a quadruple amputee back on the greens.

The recipient of this prosthetic lost both hands above the wrists, so [Ian] had to come up with a mechanism that could hold the club and mimic wrist motion throughout the swing. He was able to achieve this motion with a simple four-plate hinge for each arm. For optimal ergonomics, [Ian] also added two-axis adjustability, with only a single bolt needing to be loosened per axis. A standard golf club can be used and is clamped in the printed holders.

Machined prosthetic sockets were used to allow quick connection to the user’s existing prosthetic forearms. Theoretically, this should also allow him to switch clubs without excessive hassle. [Ian], an amputee himself, has used his engineering skills to build a series of prosthetic hands and even a custom controller mod to get back to gaming with fewer flesh fingers.

Continue reading “3D Printing A Prosthetic-Compatible Golf Club”

Fixing A Hot Shop, With Science

We know that pretty much everybody in the Northern hemisphere has had a hellish summer, and there’s little room for sympathy when someone busts out with, “Oh yeah? You think THAT’s hot? Well, lemme tell you…” But you’ve got to pity someone who lives in north Texas and has a steel Quonset hut for a shop. That’s got to be just stupidly hot.

But stupid hot can be solved — or at least mitigated — with a little smarts, which is what [Wesley Treat] brought to bear with this cleverly designed shop door heat shield. When it pushes past 42°C — sorry, that sounds nowhere near as apocalyptic as 108°F — the south-facing roll-up door of his shop becomes a giant frying pan, radiating heat into his shop that the air conditioner has trouble handling. His idea was to block that radiant heat with a folding barrier, but to make sure it would be worth the effort, he mocked up a few potential designs and took measurements of the performance of each. His experiments showed him that a layer of extruded polystyrene (XPS) foam insulation covered with reflective Mylar did better than just the foam or Mylar alone.

The finished heat shield is an enormous tri-fold plywood beast that snugs up against the door when things get toasty in the shop. There’s a huge difference in temperature between the metal door and the inside surface of the shield, which will hopefully keep the shop more comfortable. We imagine that the air between the door and the shield will still heat up, and convection could still distribute all that hot air into the shop. But at least he’s giving the AC a fighting chance.

In addition to great shop tips like this and his custom storage bins, [Wesley] is a talented signmaker. He’s pretty funny too — or maybe that’s just the heat talking.

Continue reading “Fixing A Hot Shop, With Science”

Cutting The Grass With Frickin’ Lasers

We techie types are quite often much more comfortable in front of a keyboard knocking out code, than out in the yard splitting logs for winter, and even the little jobs like cutting the grass are sometimes just too much like hard manual labour for our liking. The obvious solution is a robot mower, but they’re kinda boring, with their low-tech spinning metal blades. What we need is a big frickin’ laser. YouTuber [rctestflight] has been experimenting with using a 40W blue diode laser module to cut the weeds, (Video, embedded below) and it sort of works, albeit in a rather dangerous fashion.

A nice flat ‘cut’

The first test used a fixed assembly, mounting the laser to a camera lens, upon a rotating gear driven by a small stepper motor. An Arduino controls the beam scanning, very slowly, burning the grass in its sights. But with a range limited to around eight feet best case, sitting in one spot just isn’t going to cut it. (sorry) The obvious next step was to mount one of the tested laser modules onto a moveable platform. After tweaking one of his earlier projects — a tracked rover — with a new gearbox design, it could now drive slow enough to be useful for this slow task. The laser was mounted to a simple linear rail slider, with an attempt at a vacuum pickup system to suck up the clippings, removing them from the beam path, and stopping them impeding the cutting efficiency of the laser.

Obviously this vacuum idea didn’t work, and since the contraption takes the best part of a week to cut just one small area, we reckon it would likely be growing faster than that! Still, it must have been fun to build it anyway. It just goes to show that despite the march of technological progress, maybe the boring old spinning blades of old are still the best way to get the job done.

Lawnmowing is clearly one of those jobs we love to hate, and do so with hacks. Here’s a way to prevent your mower sucking up foreign bodies and hurling them at you at ballistic speeds, and for those who really want to be hands off, add RTK-GPS to a robot mower, and just leave it to do the dirty work.

Continue reading “Cutting The Grass With Frickin’ Lasers”

Magnetic Gearbox Can Go Fast But Not Hard

3D printed gearboxes are great for experimental designs, but due to roughness and inaccuracies in the printed surfaces, they can wear quickly and be rather noisy. As a possible alternative, [Resetman] is experimenting with magnetic 3D printed gearboxes that work without physical contact between the rotating wheels, and can also be “geared” for different ratios in some interesting ways.

Naturally, two closely spaced wheels with magnets will interact with each other, with the ratio defined by the number of magnets on each wheel. A much less obvious implementation is a second-order radial flux coaxial magnetic gearbox. It works similar to a normal planetary gearbox, with an outer and inner wheel containing magnets, and an intermediate ring known as a flux modulator, containing equally spaced pieces of ferromagnetic steel metal. In [Resetman] demonstration, the flux modulator is just a 3D printed ring screws around its circumference.

The most obvious disadvantage is of course severely limited torque transfer. [Resetman] could easily accelerate the sun wheel to 12,000 RPM if the flux modulator is accelerated slowly, but any sudden changes in speed would cause it to lose synchronization. Of course, you can consider this a torque-limiting feature for certain use cases. With a bit of testing, he determined the torque limit at a 1:4 ratio was a meager 0.05 Nm. This could be increased by some optimization, for example rearranging the magnets to form Halbach arrays, and reducing the air gaps between the components.

Magnetic gearboxes are nothing new, we’ve featured another demonstrator before, and even did an “Ask Hackaday” on the subject. What would you use these for? Let us know below.

Continue reading “Magnetic Gearbox Can Go Fast But Not Hard”