Digitizing Sound On An Unmodified Sinclair ZX81

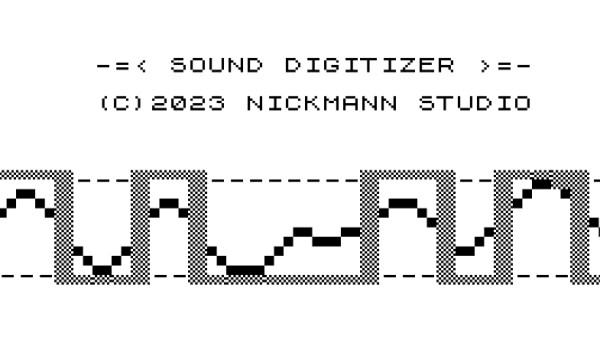
Whatever the first computer you used to manipulate digital audio was, the chances are it came with dedicated sound hardware that could play, and probably record, digitized audio. Perhaps it might have been a Commodore Amiga, or maybe a PC with a Sound Blaster. If you happen to be [NICKMANN] though, you can lay claim to the honor of doing so on a machine with no such hardware, because he managed it on an unmodified Sinclair ZX81.

For those of you unfamiliar with the ZX, it embodied Clive Sinclair’s usual blend of inflated promises on minimal hardware and came with the very minimum required to generate a black-and-white TV picture from a Zilog Z80 microprocessor. All it had in the way of built-in expansion was a cassette interface, 1-bit read and write ports exposed as 3.5 mm jacks on its side. It’s these that in an impressive feat of hackery he managed to use as a 1-bit sampler with some Z80 assembler code, capturing a few seconds of exceptionally low quality audio in an ’81 with the plug-in 16k RAM upgrade.

From 2023 of course, it’s about as awful as audio sampling gets, but in 1980s terms it’s pulling off an almost impossible feat that when we tried it with a 1-bit PC speaker a few years later, we didn’t succeed at. We’re impressed.

The ’81 may be one of the simplest of the 8-bit crop, but in its day it set many a future software developer on their career path. It’s still a machine that appears here today, from time to time.

Picture of the miniJen structure on a presentation desk

A Jenkins Demo Stand For Modern Times

Once you’re working on large-scale software projects, automation is a lifesaver, and Jenkins is a strong player in open-source automation – be it software builds, automated testing or deploying onto your servers. Naturally, it’s historically been developed with x86 infrastructure in mind, and let’s be fair, x86 is getting old. [poddingue], a hacker and a Jenkins contributor, demonstrates that Jenkins keeps up with the times, with a hardware demo stand called miniJen, that has Jenkins run on three non-x86 architectures – arm8v (aarch64), armv7l and RISC-V.

There’s four SBCs of different architectures involved in this, three acting as Jenkins agents executing tasks, and one acting as a controller, all powered with a big desktop PSU from Pine64. The controller’s got a bit beefier CPU for a reason – at FOSDEM, we’ve seen it drive a separate display with a Jenkins dashboard. It’s very much a complete demo for its purpose, and definitely an eyecatcher for FOSDEM attendees passing by the desk! As a bonus, there’s also a fascinating blog post about how [poddingue] got to running Jenkins on RISC-V in particular.

Even software demonstrations get better with hardware, and this stood out no doubt! Looking to build a similar demo, or wondering how it came together? [poddingue] has blog posts on the demo’s structure, a repo with OpenSCAD files, and a trove of videos demonstrating the planning, design and setup process. As it goes with continuous integrations, we’ve generally seen hackers and Jenkins collide when it comes to build failure alerts, from rotating warning lights to stack lights to a Christmas tree; however, we’ve also seen a hacker use it to keep their firmware size under control between code changes. And, if you’re wondering what continuous integration holds for you, here’s our hacker-oriented deep dive.

Glowscope Reduces Microscope Cost By Orders Of Magnitude

As smartphones become more ubiquitous in society, they are being used in plenty of ways not imaginable even ten or fifteen years ago. Using its sensors to gather LIDAR information, its GPS to get directions, its microphone to instantly translate languages, or even use its WiFi and cellular radios to establish a wireless hotspot are all things which would have taken specialized hardware not more than two decades ago. The latest disruption may be in microscopy, as this build demonstrates a microscope that would otherwise be hundreds of thousands of dollars.

The microscope is a specialized device known as a fluorescence microscope, which uses a light source to excite fluorescent molecules in a sample which can illuminate structures that would otherwise be invisible under a regular microscope. For this build, the light is provided by readily-available LED lighting as well as optical filters typically used in stage lighting, as well as a garden-variety smartphone. With these techniques a microscope can be produced for around $50 USD that has 10 µm resolution.

While these fluorescence microscopes do have some limitations compared to units in the hundred-thousand-dollar range, perhaps unsurprisingly, they are fairly impressive for such a low-cost alternative. More details about these builds can also be found in their research paper published in Nature. Even without the need for fluorescence microscopy, a smartphone has been shown to be a fairly decent optical microscope, provided you have the right hardware to supplement the phone’s camera.

A picture of the bottom of the Pi 4 PCB, showing the three points you need to use to tap into the Pi 4 I2C bus going to the PMIC

Dead Raspberry Pi Boards, PMICs, And New Hope

Since the Raspberry Pi 3B+ release, the Pi boards we all know and love gained one more weakpoint – the PMIC chip, responsible for generating all the power rails a Pi needs. Specifically, the new PMIC was way more vulnerable to shorting 5V and 3.3V power rails together – something that’s trivial to do on a Raspberry Pi, and would leave you with a bricked board. Just replacing the PMIC chip, the MxL7704, wouldn’t help since the Raspberry Pi version of this chip is customized – but now, on Raspberry Pi forums, [Nefarious19] has reportedly managed to replace it and revive their Pi.

First off, you get a replacement PMIC and reflow it – and that’s where, to our knowledge, people have stopped so far. The next step proposed by [Nefarious19] is writing proper values into the I2C registers of the PMIC. For that, you’d want a currently-alive Pi – useful as both I2C controller for writing the values in, and as a source of known-good values. That said, if you go with the values that have been posted online, just having something like a Pi Pico for the I2C part ought to be enough.

[Nefarious19] reports a revived Pi, and this is way more hopeful than the “PMIC failures are unfixable” conclusion we’ve reached before. The instructions are not quite clear – someone else in the thread reports an unsuccessful attempt doing the same, and it might be that there’s a crucial step missing in making the values persist. However, such an advancement is notable, and we trust our readers to take the lead.

A week ago, [Mangy_Dog] on Hackaday Discord brought up fixing Raspberry Pi boards – given that the Raspberry Pi shortages are still an issue, digging up your broken Pi and repairing it starts making sense budget-wise. It’s no longer the ages where you could buy broken Pi boards by the hundred, and we imagine our readers have been getting creative. What are your experiences with fixing Raspberry Pi boards?

The Keychain 6809

When you think of tiny microcontroller boards, you probably think of a modern surface mount processor. Not [Andreas Jakob]. His 5×5 cm keychain computer rocks a 6809 CPU at a blistering 1 MHz or, if you prefer, a 6309 that runs at 5 MHz. The RAM — all 32K — is in a SMD package to make it fit, but the board also sports a 27C256 EPROM which means that chip and the CPU take up most of the PCB.

As you might expect, there’s not much else on the board. It doesn’t hurt, too, that the PCB is a 6-layer board. The board features a USB C port for power and data, but we didn’t see the USB interface chip on the schematic until we opened it in Easy EDA using the button that says “open in editor.” The schematic says it is sheet 1 or 1, but there are actually two additional “tabs” you can only see in the editor with the apparently missing pieces.

Continue reading “The Keychain 6809”

Enjoy An Open-Source Espresso

One of the core principles of the open-source movement is that anyone who wants to build on a piece of work, in whatever way they want, is easily able to. With source code freely available, the original project can be expanded upon, modified, updated, or simply looked at and used as inspiration. Usually we think about this in the realm of software freedom, but hardware is an important component as well. And not just electronics hardware, either. [Norm] demonstrates this espresso machine which was built on these open-source foundations.

The project takes some inspiration from the open-source Gaggiuino project, which was another build that modified an entry-level espresso maker with finer control over temperature and pressure. [Norm] was not willing to sacrifice his espresso machine for this cause, though, which is how this machine with its cobbled-together hardware came to be. An older machine with some worn parts was sacrificed to the coffee gods instead, making use of its pumps, boiler, and a few other bits of hardware especially from the hydraulics system. The software control is built around the Gaggiuino project, and includes a custom control board for user interface.

Right now the coffee maker does indeed work, but [Norm] hopes to make some improvements to the device including adding an enclosure of some sort, both to prevent accidental contact with the boiler and to give it a sleek, professional look. We kind of like it the way it is, while acknowledging that it isn’t quite ready for commercial production like this. It has a similar industrial feel as this espresso machine we featured a few years ago that is made out of old engine components.

Plan To Jam Mobile Phones In Schools Is Madness

Mobile phones in schools. If you’re a teacher, school staffer, or a parent, you’ve likely got six hundred opinions about this very topic, and you will have had six hundred arguments about it this week. In Australia, push has come to shove, and several states have banned the use of mobile phones during school hours entirely. Others are contemplating doing the same.

In the state of New South Wales, the current opposition party has made it clear it will implement a ban if elected. Wildly, the party wants to use mobile phone jamming technology to enforce this ban whether students intend to comply or not. Let’s take a look at how jammers work in theory, and explore why using them in schools would be madness in practice.

Continue reading “Plan To Jam Mobile Phones In Schools Is Madness”