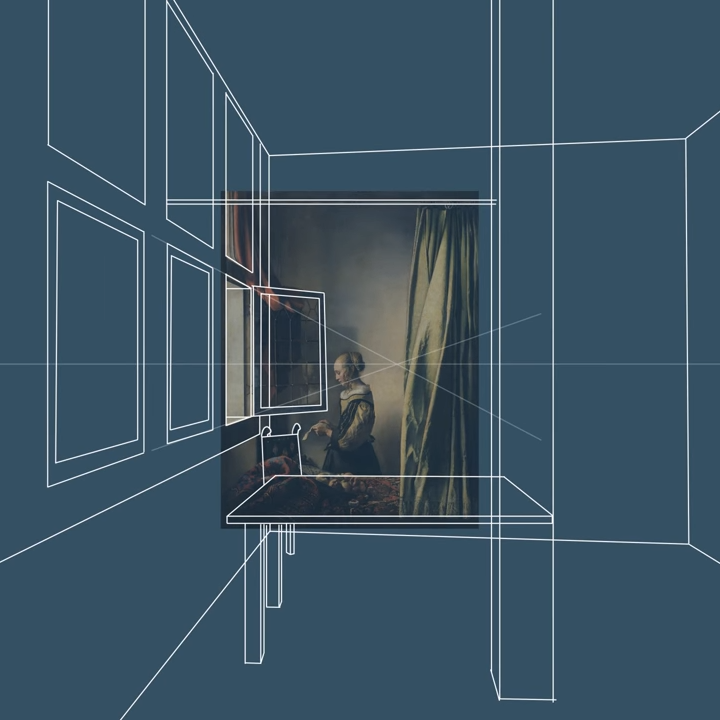
Cute NFL Standings Tracker Uses Little Mini Helmets

If you’re a die-hard sports fan, there’s nothing you love more than staying abreast of developments in the league, from top to bottom. [Kiu] had a family member that was big into NFL, so set about building them a remarkably cool ladder tracker.

The tracker displays the NFL league table with a ten-minute delay, thanks to a paid live data feed from MySportsFeeds.com. When an update comes in, miniature helmets representing each team in the competition are moved into the correct order. The helmets sit on little plastic tags that make moving them easy, reliable, and repeatable. Built using parts familiar to the 3D printer world, this tracker relies on steppers and V-rails for linear movement, under the command of an Arduino Nano.

It’s a build that would look great in any games room, and we bet a scaled-up version would look the business in an upmarket sports bar. Let’s be honest – the league’s top quarterbacks will all be fighting to have one of these sooner rather than later. That’s not to say it won’t sting to come home to your team’s helmet scooting down the board after a painful loss!

We’ve seen some other interesting sports tracking projects over the years, too. Video after the break!
Continue reading “Cute NFL Standings Tracker Uses Little Mini Helmets”

Bufferbloat, The Internet, And How To Fix It

There’s a dreaded disease that’s plagued Internet Service Providers for years. OK, there’s probably several diseases, but today we’re talking about bufferbloat. What it is, how to test for it, and finally what you can do about it. Oh, and a huge shout-out to all the folks working on this problem. Many programmers and engineers, like Vint Cerf, Dave Taht, Jim Gettys, and many more have cracked this nut for our collective benefit.

When your computer sends a TCP/IP packet to another host on the Internet, that packet routes through your computer, through the network card, through a switch, through your router, through an ISP modem, through a couple ISP routers, and then finally through some very large routers on its way to the datacenter. Or maybe through that convoluted chain of devices in reverse, to arrive at another desktop. It’s amazing that the whole thing works at all, really. Each of those hops represents another place for things to go wrong. And if something really goes wrong, you know it right away. Pages suddenly won’t load. Your VoIP calls get cut off, or have drop-outs. It’s pretty easy to spot a broken connection, even if finding and fixing it isn’t so trivial.

That’s an obvious problem. What if you have a non-obvious problem? Sites load, but just a little slower than it seems like they used to. You know how to use a command line, so you try a ping test. Huh, 15.0 ms off to Google.com. Let it run for a hundred packets, and essentially no packet loss. But something’s just not right. When someone else is streaming a movie, or a machine is pushing a backup up to a remote server, it all falls apart. That’s bufferbloat, and it’s actually really easy to do a simple test to detect it. Run a speed test, and run a ping test while your connection is being saturated. If your latency under load goes through the roof, you likely have bufferbloat. There are even a few of the big speed test sites that now offer bufferbloat tests. But first, some history. Continue reading “Bufferbloat, The Internet, And How To Fix It”

ESP8266 Smart Vents Keep Tabs On Home Temps

Have you ever found that, despite having a central heating and air conditioning system, that not all the rooms in your home end up being the temperature you want them to be? Maybe the dining room gets too hot when the heater is running, or the bedroom never seems to cool off enough in the summer months. If that sounds like your house, then these motorized “smart vents” from [Tony Brobston] might be exactly what you need.

The idea here is pretty simple: an ESP8266 and a servo is built into the 3D printed vent register, which allows it to control the position of its louvers. When connected to your home automation system via MQTT, the vents allow you to control the airflow to each room individually based on whatever parameters you wish. Most likely, you’ll want to pair these vents with an array of thermometers distributed throughout the house.

While [Tony] says the design still needs some testing, he’s released smart vents in a range of sizes from 2×10 to 6×12 inches. He’s also provided excellent documentation on how to print, assemble, and program the devices. It’s clear that a lot of care and thought went into every element of this project, and we’re excited to see how it can be developed further by the new ideas and contributors that will inevitably pop up now that it’s gone public.

Want to add some automation to your HVAC, but don’t have a fancy central unit? Don’t worry, as long as your heater or air conditioner has an infrared remote, you should be able to wedge a WiFi-enabled microcontroller in into the equation.

Continue reading “ESP8266 Smart Vents Keep Tabs On Home Temps”

A Particularly Polished ATX Bench Power Supply

Let’s be real, yanking the ATX power supply out of an old desktop computer and turning it into something you can use on the workbench isn’t exactly an advanced project. In fact, you could probably argue it’s one of the first DIY builds a budding electronic hobbyist should tackle — after all, you’re going to need a reliable bench supply if you want to do any serious work anyway.

But of course, there’s a big difference between doing the minimum and really giving something your all, and we think this ATX bench supply from [Steve Thone] of The Neverending Projects List is a phenomenal example of the latter. It not only looks impressive, but it’s been tricked out with plenty of bells and whistles to make it as capable as possible. What was once a basic 230 watt PSU pulled from an old Dell is now a piece of gear that any hacker or maker would love to have in their collection. Continue reading “A Particularly Polished ATX Bench Power Supply”

Circuit-less PCB Featured As Faceplate For A Digital Clock

If there’s no circuitry on a printed circuit board, does it cease being a “PCB” and perhaps instead become just a “PB”?

Call them what you will, the fact that PCBs have become so cheap and easy to design and fabricate lends them to more creative uses than just acting as the wiring for a project. In this case, [Jeremy Cook] put one to work as the faceplate for his “742 Clock,” a name that plays on the fact that his seven-segment display is 42 mm tall, plus it’s “24/7” backward.

In addition to the actual circuit board that holds the Wemos ESP32 module and the LEDs, a circuit-less board was designed with gaps in the solder mask to act as light pipes. Sandwiched between the boards is a 3D printed mask, to control the light and direct it only through the light pipes. [Jeremy] went through a couple of iterations of diffuser and mask designs, finally coming up with a combination that works well and looks good. He mentions a possible redesign of the faceplate board to include a copper backplane for better opacity, which we think is a good idea. We’d also like to see how different substrates work; would boards of different thickness or using FR-4 with different glass transition temperatures work better? Check out the video below and see what you think.

We’re seeing more and more PCBs turn up as structural elements, from enclosures to control panels and even tools, and we approve of this trend. But what we really approve of is what [Jeremy] did here by making this clock just a dumb display that gets network time over NTP. Would that all three digital clocks in our kitchen did the same thing — maybe then they wouldn’t each be an infuriating minute out of sync with the others.

Continue reading “Circuit-less PCB Featured As Faceplate For A Digital Clock”

An EMMC Gives Up Its Secrets

An increasing phenomenon over the years since mobile phones morphed from simply telephones into general purpose pocket computers has been that of the dead device taking with it some treasured digital resource. In most cases this means the device has died, but doesn’t necessarily mean that that the data has completely gone. Inside the device will be an eMMC flash chip, and if that can be read then the data is safe. This applies to some single board computers too, and thus [Jeffmakes]’ adventures in recovering an eMMC from a dead Raspberry Pi CM4 are particularly interesting.

The whole thing relies on the eMMC presenting the same interface as an SD card, so while it comes in a multi-pin BGA package it can be addressed with surprisingly few wires. Using the PCB from another dead CM4 he traced the relevant connections from eMMC to SoC pads, and was thus able with some very fine soldering to construct an interface for an SD card reader. The disk could then be imaged in its entirety.

This work will be of huge use to experimenters who’ve fried their Compute Modules, but of course the information it contains will also be of use to retrieve those photos from the phone that fell in the bath. It’s not the first time we’ve taken a look at someone’s efforts in this area.

Art of 3D printer in the middle of printing a Hackaday Jolly Wrencher logo

PrusaSlicer Now Imports STEP Files, Here’s Why That’s A Big Deal

PrusaSlicer has a new feature: the ability to import a CAD model for 3D printing. Starting in version 2.5.0-beta1, PrusaSlicer can import STEP format 3D models. An imported STEP file is converted to a triangle mesh on import (making it much like a typical .stl or .3mf file) which means that slicing all happens as one would normally expect. This is pretty exciting news, because one is not normally able to drop a CAD format 3D model directly into a slicer. With this change, one can now drag .stp or .step files directly into PrusaSlicer for printing.

First, a brief recap. In the world of 3D models there are two basic kinds: meshes and CAD models. The two work very differently, especially when it comes to editing. 3D printing has a long history of using .stl files (which are meshes) but making engineering-type changes to such files is difficult. Altering the size of a thread or changing mounting holes in a CAD model is easy. On an STL, it is not. This leads to awkward workarounds when engineering-type changes are needed on STLs. STEP, on the other hand, is a format widely supported by CAD programs, and can now be understood by PrusaSlicer directly. Continue reading “PrusaSlicer Now Imports STEP Files, Here’s Why That’s A Big Deal”