Bye Bye Linux On The 486. Will We Miss You?

A footnote in the week’s technology news came from Linus Torvalds, as he floated the idea of abandoning support for the Intel 80486 architecture in a Linux kernel mailing list post. That an old and little-used architecture might be abandoned should come as no surprise, it’s a decade since the same fate was meted out to Linux’s first platform, the 80386. The 486 line may be long-dead on the desktop, but since they are not entirely gone from the embedded space and remain a favourite among the retrocomputer crowd it’s worth taking a minute to examine what consequences if any there might be from this move.

Is A 486 Even Still A Thing?
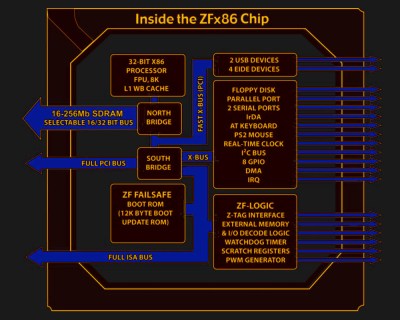
Block diagram of the ZFx86 SoC
An entire 486 PC in a chip that only uses 1W, that would have been amazing in 1994!

The Intel 80486 was released in 1989, and was substantially an improved version of their previous 80386 line of 32-bit microprocessors with an on-chip cache, more efficient pipelining, and a built-in mathematical co-processor. It had a 32-bit address space, though in practice the RAM and motherboard constraints of the 1990s meant that a typical 486 system would have RAM in megabyte quantities. There were a range of versions in clock speeds from 16 MHz to 100 MHz over its lifetime, and a low-end “SX” range with the co-processor disabled. It would have been the object of desire as a processor on which to run WIndows 3.1 and it remained a competent platform for Windows 95, but by the end of the ’90s its days on the desktop were over. Intel continued the line as an embedded processor range into the 2000s, finally pulling the plug in 2007. The 486 story was by no means over though, as a range of competitors had produced their own take on the 486 throughout its active lifetime. The non-Intel 486 chips have outlived the originals, and even today in 2022 there is more than one company making 486-compatible devices. RDC produce a range of RISC SoCs that run 486 code, and according to the ZF Micro Solutions website they still boast of an SoC that is a descendant of the Cyrix 486 range. There is some confusion online as to whether DM&P’s Vortex86 line are also 486 derivatives, however we understand them to be descendants of Rise Technology’s Pentium clone. Continue reading “Bye Bye Linux On The 486. Will We Miss You?”

3D Printed ROV Is The Result Of Many Lessons Learned

Building an underwater remotely operated vehicle (ROV) is always a challenge, and making it waterproof is often a major hurdle. [Filip Buława] and [Piotr Domanowski] have spent four years and 14 prototypes iterating to create the CPS 5, a 3D printed ROV that can potentially reach a depth of 85 m.

FDM 3D prints are notoriously difficult to waterproof, thanks to all the microscopic holes between the layers. There are ways to mitigate this, but they all have limits. Instead of trying to make the printed exterior of the CPS 5 waterproof, the electronics and camera are housed in a pair of sealed acrylic tubes. The end caps are still 3D printed, but are effectively just thin-walled containers filled with epoxy resin. Passages for wiring are also sealed with epoxy, but [Filip] and [Piotr] learned the hard way that insulated wire can also act as a tube for water to ingress. They solved the problem by adding an open solder joint for each wire in the epoxy-filled passages.

For propulsion, attitude, and depth control, the CPS 5 has five brushless drone motors with 3D printed propellers, which are inherently unaffected by water as long as you seal the connectors. The control electronics consist of a PixHawk flight controller and a Raspberry Pi 4 for handling communication and the video stream to a laptop. An IMU and water pressure sensor also enable auto-leveling and depth hold underwater. Like most ROVs, it uses a tether for communication, which in this case is an Ethernet cable with waterproof connectors.

Acrylic tubing is a popular electronics container for ROVs, as we’ve seen with an RC Subnautica sub, LEGO submarine, and the Hackaday Prize-winning Underwater Glider.

Continue reading “3D Printed ROV Is The Result Of Many Lessons Learned”

The project's wrist-worn heartrate sensor shown on someone's hand, Caption: Our device has three main components: watch electronics (arrow to watch display), organism enclosure (arrow to the 3D-printed case of the watch) and our living organism physarum polycephalum a.k.a slime mold.

What If Your Day-To-Day Devices Were Alive?

We take advantage of a variety of devices in our day-to-day life, and we might treat them as just pieces of hardware, elements fulfilling a certain purpose — forgotten about until it’s time to use them. [Jasmine Lu] and [Pedro Lopes] believe that these relationships could work differently, and their recent paper describes a wearable device that depends on you as much as you depend on it. Specifically, they built wrist-worn heart rate sensors and designed a living organism into these, in a way that it became vital to the sensor’s functioning.

The organism in question is Physarum polycephalum, a slime mold that needs water to stay alive and remain conductive — if you don’t add water on a regular basis, it eventually dries out and hibernates, and adding water then will revive it. The heart rate sensor’s power rail is controlled by the mold, meaning the sensor functions only as long as you keep the mold alive and healthy. In their study, participants were asked to wear this device for one-two weeks, and the results go way beyond what we would expect from, say, a Tamagotchi — with the later pages describing participant reactions and observations being especially impressive.

For one, the researchers found that the study participants developed a unique sense of connection towards the slime mold-powered device, feeling senses of responsibility and reciprocity, and a range of other feelings you wouldn’t associate with a wearable. Page 9 of the paper tells us how one participant got sick, but still continued caring for the organism out of worry for its well-being, another participant brought her “little pet mold friend” on a long drive; most participants called the slime a “friend” or a “pet”. A participant put it this way:

[…] it’s always good to be accompanied by some living creature, I really like different, animals or plants. […] carrying this little friend also made me feel happy and peaceful.

There’s way more in the paper, but we wouldn’t want to recite it in full — you should absolutely check it out for vivid examples of experiences that you’d never have when interacting with, say, your smartphone, as well as researchers’ analysis and insights.

With such day-to-day use devices, developing a nurturing relationship could bring pleasant unexpected consequences – perhaps, countering the “kept on a shelf since purchase” factor, or encouraging repairability, both things to be cherished. If you’ve ever overheard someone talking about their car or laptop as if it were alive, you too might have a feeling such ideas are worth exploring. Of course, not every device could use a novel aspect like this, but if you wanted to go above and beyond, you could even build a lamp that needs to be fed to function.

Continue reading “What If Your Day-To-Day Devices Were Alive?”

A wooden table with a puzzle on top of it sits in an off white room with a light wood floor. A red chair sits behind the table and the slats of the rolled away tambour top are visible.

Tambour Table With A Puzzling Secret

Some people really like puzzles. [Simone Giertz] is one of these serious puzzle lovers and built a transforming table (YouTube) to let her easily switch between puzzles and more mundane tasks, like eating.

While there are commercial solutions out there for game tables with removable tops and simpler solutions like hinged lids, [Giertz] decided to “make it more complicated and over-engineered than that.” A tambour top that rolls out of the way makes this a unique piece of furniture already, but the second, puzzle table top that can be raised flush with the sides of the table really brings this to the next level.

If that wasn’t already enough, the brass handles on the table are also custom made. In grand maker tradition, [Giertz] listened to her inner MYOG (Make Your Own Gnome) and got a lathe to learn to make her own handles instead of just buying some off the shelf.

If you’re less enamored of puzzles, you may want to see how Jigsaw Puzzles are Defeated. If you’re worried about losing pieces, check out these 3D Printed Sliding Puzzles.

Continue reading “Tambour Table With A Puzzling Secret”

A small widescreen laptop repeating the ThinkPad style. It looks cute; sadly, it does not exist.

[Dana Sibera] Creates Devices That Don’t Exist

[Dana Sibera], known as [@NanoRaptor] on Twitter, makes us wonder about devices that could have been, and wince about devices that must never see the light of day – summoned into existence by her respectable photo editing and 3D modeling skills. Ever wanted to see a Model M with a small green-tinted CRT built into its side? Now you have. Perhaps, a “self-tapping” DE-9 plug with wood screws for pins? Tough luck, here it is anyway, but you can have a palate cleanser if it was too much to bear. Having started over a year ago with the classic “spicy pillows, but actually pillows” design, she keeps gracing us with portrayals of tech and tech-adjacent objects straight from the depths of her imagination.

None of the things she shows exist in real life, some regretfully and some thankfully so, but that’s not the first thing on your mind when you stumble upon a cube-shaped iPod with a built-in equalizer in your Twitter feed. Pictures like this “cassette ROM” or the deluxe woodgrain 386DX are quite apparent in what they are. On the other hand, devices like this “Mini VGA” dongle or the amber CRT-adorned TI92 Plus might have you reach for your wallet before you realize what’s up, and the photographic-proof-accompanied assertion about early floppy drives being punchcard-based might have you believe you are just not up to date on your retrocomputing trivia. Continue reading “[Dana Sibera] Creates Devices That Don’t Exist”
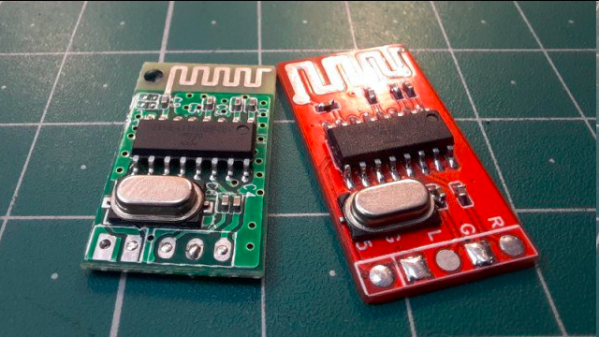
PCB antenna rendered useless by overly enthusiastic copper fill.

The Many Ways You Can Easily Ruin Your PCB Antenna Design

PCB antenna impaired by copper fill and other attenuation sources.

We have all seen Printed Circuit Board (PCB) antennas: those squiggly bits of traces on PCBs connected often to a Bluetooth, WiFi or other wireless communication chip. On modules like for the ESP8266 and ESP32 platforms the PCB antennas are often integrated onto the module’s PCB, yet even with such a ready-made module it’s possible to completely destroy the effectiveness of this antenna. These and other design issues are discussed in this article by [MisterHW].

It covers a range of examples of poor design, from having ground fill underneath an antenna, to having metal near the antenna, to putting dielectric materials near or on top of the antenna. The effect of all of these issues is generally to attenuate the signal, sometimes to the point where the antenna is essentially useless.

Ultimately, the best PCB antenna design is one where there is no nearby copper fill, and there are no traces running near or on layers below the antenna. After all, any metal trace or component is an antenna, and any dielectric materials will dampen the signal. Fortunately, there is e.g. a free KiCad library with ready-to-use PCB antenna designs to help one get started with a custom design, as well as many other resources, covered in the article.

If you want to get really professional about checking the effectiveness of an antenna design, you’ll want to use a Network Vector Analyzer. These will also help you with tuning the capacitors used with the PCB antenna.

(Featured image: PCB antenna rendered useless by overly enthusiastic copper fill.)

A hand holding a paper cup pours orange resin into a mold. There are several different colors in a spiral inside a circular mold on a circular platform with holes around its perimeter sitting on a wooden table.

Reproducing Vinyl Records In Resin

While most are just plain, vinyl records can be found in a variety of colors, shapes, and some even glow in the dark. [Evan and Katelyn] decided to spruce up a plain old record by replicating it in bright, glow-in-the-dark resin.

By first making a silicone mold of the vinyl record and then pouring several different colors of resin into the resulting mold, [Evan and Katelyn] were able to make a groovy-looking record that still retained the texture necessary to transmit the original sounds of the record. The resulting piece has some static, but the music is still identifiable. That said, audiophiles would probably prefer to leave this up on the wall instead of in their phonograph.

Acrylic rings were laser cut and bolted together to build the form for the silicone mold with the original record placed at the bottom. To prevent bubbles, the silicone was degassed in a vacuum chamber before pouring over the record and the resin was cured in a pressure pot after pouring into the resulting mold.

If you’re interested in how records were originally made, check out this installment of Retrotechtacular. A more practical application of resin might be this technique to reproduce vintage plastic parts.

Continue reading “Reproducing Vinyl Records In Resin”