Roll The Radioactive Dice For Truly Random D&D Play

When you have a bunch of people gathered around a table for a “Dungeons & Dragons” session, you have to expect that things are not always going to go smoothly. After all, people who willingly create and immerse themselves in an alternate reality where one bad roll of the dice can lead to the virtual death of a character they’ve spent months or years with can be traumatic. And with that trauma comes the search for the guilty — it’s the dice! It’s always the dice!

Eliminating that excuse, or at least making it statistically implausible, is the idea behind this radioactively random dice roller. It comes to us from [Science Shack] and uses radioactive decay to generate truly random numbers, as opposed to the pseudorandom number generators baked into most microcontrollers. The design is based on [AlphaPhoenix]’s muon-powered RNG, but with a significant twist: rather than depending on background radiation, [Science Shack] brought the power of uranium to the party.

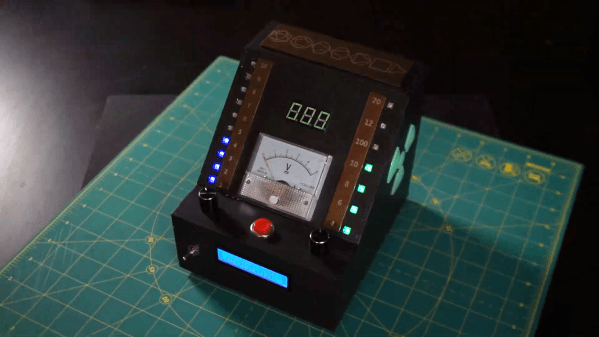
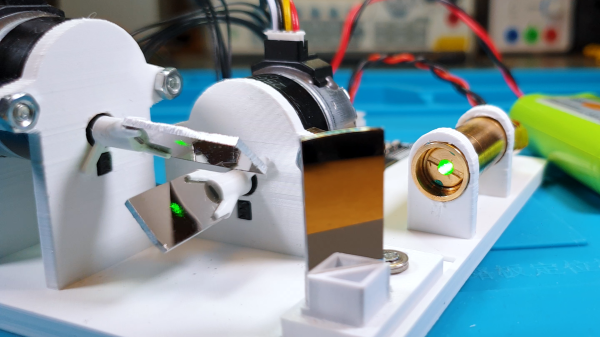
They obtained a sample of autunite, a weird-looking phosphate mineral that contains a decent amount of uranium, perfect for stimulating the Geiger counter built into the dice roller. Autunite also has the advantage of looking very cool under UV light, taking on a ghostly “fuel rod glow,” in the [Homer Simpson] sense. The decay-powered RNG at the heart of this build is used to simulate throws of every standard D&D die, from a D4 to a D100. The laser-cut hardboard case holds all the controls and displays, and also has some strategically placed openings to gaze upon its glowing guts.

We really like the design, but we have to quibble with the handling of the uranium ore; true, the specific activity of autunite is probably pretty low, but it seems like at least some gloves would have been in order.

Continue reading “Roll The Radioactive Dice For Truly Random D&D Play”

Showing a car dash screen with options menu, showing a "Steering" entry and a bunch of options one can change, i.e. Normal, Sport, offroad, Eco etc.

Your Car Has Driving Profiles – Here’s How To Change Them

Just like mobile phones of yesteryear, modern cars have profiles. They aren’t responsible for the sounds your car produces, however, as much as they change how your car behaves – for instance, they can make your engine more aggressive or tweak your steering resistance. On MQB platform cars, the “Gateway” module is responsible for these, and it’s traditionally been a black box with a few user-exposed profiles – not as much anymore, thanks to the work of [Jille]. They own a Volkswagen hybrid car, and had fun changing driving modes on it – so naturally, they decided to reverse-engineer the configuration files responsible.

Now, after two years of experimentation, tweaking values and observing changes, there’s quite some sense made of the configuration binaries. You can currently edit these binaries, also referred to as datasets, in a hex editor – there’s profiles for the 010 hex editor that make sense of the data you load, and explanation of the checksums involved. With this, you are no longer limited by profiles the manufacturer composed – if a slightly different driving combination of parameters makes more sense to you, you can recombine them and have your own profile, unlock modes that the manufacturer decided to lock out for non-premium cars, and even fix some glaring oversights in factory modes.

This is pretty empowering, and far from ECU modifications that introduce way more fundamental changes to how your car operates – the parameters being changed are within the range of what the manufacturer has implemented. The smarter our cars become, the more there is for us hackers to tweak, and even in a head unit, you can find things to meaningfully improve given some reverse-engineering smarts.

Simple Wi-Fi Cat Door Solves The Extra Critter Problem, And Nothing More

Anyone with an outdoor cat in their life knows their propensity for bringing home offerings, in the form of critters in various stages of the process of becoming ex-critters. And anyone with a hacker in their life knows that there’s a tendency to throw technology at this problem. But sometimes, the simplest solutions are the best.

Take this simple stepper-powered cat door lock. For [Jason Winfield], the essential problem with his outdoor cat’s late-night demands for reentry was having to manually unlock the cat door after a quick visual check that no midnight snacks were along for the ride. Such activity tends to make it hard to get back to sleep. One natural reaction to this would be to completely automate the process with machine learning to recognize the offering and deny entry; we’ve seen exactly that before, after all. But recognizing that the disruptive part was the getting up to check bit, [Jason] just whipped up a simple stepper-driven lock with an ESP8266 microcontroller. With a 3D-printed case and a battery pack, and a nearby Wi-Fi camera, the lock denies entry to the cat until he gets a look at it, at which point he simply hits the lock’s webpage to unlock the door. The video below would show the lock in action, except the cat buggered off once it got a whiff of the doings. Cat’s gonna cat.

What we appreciate about this project is its simplicity. It solves the problem with the minimum feature set, which is something we see too little of sometimes. It’s also got some nice ideas, like the non-captive bolt that can be removed to unlock the door if the battery dies. Smart thinking, [Jason], and sweet dreams.

Continue reading “Simple Wi-Fi Cat Door Solves The Extra Critter Problem, And Nothing More”

Breakers for the system on a DIN rail, with markings like 48V and 24V and 12V and so on on the bottom, and two hefty devices of some kind on the bottom, probably MPTT controllers, with hefty wires running from them.

Low-Voltage DC Network Build Incited By Solar Panels

Nowadays, some people in Europe worry about energy prices climbing, and even if all the related problems disappear overnight, we’ll no doubt be seeing some amounts of price increase. As a hacker, you’re in a good position to evaluate the energy consuming devices at your home, and maybe even do something about them. Well, [Peter] put some solar panels on his roof, but couldn’t quite figure out a decent way to legally tie them into the public grid or at least his flat’s 220V network. Naturally, a good solution was to create an independent low-voltage DC network in parallel and put a bunch of devices on it instead!

He went with 48V, since it’s a voltage that’s high enough to be efficient, easy to get equipment like DC-DCs for, safe when it comes to legal matters concerned, and overall compatible with his solar panel setup. Since then, he’s been putting devices like laptops, chargers and lamps onto the DC rail instead of having them be plugged in, and his home infrastructure, which includes a rack full of Raspberry Pi boards, has been quite content running 24/7 from the 48V rail. There’s a backup PSU from regular AC in case of overcast weather, and in case of grid power failures, two hefty LiFePO4 accumulators will run all the 48V-connected appliances for up to two and a half days.

The setup has produced and consumed 115kWh within the first two months – a hefty contribution to a hacker’s energy independence project, and there’s enough specifics in the blog post for all your inspiration needs. This project is a reminder that low-voltage DC network projects are a decent choice on a local scale – we’ve seen quite viable proof-of-concept projects done at hackercamps, but you can just build a small DC UPS if you’re only looking to dip your feet in. Perhaps, soon we’ll figure out a wall socket for such networks, too.

Laser Projector Relies On Steppers Rather Than Galvanometers

Laser light shows have always been real crowd-pleasers. There’s just something about the frenetic movement of a single point of intensely bright light making fluid animations that really captures the imagination. Large-scale laser shows require a lot of gear, of course, but that doesn’t mean you can’t get in on the fun yourself using something like this homebrew X-Y laser projector.

This is actually [Stanley]’s second pass at a stepper-based DIY projector; we featured his previous build back in 2016. This time around, he wanted to move beyond the “module mix-and-match” style of construction, so rather than use an Arduino and stepper shield, he rolled his own controller PCB to hold an ESP32 and a pair of STSPIN220 stepper drivers. The business end of the new version saw improvements, too — given that he was seeing unwanted softening of corners and curving of straight lines in the first projector’s images, he opted for smaller steppers holding smaller mirrors this time around. There’s also a new 3D printed chassis to hold everything, simplifying the build and keeping the two mirrors in better alignment.

The video below has the build details and some nice footage of the projector in action — it’s hard to go wrong with lasers and smoke. The performance seems pretty good, so the improvements seem to have paid off. And for those of you tapping out your “Should have used galvos” comments below, relax; [Stanley] says he’s thinking about ways to make his own galvanometers for the next version.

Continue reading “Laser Projector Relies On Steppers Rather Than Galvanometers”

A Raspberry Pi 3 with a black Raspberry Pi Camera PCB on top of it, looking at the camera taking this picture. There's a Jolly Wrencher in the background.

Make Your Pi Moonlight As A Security Camera

A decade ago, I was learning Linux through building projects for my own needs. One of the projects was a DIY CCTV system based on a Linux box – specifically, a user-friendly all-in-one package for someone willing to pay for it. I stumbled upon Zoneminder, and those in the know, already can tell what happened – I’ll put it this way, I spent days trying to make it work, and my Linux skills at the time were not nearly enough. Cool software like Motion was available back then, but I wasn’t up to the task of rolling an entire system around it. That said, it wouldn’t be impossible, now, would it?

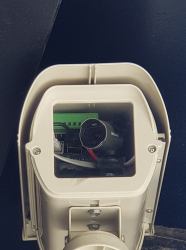
Five years later, I joined a hackerspace, and eventually found out that its CCTV cameras, while being quite visually prominent, stopped functioning a long time ago. At that point, I was in a position to do something about it, and I built an entire CCTV network around a software package called MotionEye. There’s a lot of value in having working CCTV cameras at a hackerspace – not only does a functioning system solve the “who made the mess that nobody admits to” problem, over the years it also helped us with things like locating safety interlock keys to a lasercutter that were removed during a reorganization, with their temporary location promptly forgotten.

Being able to use MotionEye to quickly create security cameras became quite handy very soon – when I needed it, I could make a simple camera to monitor my bicycle, verify that my neighbours didn’t forget to feed my pets as promised while I was away, and in a certain situation, I could even ensure mine and others’ physical safety with its help. How do you build a useful always-recording camera network in your house, hackerspace or other property? Here’s a simple and powerful software package I’d like to show you today, and it’s called MotionEye.

Continue reading “Make Your Pi Moonlight As A Security Camera”

Keeping An Eye On Heating Oil

Energy costs around the world are going up, whether it’s electricity, natural gas, or gasoline. This is leading to a lot of people looking for ways to decrease their energy use, especially heading into winter in the Northern Hemisphere. As the saying goes, you can’t manage what you can’t measure, so [Steve] has built this system around monitoring the fuel oil level for his home’s furnace.

Fuel oil is an antiquated way of heating, but it’s fairly common in certain parts of the world and involves a large storage tank typically in a home’s basement. Since the technology is so dated, it’s not straightforward to interact with these systems using anything modern. This fuel tank has a level gauge showing its current percentage full. A Raspberry Pi is set up nearby with a small camera module which monitors the gauge, and it runs OpenCV to determine the current fuel level and report its findings.

Since most fuel tanks are hidden in inconvenient locations, it makes checking in on the fuel level a breeze and helps avoid running out of fuel during cold snaps. [Steve] designed this project to be reproducible even if your fuel tank is different than his. You have other options beyond OpenCV as well; this fuel tank uses ultrasonic sensors to measure the fuel depth directly.