Beautiful And Bouncy RGB LED Skirt Reacts To Movement

Is there any garment so freeing to wear as a skirt, assuming it isn’t skin tight? (Well, unless that’s your thing — we won’t judge.) Skirts and dresses are pretty darn freeing compared to pants, so it’s too bad that most of them come without pockets. And it’s really too bad that pretty much all skirts and dresses come without RGB LEDs that can react to movement. Maybe someday.

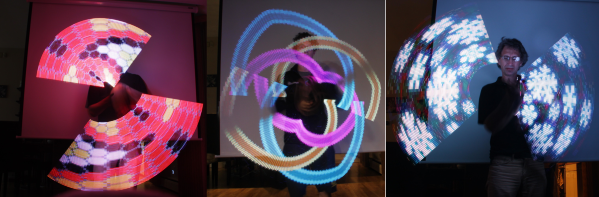
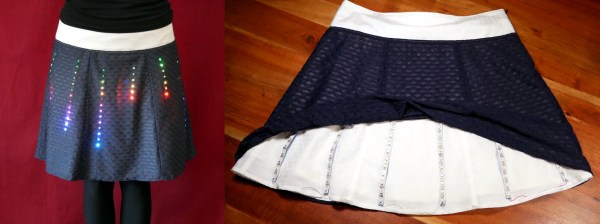
Until then, we’ll just have to design our own LED skirt like [makeTVee] and his girlfriend did, and hope that it looks half as good. This skirt has six RGB LED strips running down the front for a total of 120 LEDs. The strips are held in place with hook and loop tape and all the electronics — an Adafruit QT Py, a 6-DOF IMU, and a USB power bank — are tucked into the waistband and can be easily removed when it’s time to wash the skirt. Continuing with the practicality theme, there are no LEDs on the back, though they could easily be added in for getting down on the dance floor.

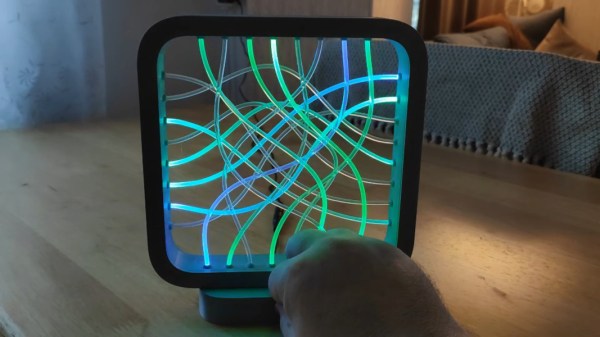
We really love the fabric choices here. The overlay fabric looks good on its own, but it also does a great job of showing and diffusing the light, while at the same time hiding the LED strips themselves. It’s clear that they took comfort and practicality into consideration and made a wearable that’s truly wearable. [makeTVee] calls this a work in progress, but has already got a few nice animations going, which you can see in the video after the break.

If you don’t care whether your wearables are practical, try this fiber optic jellyfish skirt on for size.

Continue reading “Beautiful And Bouncy RGB LED Skirt Reacts To Movement”

Transmit Your Gaze To This Fiber Optic LED Lamp

Call us easily amused, but we think it’s pretty amazing what can be done with a microcontroller, some RGB LEDs, and a little bit of plastic. Case in point is [andrei.erdei]’s beautiful and quite approachable fiber optic LED lamp. It’s a desktop-friendly version of a similar piece [andrei] made that is roughly nine times the size of this one and hangs on the wall. The build may be simple, but the product is intricately lovely.

We really like the visual density of this lamp — it’s just the right amount of tubes and strikes a balance between being too sparse and too chaotic. As you might expect, there’s an Arduino and some RGB LED strips involved. But the key to this build is in the 16 pieces of side-glow plastic fiber optic tubing. Side-glow is designed to let light escape along the length of the tube as opposed to end-glow, which is made to minimize light loss from one end to the other like a data pipe. This allows for all sorts of fun effects, and you can watch [andrei.erdei] go slowly and soothingly through the different colors and modes in the demo video after the break. Make sure you watch long enough to see the tubes move like the old Windows 3D pipes screensaver

Already have too many knickknacks and wall hangings? You’re missing out on prime real estate — the ceiling. Check out this fiber optic ceiling installation that reacts to music.

Continue reading “Transmit Your Gaze To This Fiber Optic LED Lamp”

LEDs From Dubai: The Royal Lights You Can’t Buy

[Clive] had an interesting video about LED lights from Philips. You can’t buy them unless you live in Dubai. Apparently inspired by the ruler of Dubai, Sheikh Mohammad Bin Rashid Al Maktoum, who wanted more efficient and longer-lasting bulbs. The secret? A normal LED bulb uses an LED “filament” at 1 watt each. The Dubai bulbs run at about a fourth of that which means they need more LEDs to get the same amount of light, but they should last longer and operate more efficiently.

After exploring the brightness and color of different lamps, [Clive] tears one up and finds some surprises inside. The LEDs get over 200V each and the driver circuit has a lot of pairs of components, possibly to keep the size small for the high voltages involved, although it could be to improve reliability, [Clive] wasn’t sure.

By reducing the power, [Clive] was able to count that each LED strip contains 21 LEDs. He also notes some of the oddities in construction that appear to be for reliability and ease of manufacturing. We aren’t sure how that compares to the construction of conventional bulbs. The circuit includes a bridge rectifier and a linear current regulator using a MOSFET.

The bulbs cost a bit more, but if you factor in the probable long life, their total cost over time should be reasonable. Overall, it is interesting that a nice design came from what amounts to government regulation. Of course, there is a price: in exchange for the development of the bulbs, Philips has the exclusive right to make and sell the bulbs for the next several years. They expect to sell 10 million lamps by the end of 2021, although they are only available, currently, in Dubai.

Continue reading “LEDs From Dubai: The Royal Lights You Can’t Buy”

A Wi-Fi Enabled Dog!

Our canine friends have been at our side for millennia, their prehistoric wolf ancestors evolving alongside us into the breeds we know today. But astoundingly until now no dog has been Wi-Fi enabled, at least according to [Entropy], whose dog [Kaya] now sports a colourful Wi-Fi enabled collar.

Light-up dog collars and harnesses have been with us for a while, and serve the very useful purpose of protecting the animals from accidents by making them visible at night, but [Kaya]’s colar was a particularly disappointing example. Its single light and lacklustre optical fibre coupled with disappointing battery life left much to be desired, so when it broke there was ample excuse to upgrade it. In went a strip of addressable LEDs and an ESP32 module, along with an 18650 lithium-ion cell. We’re a bit unsure whether lights can be controlled from a mobile phone, but perhaps the most significant benefit lies elsewhere. The Wi-Fi hotspot from the ESP32 serves as a beacon to find [Kaya] within a short distance should she wander off, which as any dog owner will tell you can be a boon when they’re investigating some fascinating new smell and ignoring your calls. You can see her modelling the collar in the video below the break.

Canine hacks appear on these pages from time to time. One of our favourites is this not very successful but highly amusing remote controlled dog.

Continue reading “A Wi-Fi Enabled Dog!”

This Automated Wire Prep Machine Cuts And Strips The Wire

We’ve seen a fair number of automated wire cutting builds before, and with good reason: cutting lots of wires by hand is repetitive and carries the risk of injury. What’s common to all these automated wire cutters is a comment asking, “Yeah, but can you make it strip too?” As it turns out, yes you can.

The key to making this automated wire cutter and stripper is [Mr Innovative]’s choice of tooling, and accepting a simple compromise. (Video, embedded below.) Using just about the simplest wire strippers around — the kind with a diamond-shaped opening that adjusts to different wire gauges by how far the jaws are closed — makes it so that the tool can both cut and strip, and adapt to different wire sizes. The wire is fed from a spool to a custom attachment sitting atop a stepper motor, which looks very much like an extruder from a 3D-printer. The wire is fed through a stiff plastic tube into the jaws of the cutter. Choosing between cutting and stripping is a matter of aiming the wire for different areas on the cutter’s jaws, which is done with a hobby servo that bends the guide tube. The throw of the cutter is controlled by a stepper motor — partial closure nicks the insulation, while a full stroke cuts the wire off. The video below shows the build and the finished product in action.

Yes, the insulation bits at the end still need to be pinched off, but it’s a lot better than doing the whole job yourself. [Mr Innovative] has a knack for automating tedious manual tasks like this. Check out his label dispenser, a motor rotor maker, and thread bobbin winder.

Continue reading “This Automated Wire Prep Machine Cuts And Strips The Wire”

Alfa Romeo Gauge Cluster Gets A Fresh Set Of LEDs

On older vehicles, if you noticed that the lights had gone out behind one of your gauges, you knew it was time to snake your hand back there and replace the little incandescent bulb that had given up the ghost. But what are you supposed to do if you’re seeing the same problem on a modern vehicle that’s already made the leap to LED dash lighting? That’s what [Tysonpower] recently had to find out when the fuel indicator on his Alfa Romeo Giuletta QV went dark.

In the video after the break, [Tysonpower] details how to remove the instrument cluster from the Giuletta’s dash, which we imagine would be a useful little tutorial for anyone who owns the same vehicle. Once he has it out on the bench, he strips it down to the bare PCB and starts (literally) poking around.

He eventually noticed that if he pushed on the board near the fuel indicator he could get the appropriate 3528 SMD LED to light up, but touching up the solder joints didn’t seem to fix the issue. Assuming the LED must be defective internally, he simply replaced it and all was good again.

Well, not exactly. The light produced by the new part didn’t match the color or brightness of the other dozen or so white LEDs that were installed on the board, so [Tysonpower] decided to just dive in and replace them all. While it obviously took a lot more time and effort, he says the end result is that the instrument cluster looks noticeably brighter and crisper when driving at night. Not bad for an afternoon’s work and a couple bucks worth of LEDs.

Most of the time, when we see somebody messing around behind the dash it’s because they intend on replacing the original instruments with something more capable. But projects like this, which add just a touch of refinement to the existing hardware, prove that stock components aren’t always a disappointment.

Continue reading “Alfa Romeo Gauge Cluster Gets A Fresh Set Of LEDs”

POV LED Staff Takes Art For A Spin

The human body does plenty of cool tricks, but one of the easiest to take advantage of is persistence of vision (POV). Our eyes continue to see light for a fraction of a second after the light goes off, and we can leverage this into fun blinkenlight toys like POV staffs. Sure, you can buy POV staffs and other devices, but they’re pretty expensive and you won’t learn anything that way. Building something yourself is often the more expensive route, but that’s not the case with [shurik179]’s excellent open-source POV staff.

There’s a lot to like about this project, starting with the detailed instructions. It’s based on the ItsyBitsyM4 Express and Adafruit’s Dotstar LED strips. You could use the Bluetooth version, but it’s already quite easy to load images to the staff because it shows up as a USB mass storage device. We like that [shurik179] added an IMU and coded the staff so that the images look consistent no matter how fast the staff is spinning. In the future, [shurik179] might make a Bluetooth version that’s collapsible. That sounds like quite the feat, and we can’t wait to see it in action.

As cool as it is to wave a POV staff around, there’s no real practical application. What’s more practical than a clock?