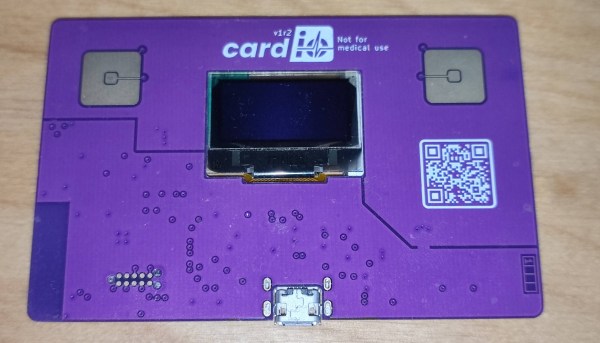
A three picture sequence, with the first picture being a woman in a blue lit up prom dress touching a wand to her hand, the second picture being a woman in a pink lit up dress touching a wand to her hand and the third picture being the same woman in a lit up pink prom dress holding a blue glowing star wand over her head

Be The Star Of The Evening With This Light Up Prom Dress

[Kellechu] went full parent beast mode by creating a prom dress for her daughter. This incredible build is a tour-de-force of DIY crafting, combining sewing, electronics, 3D printing and programming.

The dress skirt is made of tulle that allows for the LED strip underneath to diffuse through. The top bodice is made of fiber optic fabric sewn between the fabric form with the dangling fiber optic threads grouped into bundles. The dangling fiber optic bundles were then inserted and glued into “out caps” that forced the strands to sit next to a NeoPixel LED. A 20 NeoPixel “Dots Strand” strip was strung around the waist line, affixing 12 of the NeoPixels with an “out cap” to light up the fiber optic bodice. The remaining NeoPixels were outfitted with a diffuser cap and hung lower to light up the tulle skirt portion of the dress.

A bodice of a prom dress hanging on a form with fiber optic fabric bundles dangling underneath with some of them installed into a NeoPixel "Dots Strand" strip installed along the waist line

A wand was 3D printed and housed with an RFM69HCW Packet Radio M0 Feather, a NeoPixel LED color ring and a TCS34725 Flora color sensor powered by a 2.2 Ah 3.7 V LiPo battery. Another RFM69HCW Packet Radio M0 Feather was placed in the dress to be able to receive messages from the wand so that the sensed color could be transmitted and the LED strip could be updated with the sensed color. The dress portion was powered by a 10 Ah 3.7 V LiPo, with the battery and electronics fitting snugly into yoga bike shorts with side pockets.

[Kellechu]’s Instructable is full of details about the process and is worth checking out. For example, [Kellechu] goes into detail about the troubles and care taken when dealing with the different media, making sure to avoid ironing the fiber optics so as not to melt the lines and experimenting with different sewing needles to limit the amount of dead fibers as collateral damage from the sewing process.

Dresses with LEDs and other lights are a big hit, as can be seen from our feature on an LED wedding dress.

Continue reading “Be The Star Of The Evening With This Light Up Prom Dress”

The 2022 Supercon Badge Is A Handheld Trip Through Computing History

Over the last several years, there’s been a trend towards designing ever more complex and powerful electronic event badges. Color displays, sensors, WiFi, USB, Bluetooth — you name it, and there’s probably a con badge out there that has packed it in. Even our own 2019 Supercon broke new ground with the inclusion of a Lattice LFE5U-45F FPGA running a RISC-V core. Admittedly, observing this unofficial arms race has been fascinating. But as we all know, a hacker isn’t defined by the tools at their disposal, but rather the skill and imagination with which they wield them.

So this year, we’ve taken a slightly different approach. Rather than try and cram the badge with even more state of the art hardware than we did in 2019, we’ve decided to go back to the well. The 2022 Supercon badge is a lesson in what it means to truly control a piece of hardware, to know what each bit of memory is doing, and why. Make no mistake, it’s going to be a challenge. In fact, we’d wager most of the people who get their hands on the badge come November 4th will have never worked on anything quite like it before. Folks are going to get pulled out of their comfort zones, but of course, that’s the whole idea.

Continue reading “The 2022 Supercon Badge Is A Handheld Trip Through Computing History”

This Infinity Dodecahedron Build Shows All The Tricks

The infinity dodecahedron is one of those super eye-catching builds that many of us hardware hackers have on our ‘build one day’ project list. The very thought of actually doing it strikes a little fear into the heart of even the most intrepid maker, once you start to think about all the intricate little details and associated ways it could all go horribly wrong. Luckily for us, [Hari Wiguna] has documented his latest build as a long video build log, showing lots of neat tricks and highlighting many problems along the way. With the eventual goal of removing many of the issues that make such a build tricky, [Hari] hopes to make it practically easy. Let’s see how that turns out!

HASL-finished castellated (half hole) edge contacts make butt-jointing a breeze

A common route for such a build relies on appropriately shaped 3D printed frame parts, with some kind of clear plastic for the 12 faces, and LED strips stuck to the inside of each of the 30 edges. Whilst this works, [Hari] thought he could do a bit better, using butt-jointed PCBs as the frame material.

The PCBs handily double up as something to solder LEDs onto (because that’s what PCBs are mostly intended for!) as well as a way to pass power and data signals around the frame in a minimally visible way. As will become obvious from the lengthy discussion in the video, a few simple tricks here and there are needed to make this strategy work. With the recent proliferation of PCB modules using castellated edges for termination, the usual Chinese PCB fab services have all started offering very good value services for this feature. Once a PCB feature that was a specialized (read that as ‘expensive’) offering, it is now quite affordable on your average maker’s budget.

Data path planning? Just use paper and tape!

One immediate practical issue was how to pass the data connection around from edge to edge, given that there are three edges per vertex. The solution [Hari] came up with was simple, just duplicate the signals on each end of the PCB, so the data out signal can be tapped from either end, as required.

Even with 3D printed jigs to hold the PCBs at just the right angles, there’s still some wiggle and a little risk of edges not quite aligning, due to accumulated errors around the frame. It did come together in the end, with the expected spectacular visuals. We’re sure many of you will be waiting for [Hari] to release the next version of the design to the community, hopefully with even more of the ease-of-build issues resolved, because we want one even more now.

Naturally, this is by no means the first infinity platonic solid we’ve seen, here’s a smaller one for starters. If you remove the mirrors and LEDs, then you’re just left with a plain old dodecahedron, like this cool folding project.

Continue reading “This Infinity Dodecahedron Build Shows All The Tricks”

Rollercoasters Are Triggering The IPhone’s Crash Detection System

Apple has been busy adding new features to its smartphone and smartwatch offerings. Its new iPhone 14 and Apple Watch 8 now feature a safety system that contacts emergency services in the event the user is in a automobile accident.

As with so many new technologies though, the feature has fallen afoul of the law of unintended consequences. Reports are that the “crash detection system” is falsely triggering on rollercoasters and in other strange circumstances. Let’s take a look at how these systems work, and why this might be happening.

Continue reading “Rollercoasters Are Triggering The IPhone’s Crash Detection System”

A futuristic bed headboard has a continuous light with a hexagonal grid overlaid on top of it that wraps around the bed, much like an ovoid MRI machine.

This Headboard Contains An Artificial Sun

Despite the proliferation of artificial lighting, humans are still highly dependent on sunlight for regulation of our circadian rhythms. Accordingly, [Sector 07] has built a futuristic headboard that can help with the waking up side of things whether you’re headed to space or just in the dead of winter.

The interior of the headboard includes custom 3D printed panels to mount the electronics and a light diffusion screen made of nylon fabric. The printed parts were all joined by “welding” the pieces with a soldering iron and extra filament. Besides the futuristic hexagon motif in the diffusion screen, the most eye-catching part of this build is the curved ends making it look like a set piece from Star Trek: TNG. [Sector 07] was able to get the unique shape by kerf bending the plywood ends before joining them to the flat sections with dowels and wood glue.

Since this build also includes an integrated coffee maker and voice assistant, there’s a bit more going on with the electronics than you might have in a normal circadian lamp. Powering the project are two Arduino Mega boards and a SpeakUp Click that handles the voice commands. Wake-up times are controlled via a keypad, and the voice assistant, Prisma, will ask if you are awake once the 30 minute sun simulation has completed before your alarm goes off. If you don’t confirm wakefulness, Prisma will escalate alarms until the system is sure you’re awake and then will ask if you want coffee. If you want a deep dive into the system’s functionality, be sure to checkout the video after the break.

We’ve covered artificial suns before, so if you’re interested in trying to build you’re own you should check out this Hugely Bright Artificial Sun, a Sunrise Alarm Clock Mounted Above the Bed, and this Artificial Sun Via Old Satellite Dishes.

Continue reading “This Headboard Contains An Artificial Sun”

Hacking Developers With A Cat Feeder: Who’s A Good Kitty?

Most of us probably know the drudgery of getting through some coding work, with just tedious hours of monkeying around stretching ahead of us. What if this tedium were to be interrupted by an occasional reward when we did something productive, like pushing a commit or other measure of progress? That’s roughly the concept that [John Partee] started off with when his gaze fell upon one of those automated cat feeders. Cat or developer, who doesn’t like to hear the tinkle of a tasty treat falling into their bowl?

The target pet feeder is a PetKit Fresh Element Solo, which allows for objects with a size of 12×12 mm (any orientation) to be fed through the feeding mechanism. Fortunately [John]’s favorite dark chocolate-covered almonds treat fit these requirements, and he set to work to figure out the REST API call needed to trigger a manual feeding event on the cat feeder device, employing the existing PyPetKit Python library that does the heavy lifting of connecting to and communicating with PetKit’s servers, as the feeder is of course an IoT device.

This means that the event flow still depends on PetKit’s “cloud”, which may inspire some enterprising hackers to make a stand-alone version, the development of which may be assisted by [John]’s solution through a regular treat. Before taking such a solution into use, be sure to discuss it with any pets you have, as they may not quite comprehend why there’s no reward for them whenever the *tinkle* sound occurs.

Continue reading “Hacking Developers With A Cat Feeder: Who’s A Good Kitty?”

Two shots of a Thriller jacket with LED strips being worn by Louise Katzovitz, one from the front and the other from the back.

Thrills With An LED “Thriller” Jacket

[Louise Katzovitz] has created a light-up jacket in the style of the jacket worn by Michael Jackson in the 1983 music video for “Thriller”. [Louise Katzovitz]’s Thriller jacket is the perfect example of combining sewing hacks and electronic hacks to make an awesome, wearable jacket.

A bomber jacket was used as the base form to layer on the sequins and LED strips. Instead of bands of metal studs, [Louise] used WS2812B 60 pixels/m LED strips. 3D-printed transparent PLA “gems” were placed on top of the LEDs to mimic the form of the metal studs in the original jacket and provide diffusion for the underlying LEDs.

Inside of the LED thriller jacket, with battery pack, arduino nano and wiring exposed

Each LED strip was laid out on a piece of vinyl strip. Then, a top layer of vinyl was cut to allow each of the LEDs to poke through, with the 3D printed gems super-glued on top. The assembled LED bands are attached to the jacket by Velcro with the wiring fed behind the lining material, which can be removed easily via small hooks. The whole thing is driven by an Arduino Nano and a 5 V power bank.

With the details and process worked out, [Louise] even made a tiny version of the jacket for her dog. We’ve featured LED wearables and fashion before and [Louise]’s jacket is a great addition. These projects are perfect for anyone who wants to wow their friends this upcoming Halloween season. Video after the break!

Continue reading “Thrills With An LED “Thriller” Jacket”