A desktop LED implementation of the arcade game Cyclone

Going Around In Circles With Homemade Arcade Classic Cyclone

The classic arcade game Cyclone has attracted many players, along with their coins, thanks to its simple yet addictive gameplay. In its most basic form it consists of a light racing around a circular track, which the player then has to stop at exactly the right place. Arduino enthusiast [mircemk] made a home version of this game, which allows addicts to keep playing forever without running out of quarters.

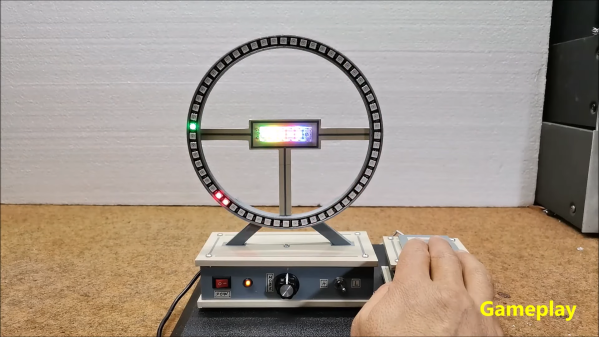
Instead of an arcade cabinet, this smaller version has an upright 3D-printed ring that holds 60 WS2812 LEDs. A further six in the center of the ring act as a score counter. An Arduino in the base drives the LEDs and runs the game, which is based on an earlier iteration built by [oKeeg]. An interesting addition is a large homemade “arcade button”, which is large and sturdy enough to withstand any abuse inflicted on it by a frustrated player.

Retro-style sound effects and flashing light sequences give the game a bit of an arcade vibe, even without a big cabinet and piles of coins. Simple LED games like this are always great eye-catchers in any home or office; if you like this one, be sure to check out other LED games like the handheld LEDBOY, the one-dimensional dungeon crawler TWANG, and this LED racing game. Continue reading “Going Around In Circles With Homemade Arcade Classic Cyclone

Three flowers in a corner of a darkened room, shining in different colors.

LED Flower Bouquet Is A Radiant Hacker Desk Decoration

[Jeremy Cook] writes to us about a project of his – a bouquet of LED cube flowers. The flowers are PCB cubes made out of small castellated PCBs, each of those having an individually addressable LED in its center. Castellations hold the cubes together mechanically, and thanks to a cleverly chosen pinout, only two different kinds of PCB need to be ordered for building such a flower!

As a vase for these flowers, he decided to use a glass bottle – which would need a cutout to fit a ESP8266-powered NodeMCU board, a controller of choice for the project. After a few different approaches for cutting glass all resulted in the bottles cracking, he gave up on the “clean cut” idea and reused one of the broken bottles, gluing it back together well enough for the aesthetic to work.

[Jeremy] tells us that he’s had help from a hack we covered back in 2017 – using a diode for level shifting, as the ESP8266’s 3.3 V level signals aren’t a good match for WS2812 inputs. From there, the WLED firmware for the ESP8266 ties everything together beautifully. It’s clear that [Jeremy] had a field day designing this, toying with all the ideas and approaches!

Colorful LEDs are a must-have for decorating hacker homes. From a bouquet of flowers, you might find yourself sketching a castellated PCB tile design, and next thing you know, you’ve created a beautiful system of LED triangle tiles. Some PCB fabs scoff at castellations, and if that’s the case, you might as well finish the job yourself.

Continue reading “LED Flower Bouquet Is A Radiant Hacker Desk Decoration”

fiber matrix

Big LED Matrix Becomes Tiny LED Matrix Thanks To Fiber Optics

Everyone loves LED matrices, and even if you can’t find what you like commercially, it’s pretty easy to make just what you want. Need it big? No problem; just order a big PCB and some WS2812s. Need something tiny? There are ridiculously small LEDs that will test your SMD skills, as well as your vision.

But what if you want a small matrix that’s actually a big matrix in disguise? For that, you’ll want to follow [elliotmade]’s lead and incorporate fiber optics into your LED matrix. The build starts with a 16×16 matrix of WS2812B addressable LEDs, with fairly tight spacing but still 160 mm on a side. The flexible matrix was sandwiched between a metal backing plate and a plastic bezel with holes directly over each LED. Each hole accepts one end of a generous length of flexible 1.5-mm acrylic light pipe material; the other end plugs into a block of aluminum with a 35 by 7 matrix of similar holes. The small block is supported above the baseplate by standoffs, but it looks like the graceful bundle of fibers is holding up the smaller display.

A Raspberry Pi Pico running a CircutPython program does the job of controlling the LEDs, and as you can see in the video below, the effect is quite lovely. Just enough light leaks out from the fibers to make a fascinating show in the background while the small display does its thing. We’ve seen a few practical uses for such a thing, but we’re OK with this just being pretty. It does give one ideas about adding fiber optics to circuit sculptures, though.

Continue reading “Big LED Matrix Becomes Tiny LED Matrix Thanks To Fiber Optics”

Image showing differences between WS2815 and WS2813 LED strips - the WS2815 strip lighting is more uniform throughout the strip's length.

Teaching You Everything You Might Have Missed About Addressable LEDs

Often, financial motivation results in people writing great educational material for hackers. Such is absolutely the case with this extensive documentation blog post on addressable LEDs by [DeRun]. This article could very be named “Addressable LEDs 101”, and it’s a must-scroll-through for anyone, whether you’re a seasoned hacker, or an artist with hardly any technical background and a desire to put LEDs in your creations.

This blog post is easy to read, painting a complete picture of what you can expect from different addressable LED types, and with apt illustrations to boot. Ever wonder which one of the addressable strips you should get from your retailer of choice, and what are the limitations of any specific type? Or, perhaps, you’d like to know – why is it that a strip with a certain LED controller is suspiciously cheap or expensive? You’re more than welcome to, at least, scroll through and fill into any of your addressable LED knowledge gaps, whether it’s voltage drops, color accuracy differences, data transfer protocol basics or dead LED failsafes.

Addressable LEDs have a special place in our hearts, it’s as if the sun started shining brighter after we’ve discovered them… or, perhaps, it’s all the LEDs we are now able to use. WS2812 is a staple of the addressable LED world, which is why we see them even be targets of both clone manufacturers and patent trolls. However, just like the blog post we highlight today mentions, there’s plenty of other options. Either way do keep coming cover a new addressable LED-related hack, like rewriting their drivers to optimize them, or adding 3.3V compatibility with just a diode.

We thank [Helge] for sharing this with us!

Tutorial Teaches You To Use Neopixels With Micropython

Addressable LEDs are wonderful things, with products like Neopixels making it easy to create all kinds of vibrant, blinking glowables. However, for those without a lot of electronics experience, using these devices can seem a bit daunting. [Bhavesh Kakwani] is here to help, with his tutorial on getting started with Neopixels using the MicroPython environment. 

The tutorial flows on from [Bhavesh’s] Blink example for MicroPython, and is aimed at beginners who are learning for the first time. It explains the theory behind RGB color mixing that allows one to generate all manner of colors with WS2812B-based LED strings, and how to code for the Raspberry Pi Pico to make these LEDs do one’s bidding.

The guide even covers the use of the Wokwi simulation tool. This is a great way for beginners to test their projects before having to play with actual hardware. This is useful for beginners, because it’s a great way to catch mistakes – is there a software problem, or did they push the soldering iron through the microcontroller? It’s also a technique that pays dividends when working on more complicated projects.

Whether you’re entirely new to the embedded world, or just want to learn the intricacies of talking to addressable LEDs and make sense of color mixing theory, this tutorial will serve you well. Before you know it, you’ll be building glowing projects with the best of them!


DIY Nanoleaf LED Panels Offer Peace Of Mind

Nanoleaf light panels are a popular product for creating glowing geometric designs on walls. However, for those that like to avoid IoT devices that integrate with big cloud services, they’re not ideal, and involve compromising on one’s privacy, somewhat. [Viktor] decided to build something of his own instead to avoid this problem.

The design is that of an equilateral triangle, which allows the panels to tesselate well. Each panel consists of two 3D printed parts. The black PLA base holds the WS2812B LED strips, cabling, and ESP8266 controller, while a white PLA cover goes over the top, which acts as a diffuser to spread the light from the individual LEDs. Each triangle contains 24 LEDs, and six triangles together consume around 1.6 amps when in use.

The benefit of the system is that it’s not controlled from a company’s cloud system, which can be shutdown at any time. [Viktor’s] setup runs entirely independently, and can be controlled from a simple web page. Plus, there’s nothing stopping him from modifying the code to use the panels for any purpose; commercial products like Nanoleaf don’t offer anywhere near the flexibility of building your own.

We’ve seen others build their own smart lighting with similar techniques before, too. Video after the break.

Continue reading “DIY Nanoleaf LED Panels Offer Peace Of Mind”

Breakbeats Courtesy Of The RP2040

While one often listens to songs or albums in full, sometimes you just want to lay down a simple beat. [todbot]’s latest project promises to do just that.

The build relies on a Raspberry Pi Pico or any other RP2040-based microcontroller board, and is programmed in CircuitPython. The PWM feature is used for audio output, and it’s loaded with different WAV samples of the classic “Amen” break.

Each measure, a random new sample is chosen and played, changing the beat. Even better, all the samples can loop, and they come in varying lengths, allowing them to overlap and lay over each other to add further depth to the mix. It’s a cinch to setup, as CircuitPython has an AudioMixer object built in.

Those wishing to tinker for themselves can find all the code and samples on Github. A build like this one is a great way to start learning about working with audio and music, after all. We’ve seen [todbot]’s work here before, too. Video after the break.

Continue reading “Breakbeats Courtesy Of The RP2040”