PlayStation 4 Controller Gets A USB-C Upgrade

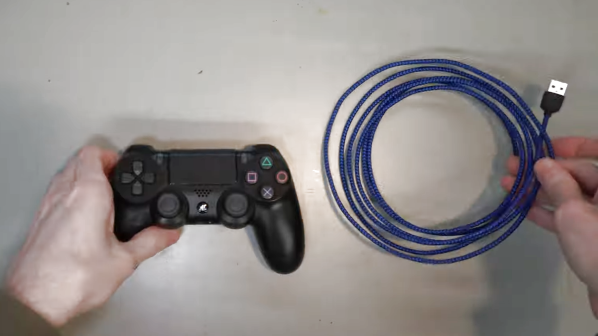
Micro USB was once the connector of choice for applications where USB-A was too big, but now USB-C has come to dominate all. It’s becoming standard across the board for many peripherals, and [Ian] recently decided that he wanted to upgrade his PS4 controller to the newer standard. Hacking ensued.

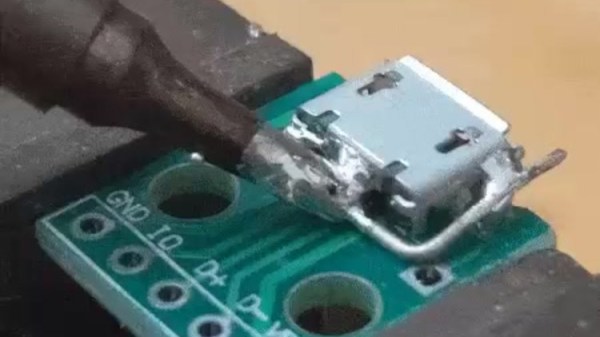
The hack consists of a small breakout board that enables a USB-C connector to be fitted into the PS4 controller in place of the original micro USB port. [Ian] explains what needs to be done to complete the mod, which first involves disassembling the controller carefully to avoid damage. The original microUSB breakout board can then be removed, and fitted with one of a selection of replacement boards available on Github to suit various revisions of PS4 controller. A little filing is then required to allow the new connector to fit in the controller case, and [Ian] notes that using an 0.8mm thick PCB is key to enabling the new breakout board to fit inside the shell.

It’s a neat hack that makes charging PS4 controllers way easier in the modern environment without having to keep legacy micro USB cables around. We’ve actually seen similar hacks done to iPhones, too, among other hardware. Video after the break.

Continue reading “PlayStation 4 Controller Gets A USB-C Upgrade”

The teeny tiny MCU mentioned in the article, merely a blimp on a giant devboard

New Part Day: Smallest ARM MCU Uproots Competition, Needs Research

We’ve been contacted by [Cedric], telling us about the smallest ARM MCU he’s ever seen – Huada HC32L110. For those of us into miniature products, this Cortex-M0+ package packs a punch (PDF datasheet), with low-power, high capabilities and rich peripherals packed into an 1.6mm x 1.4mm piece of solderable silicon.

This is matchstick head scale computing, with way more power than we previously could access at such a scale, waiting to be wrangled. Compared to an 8-bit ATTiny20 also available in WLCSP package, this is a notable increase in specs, with a way more powerful CPU, 16 times as much RAM and 8-16 times the flash! Not to mention that it’s $1 a piece in QTY1, which is about what an ATTiny20 goes for. Being a 0.35mm pitch 16-pin BGA, your typical board house might not be quite happy with you, but once you get a board fabbed and delivered from a fab worth their salt, a bit of stenciling and reflow will get you to a devboard in no time.

Drawbacks? No English datasheet or Arduino port, and the 67-page PDF we found doesn’t have some things like register mappings. LILYGO promised that they will start selling the devboards soon, but we’re sure it wouldn’t be hard for us to develop our own. From there, we’d hope for an ESP8266-like effect – missing information pieced together, translated and made accessible, bit by bit.

When it comes to soldering such small packages, we highly recommend reflow. However, if you decide to go the magnet wire route, we wouldn’t dare object – just make sure to send us pictures. After all, seems like miniature microcontrollers like ATTiny20 are attractive enough of a proposition that people will pick the craziest route possible just to play with one. They say, the madness of the brave is the wisdom of life.

We thank [Cedric] for sharing this with us!

Soldering iron tip heating up a piece of wire wrapped around the metal parts of a MicroUSB socket, with melted solder heating up all the important parts.

Desoldering Without Hot Air: Piece Of Wire Edition

Quite a few hackers nowadays share their tips and tricks on Twitter – it’s easy to do so, and provided either an existing audience or a bit of effort to get one, you’ll get at least a few notifications telling you that people appreciated what you had to share. Today, we’re covering two desoldering hacks highlighted there that will be useful some day, exactly when you need them. Both of them use a piece of wire and, in a way, extend the reach of your soldering iron’s tip. Copper wire would work better because of superior thermal conductivity, but other types of solid core wire will work in a pinch.

First hack is brought to us by [Erin Rose] – desoldering a microUSB socket. You need to heat up the entire shield and the pins at the same time, which the wire acts as a thermal gateway for. As long as there are melted solder bridges from sections of the wire to all the copper-to-part connection points, it should be easy to pump enough heat into the solder joints for all of them to eventually melt and give in at once.

Second hack is brought to us by [arturo182]. A piece of thick wire acts, again, as a heat conductor to desolder a 0.5mm pitch TQFP-100 package IC. You have to bend the wire into a correct shape, so that it’s as close to the pins of the TQFP as possible. In this situation, the wire performs two functions: first, transferring the heat from the iron’s tip to different points along the wire, then, as a barrier that helps solder not escape too far away from the pins. Copious amounts of flux likely desired for this one!

Hopefully, this comes handy if you ever need to replace an all-SMD part ASAP but don’t have a hot air gun or a hotplate handy. After getting this concept down to an art, we are sure you won’t limit yourself to TQFP parts and MicroUSB sockets. We’ve talked about desoldering practices before as part of our newsletter, and using lots of melted solder for part removal is not a foreign concept to us, either.

Continue reading “Desoldering Without Hot Air: Piece Of Wire Edition”

fiber matrix

Big LED Matrix Becomes Tiny LED Matrix Thanks To Fiber Optics

Everyone loves LED matrices, and even if you can’t find what you like commercially, it’s pretty easy to make just what you want. Need it big? No problem; just order a big PCB and some WS2812s. Need something tiny? There are ridiculously small LEDs that will test your SMD skills, as well as your vision.

But what if you want a small matrix that’s actually a big matrix in disguise? For that, you’ll want to follow [elliotmade]’s lead and incorporate fiber optics into your LED matrix. The build starts with a 16×16 matrix of WS2812B addressable LEDs, with fairly tight spacing but still 160 mm on a side. The flexible matrix was sandwiched between a metal backing plate and a plastic bezel with holes directly over each LED. Each hole accepts one end of a generous length of flexible 1.5-mm acrylic light pipe material; the other end plugs into a block of aluminum with a 35 by 7 matrix of similar holes. The small block is supported above the baseplate by standoffs, but it looks like the graceful bundle of fibers is holding up the smaller display.

A Raspberry Pi Pico running a CircutPython program does the job of controlling the LEDs, and as you can see in the video below, the effect is quite lovely. Just enough light leaks out from the fibers to make a fascinating show in the background while the small display does its thing. We’ve seen a few practical uses for such a thing, but we’re OK with this just being pretty. It does give one ideas about adding fiber optics to circuit sculptures, though.

Continue reading “Big LED Matrix Becomes Tiny LED Matrix Thanks To Fiber Optics”

chain and sprocket clock

Sprockets And Chains Drive This Unique Mechanical Digital Clock

When it comes to mechanical timepieces, we’re used to seeing mechanisms stuffed with tiny gears and wheel, often of marvelous complexity and precision. What we’re perhaps less used to seeing is a clock that uses chains and sprockets, and that looks more like what you’d find on a bicycle on your typical bicycle.

We can’t recall seeing anything quite like [SPE]’s “Time Machine” before. It’s one of those builds that explains itself by watching it work, so check out the video below and you’ll see where this one is going. The clock has three loops of roller link chain, each of which has a series of numbers welded to the links. The loops of chain are advanced around sprockets by a trio of geared-down motors, with the numbers standing up straight at the top of each loop. A microcontroller keeps track of the time and starts the clock advancing every minute, but a series of microswitches that are activated by the passing chain do all the rest of the control — sounds like a perfect time to say, “Could have used a 555,” but we still think it’s great the way it is.

Surprisingly, [SPE]’s clock seems like it wouldn’t be that hard to live with. Many unique electromechanical clocks that we feature, like a clock that’s nothing but hands or The Time Twister, are a little on the noisy side. While “Time Machine” isn’t exactly silent, its whirring isn’t terrible, and even though its clicks are a little loud, they’ve got a satisfying mechanical sound to them.

Continue reading “Sprockets And Chains Drive This Unique Mechanical Digital Clock”

Human Power, Past And Future

We will assume you’ve seen The Matrix — it was from 1999, after all. The surprise, at the end, was that humans were being used as human batteries to power a civilization of intelligent machines. But aside from just putting out some heat, the idea does have some precedent. After all, humans powered machines like mills, sewing machines, and pumps for centuries before there were good alternatives.

History

Galley ship
Reconstruction of a squadron of ancient Greek galley ships.

Early machines used hand cranks, treadwheels, treadles, and even pedal power to harness energy from humans. Consider, for example, an ancient galley ship with many oarsmen providing an engine. This wasn’t a great use of human power. An oarsman on a galley used his arms and back but didn’t much use his legs. The legs, though, have larger muscles and are often stronger. A pedal boat or racing shell would have been much more efficient, but without mass production of strong metal parts, it would have been difficult to build and maintain such machines in ancient times.

There was a time when pedals or treadles operated lots of machines from sewing machines to lathes. There were even old radios able to transmit and receive with no external power thanks to pedals as late as the 1940s.

Continue reading “Human Power, Past And Future”

DIY Super-Bright Outdoor TV With Watercooling

Watching TV or playing a console game is usually not an outdoor activity, helped by the fact that you can’t see anything on your average TV in direct sunlight. However, with some basic fabrication skills, [Matt] from [DIY Perks] demonstrates how to upgrade an LCD TV to be viewable in the brightest conditions by upgrading its backlight, and adding a simple water-cooling system in the process. Full build video after the break.

An LCD panel doesn’t produce any light but acts as a filter for the backlight behind it, which is just a widely spaced array of white LEDs. The core of the build is upgrading the backlight, so [Matt] picked up a large 4K TV with a partially faulty backlight for a very affordable price. The new backlight consists of a set of high-brightness LED panels, screwed to a sheet of aluminum. The LEDs generate a lot of heat, so [Matt] cools the back of the aluminum sheet with a budget-friendly water cooling system built from a car radiator, small water pump, and some clear plastic tubing. Everything is housed in an industrial-looking enclosure made from aluminum sheet, aluminum extrusions, and an acrylic back panel. To protect the LCD panel, it’s glued to a sheet of tempered glass from an old coffee table.

The final product performs very well, even in direct sunlight, and is also weatherproof. [DIY Perks] is known for projects that work as well as they look, like his triple-screen luggable PC or massive bellow-cooled PC. Continue reading “DIY Super-Bright Outdoor TV With Watercooling”