Keep Track Of Your Google Calendar With This Custom Build

Keeping track of your appointments on Google Calendar is easy enough if you’re holding a phone or sitting at a computer, but sometimes you just want to know what’s going on at a glance. This desktop calendar build from [andrei.erdei] does just that with plenty of helpful LEDs.

The attract mode is very cool, even if it doesn’t display any actual information.

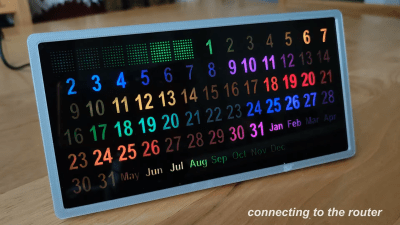
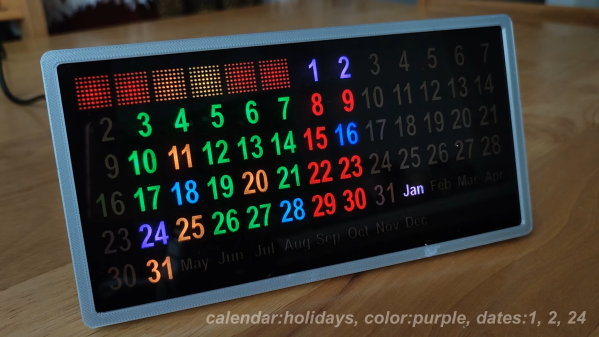
The design is simple, using WS2812 LEDs to backlight numbers to indicate whether they are weekdays, weekends, anniversaries, holidays, or any other dates of importance. The numerical layout is a nifty perpetual design allowing the display to easily accommodate the structure of any month, even those neat and tidy ones that start on Monday.

The design relies on an ESP-01 to communicate with Google Calendar and display the relevant data. It’s all wrapped up in a 3D printed case, with the printed paper template backlit from behind some smoked acrylic giving a surprisingly professional-looking finish.

If you’re tired of picking up your phone for every last thing, this design could be just what you’re after for keeping track of your appointments. Alternatively, you could always go the hard copy route. Video after the break.

Continue reading “Keep Track Of Your Google Calendar With This Custom Build”

An LED bulb with integrated controller chip

Reverse-Engineering A Two-Wire LED Strip Protocol

Although Christmas may be several weeks behind us, various colorful LED contraptions can nowadays be found in our houses at any time of year. [Tim] got his hands on an LED curtain that came with a remote control that allows the user to set not only the color of the LEDs as a whole but also to run simple animations. But these were not your standard WS2812B strips with data lines: all the LEDs were simply connected in parallel with just two wires, so how was this even possible?

An oscilloscope screenshot showing the data protocol used in an LED string
The LED string protocol is very simple, with one address field and one data field.

[Tim] hooked up his oscilloscope to the LED strings to find out how they worked, detailing the results in a comprehensive blog post. As it turns out, the controller briefly shorts the LED strip’s supply voltage to generate data bits, similar to the way old pulse-dialing phones worked. A tiny chip integrated into each LED picks up these pulses, but retains its internal state thanks to a capacitor that keeps the chip powered when the supply line goes low.

After reverse-engineering the protocol, [Tim] went on to implement a similar design using an ATMega328P as a controller and an ATtiny10 as the LED driver. With just a few lines of code and a 100 nF buffer capacitor across the ATtiny’s power pins, [Tim] was able to turn an LED on and off by sending pulses through the supply lines. Some work still needs to be done to fully implement a protocol as used in the LED strings, but as a proof-of-concept it shows that this kind of power-line communication is possible with standard components.

We’ve seen projects that send signals down a two-wire LED chain before, although as an add-on to a more ordinary LED strip. [Tim] is not the first to reverse-engineer poorly documented LED strip protocols, but probably won’t be the last either.

Remoticon 2021 // Debra Ansell Connects PCB In Ways You Didn’t Expect

“LEDs improve everything.” Words to live by. Most everything that Debra Ansell of [GeekMomProjects] makes is bright, bold, and blinky. But if you’re looking for a simple string of WS2812s, you’re barking up the wrong tree. In the last few years, Debra has been making larger and more complicated assemblies, and that has meant diving into the mechanical design of modular PCBs. In the process Debra has come up with some great techniques that you’ll be able to use in your own builds, which she shared with us in a presentation during the 2021 Hackaday Remoticon.

She starts off with a quick overview of the state of play in PCB art, specifically of the style that she’s into these days: three dimensional constructions where the physical PCB itself is a sculptural element of the project. She’s crossing that with the popular triangle-style wall hanging sculpture, and her own fascination with “inner glow” — side-illuminated acrylic diffusers. Then she starts taking us down the path of creating her own wall art in detail, and this is where you need to listen up. Continue reading “Remoticon 2021 // Debra Ansell Connects PCB In Ways You Didn’t Expect”

Tileable LED matrix

Tiny LED Matrix Panels Tile Together Perfectly

There’s a lot to admire about LED matrix projects, which more often than not end up looking really cool. But most of them rely on RGB matrix panels sourced from the surplus market, and while there’s nothing wrong with that, building your own tiny, tileable LED matrix panels makes these builds just a little bit cooler.

There’s a lot to admire about these matrix panels, not least of which is the seamless way they tile together. But to get to that point, [sjm4306] had a lot of prep work to do. He started with a much simpler 5×7 array, using the popular WS2812 RGB LEDs on a custom PCB. With a little practice under his belt, it was time to move to the much smaller SK6805 LEDs, which were laid out in an 8×8 matrix. The board layout is about as compact as it can be; [sjm4306] reports that it pushed the PCB fab to their limits, but he ended up with LEDs spaced perfectly on the board and just enough margin to keep consistent spacing in two dimensions when the boards are adjacent to each other.

Assembly of the boards was challenging, to say the least. The video below shows that the design left barely enough room for handling the LEDs with tweezers, and some fancy finagling was needed to get the boards on and off the hotplate for reflow. [sjm4306] says that he’ll be exploring JLC PCB’s assembly service in the future, since each board took an hour for him to assemble. But they look fantastic when daisy-chained together, with no detectable gaps at the joints.

With matrices like these, the possibilities are endless. We’ve even got a whole list of LED matrix projects over on Hackaday.io for you to check out.

Continue reading “Tiny LED Matrix Panels Tile Together Perfectly”

Enter The Matrix With This Custom PC Side Panel

With a new Matrix movie out now, it’s hardly a surprise that we’re starting to see more and more projects centered around the franchise’s iconic “Digital Rain” effect. A few particularly unique examples have floated to the top of this virtual tsunami of green-tinted sushi recipes, such as this very slick RGB LED PC side panel built by [Will Donaldson].

In place of the normal clear window in his PC case, [Will] has mounted a black acrylic sheet that has had all of the “code” characters laser-cut from it. Behind that is an array of WS2812B LED strips, nestled into vertically aligned channels that keep the light from bleeding out horizontally. A sheet of frosted plastic is sandwiched between the two, which helps diffuse the light so the individual LEDs aren’t as visible.

All of the LEDs are connected to a NodeMCU ESP8266 by way of a 74AHCT125 level-shifter, though [Will] notes you could certainly use a different microcontroller with some tweaks to the code. As it stands, the user selects from various lighting patterns using two potentiometers and a button that have been mounted next to the panel. But if you were so inclined, it certainly wouldn’t take much to adapt the firmware so that the lighting effects could be triggered from the PC.

The sticklers will note that this means the characters can’t actually change or move, but as you can see in the video below, it still looks quite impressive when the LEDs get going behind them. If you’re looking to recreate the look on a considerably smaller scale, check out this Arduino library that can make it rain on a TFT display with just a few lines of code.

Continue reading “Enter The Matrix With This Custom PC Side Panel”

An Easy Music Visualizer With The Arduino Nano

Flashing LEDs are all well and good, but they’re even better if they can sync up with ambient sounds or music. [mircemk] has built the LUMAZOID visualizer to do just that, relying on some staple maker components to do so.

The build is open-source, and designed to work with strings of 60, 120, or 180 WS2812B LEDs. An Arduino Nano is charged with running the show, capturing audio via its analog-to-digital converter. A sensitivity pot enables the input level to be set appropriately.

From there, a Fast Fourier Transform is taken, providing data on the intensity of the audio in various frequency bins. The LUMAZOID can be set up to respond to just bass or to all frequencies as a whole. This data is then used to pulse the LEDs in time with the beat.

It’s a fun project that demonstrates the basic techniques required to build an audio-reactive visualizer. We’ve seen some other great builds in this space before, too. Video after the break.

Continue reading “An Easy Music Visualizer With The Arduino Nano”

PicoMite Gives Your Pico A Deluxe BASIC

What makes developing a microcontroller project quick and easy? Tops on our list are an interactive shell and comprehensive libraries that handle all the low-level peripheral stuff. You think we’re talking MicroPython? Not today! MMBasic has just been ported to the Raspberry Pi Pico dev board, and it has all the batteries included.

Just to give you a taste, it has built-in support for SD cards, all sorts of displays, touch screens, real-time clocks, IR remotes, numerous sensors, and of course WS2812 LED strips. And because all of this is baked into the BASIC, writing code to use any of these peripherals is straightforward.

Now, there’s BASIC and there’s BASIC. This is a modern BASIC: it has loops, functions, arrays, floating point, and a built-in full-screen editor. You connect to the Pico via UART, and you’re off to the races. If you’ve got a Pico sitting around, flash it and give it a try. Or check out the GitHub repository if you want to poke around in the internals.

This is a port of the BASIC that’s used on the Maximite virtual retrocomputer platform, which means that there are many working examples out there for you to crib from, and even a forum. Add in the incredibly nice user manual and tutorial (PDF), and you’ve got the perfect weekend afternoon.

Think MicroPython killed BASIC? Think again. BASIC is small enough that it can run where Python can’t, but that’s of course a more minimal experience. In contrast, MMBasic looks like it’s got all the toppings. The whole enchilada. It’s like BASIC Deluxe.