Circuit Sculpture Lamp Is A Colorful Cube Companion

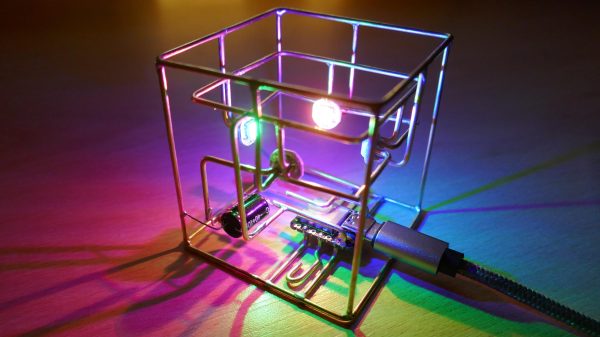
Circuit sculpture is engineering and art all at play together. One must combine the functional with the aesthetically appealing. [EdwardA61] did just that with this enchanting lamp build.

Like many other circuit sculptures, the build relies on the aesthetic qualities of brass, though [EdwardA61] notes that copper wire can be used as well. Four WS2812B LEDs, in their bare PCB-mount form, are soldered into a circuit using the brass to carry the power and data signals as needed.

A Seeduino Xiao microcontroller is responsible for controlling the show, though relies on a typical PCB rather than a circuit sculpture in and of itself. It does provide for easy powering and programming however, with the benefit of its USB-C connector.

It’s a simple skeleton design, as so many circuit sculptures are, but it’s a form that we’ve come to love and appreciate. [EdwardA61] did a great job of photographing the build, too, showing how the colors on each LED interplay with each other as they’re cast on the table.

It’s a lamp we’d love to build ourselves, and we hope that [EdwardA61] follows through on plans to cast a similar design in clear resin, as well. If you’ve built your own artistically electrical sculptures, be sure to let us know!

Big RGB LED Cube You Can Build Too

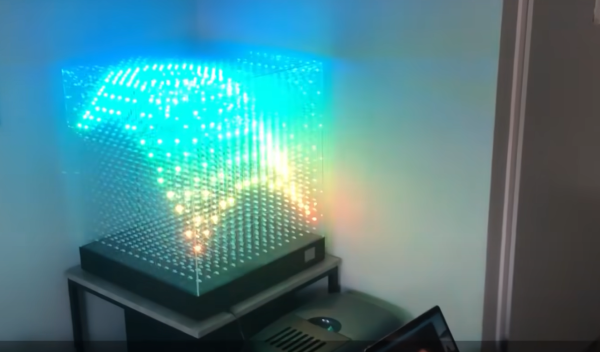
LED cubes are really nothing new, many of us consider the building of a good sized one almost an electronics rite of passage that not so many manage to find the time or have the skill to pull off. It’s our pleasure to draw your attention to a lovely build, showing all the processes involved, the problems and the solutions found along the way.

Building a small cube is somewhat of a trivial affair, especially without considering PWM colour mixing, however as simple maths will illustrate, as you increase the number of LEDs on each side, the total number will quickly get quite large. More LEDs need more power and increase control complexity considerably. A larger matrix like this 16 x 16 x 16 LED build, has a total of 4096. This would be a nightmare to drive with plain RGB LEDs, even with cunning multiplexing, but luckily you can buy indexable LEDs in a through-hole package similar to the ubiquitous WS2812-based SMT LEDs you see around. These are based on the PD9823 controller, which can be programmed as if they were a WS2812, at least according to this analysis. Now you can simply chain a column of LEDs, with the control signal passed from LED to nearest neighbour.

Early on in the video build log, you will note there are four power supply modules needed to feed this juice. If we assume each LED consumes 60 mA on full-white (the data for this product link shows a peak value of 100 mA) that is still a total of 246 A or around 1 kW of power. The video does shows a peak power measurement of around this figure, for the whole array on full white, so the maths seems about right.

Control is via a Teensy 4.0 using the FlexIO function of the IMXRT1060RM CPU, and a bunch of 74AHCT595 shift registers giving 32 channels of up to 1000 LEDs per channel if needed. Roughly speaking, using the DMA with FlexIO, the Teensy can drive up to 1 Million LED updates per second, which works out about 32 channels of 100 LEDs per channel updated at 330 frames/sec, so plenty of resource is available. All this is with almost no CPU intervention, freeing that up for handling the 2.4-inch LCD based UI and running the animations, which looks pretty darn slick if you ask us. You can checkout the description of the firmware in the firmware section of the GitHub project. 3D printed jigs allowed for bending and clipping the LEDs leads as well as fixing and aligning the LED column units, so there really is enough detail there to allow anyone so inclined reproduce this, so long as you can swallow the cost of all those LEDs.

For a different approach to LED cubes, checkout this sweet panel based approach, and here’s a really small 4x4x4 module for those with less space to spare.

Continue reading “Big RGB LED Cube You Can Build Too”

FFT display on 16x16 RGB LED grid

Art Project Fast And Fouriously Transforms Audio Into Eye Candy

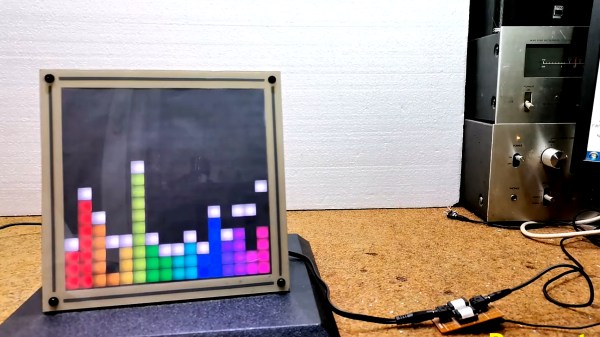
Fast Fourier Transforms. Spectrum Analyzers. Waterfall displays. Not long ago, such terms were reserved for high end test gear. But oh, how things have changed! It’s no surprise to many Hackaday readers that modern microcontrollers have transformed the scene as they become more powerful and as a result are endowed with more and more powerful software libraries. [mircemk] has used such a library along with other open source software combined with mostly off the shelf hardware to create what he calls the DIY FFT Spectrum Analyzer. Rather than being a piece of test gear, this artful project aims to please the eye.

The overall build is relatively simple. Audio is acquired via a line-in jack or a microphone, and then piped into an ESP32. The ESP32 runs the audio through the FFT routine, sampling, slicing, and dicing the audio into 16 individual bands. The visual output is displayed on a 16 x 16 WS2812 Led Matrix. [mircemk] wrote several routines for displaying the incoming audio, with a waterfall, a graph, and other visualizations that are quit aesthetically pleasing. Some of them are downright mesmerizing! You can see the results in the video below the break.

Of course the build doesn’t stop with slapping some hardware and a few passive components together. To really be finished, it needs to be encased in something worth displaying. [mircemk] does not disappoint, as a beautiful 3D-printed enclosure wraps it all up nicely.

We think that the final product is great, and it reminds us of some of the very things that inspired us early on in our hacking careers. We would love to see this project integrated with an Interactive Musical Art Installation of any kind, the more esoteric the better. Perhaps a 555 timer synth could fit the bill? Be sure to share your own hacks with us via the Tip Line!

Continue reading “Art Project Fast And Fouriously Transforms Audio Into Eye Candy”

an image of maketime showing the current time

Unique Clock Doubles As A Development Board

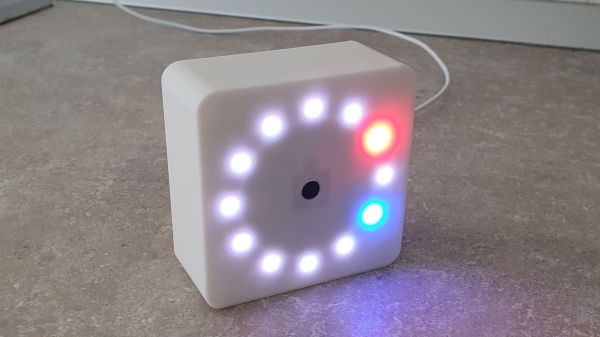
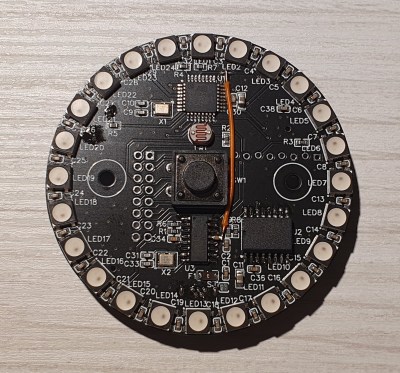
Most clocks these days have ditched the round face and instead prefer to tell time through the medium of 7-segment displays. [mihai.cuciuc] is bringing the round face to digital clocks with his time-keeping piece, MakeTime.

MakeTime's custom PCBMakeTime serves two purposes, the first and most obvious one is as a clock. Rather than displaying the time with digits, MakeTime harkens back to round dial clocks by illuminating RGB LEDs along its perimeter to show the position of the minute and hour “hands”. By using 24 LEDs, MakeTime achieves a timing granularity of 2.5 minutes.

The second purpose is as a development platform. [mihai.cuciuc] designed the clock with hacking in mind, opting to build it with components that many are already familiar with, such as a DS3231 RTC and WS2812 LEDs. To make the entire thing Arduino compatible, the microcontroller is an AtMega 328P, that can be connected to through the micro-USB port and CH340 USB-UART IC. If MakeTime outlives its time as a clock, all of the unused GPIO of the 328P are broken out to a single pin header, allowing it to be repurposed in other projects for years to come.

It seems like everyone is making their own unique timekeeping device these days. Check out the clock made out of ammeters we covered last week.

Interactive LED Shoes That Anyone Can Build!

Normally when we see blinky projects these days, it’s using addressable LED strips with WS2812Bs, or similar alternatives. However, old-school blobby round LEDs are still on the market, and can still be put to great use. These DIY LED shoes from [TechnoChic] are an excellent example of just that.

The shoes use big 10mm LEDs that have color-changing smarts baked in. Simply power them up and they’ll fade between a series of colors. They’re run from a coin cell sewn on to the side of each shoe, with the LEDs jammed into the rear of the sole. A conductive product called Maker Tape is then used to create a circuit for the LEDs and the coin cell, along with a pressure switch inside each shoe. When the wearer puts weight on their heel, the switch conducts, lighting up the LEDs as the wearer takes each step.

This isn’t the first time we’ve seen a pair of shoes bedazzled with LEDs, but it’s arguably the easiest version of the concept to grace these pages. This is a quick way to create interactive flashing LED gadgets, and a great way for beginner makers to jazz up their projects.

Continue reading “Interactive LED Shoes That Anyone Can Build!”

PS2 Gets The Ginger Portable Treatment

The first thing we notice about this portable PS2 is that the plastic looks like a consumer-grade shell, not a 3D printed case. It comes from [GingerOfOz], who has lots of portable conversions under his belt, so we are not surprised this looks like a genuine Sony device. When you are as experienced as he, details like plastic texture, and button selection, are solved problems, but shouldn’t be taken for granted by us mortals.

Of course, this isn’t just pretty, and if it weren’t functional, we wouldn’t be talking about it. The system plays nearly all PS2 titles from USB memory. The notable exceptions are the ones that refuse to load without a Dualshock controller. Rude. If you’re wondering if it plays games at full speed, yes. It achieves authentic speed because it uses a PS2 slim motherboard which gets cut down by a Dremel. Custom PCBs provide the rest of the hardware, like volume buttons and battery charging. There is no optical drive since they are power hogs, so your cinematic cut scenes may lag, and load times are a little longer.

Modern mobile phones are one of the most powerful gaming systems ever built, but there is something about purpose-built portable gaming hardware that just feels right. You know?

Continue reading “PS2 Gets The Ginger Portable Treatment”

Dedicated LED Animation Framework For ESP32

[Eric Arcana] has been creating animated holiday decorations for several years, which involved a lot of custom code to make things light up the way he wanted, pulling the microcontroller to make changes. Using ESP32s with remote software updates is easier, but [Eric] also wanted to make the code simpler. To achieve this he created Fade, a custom programming language/framework for controlling LED animations from the ESP32.

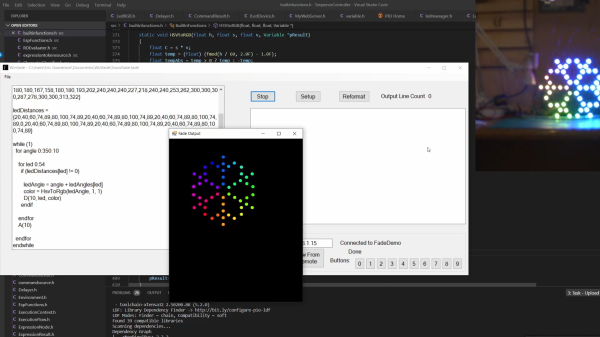
Fade is written for addressable RGB LEDs like the Neopixel/WS2812. It keeps track of the current color of every LED in the system and allows the user to define what color it should be at a specified time in the future. Time is specified using 10 ms clock cycles. The LEDs will smoothly change from one color to the other in the specified number of clock cycles, without needing to specify what the intermediate colors should be.

Code is written in simple IDE, running on a web server on the ESP32 itself, or on a remote Windows PC. The language is very simple, but still powerful enough to create complex LED animations. A key part of it is the ability to specify multiple concurrent state changes in just a few lines of code. [Eric] also included optioning to take touch button inputs and use them to update the animations. Another nice feature is a simulation window on the desktop IDE. It allows you to create custom LED layouts on PC, and test your code without needing to send it to the ESP32.

Addressable LEDs have made creating large LED installations a lot simpler, like this 6 foot LED ball or a LED Video Wall.

Continue reading “Dedicated LED Animation Framework For ESP32”